Friday, November 7, 2014

Our New Kitchen


We've just finished our first major kitchen renovation ever, a back-to-studs (and, in fact, logs) affair, with all new cabinets, counters, sink and faucet, and appliances--including a vent hood, which was, in a sense, the impetus for the whole thing.  It started when we ripped the old drop tile ceiling down in a fit of cabin fever last winter, went into high gear late last summer, and culminated in a furious push during the first three weeks of October.  All in all, it went pretty well; we only had to do dishes in the bathroom sink and bathtub for those last three weeks.  We learned a lot of things we may never get to chance to apply again, and one invaluable lesson applicable in many situations, to wit:  if you do your own contracting, you may find that your contractors are idiots.  We did, and we did.

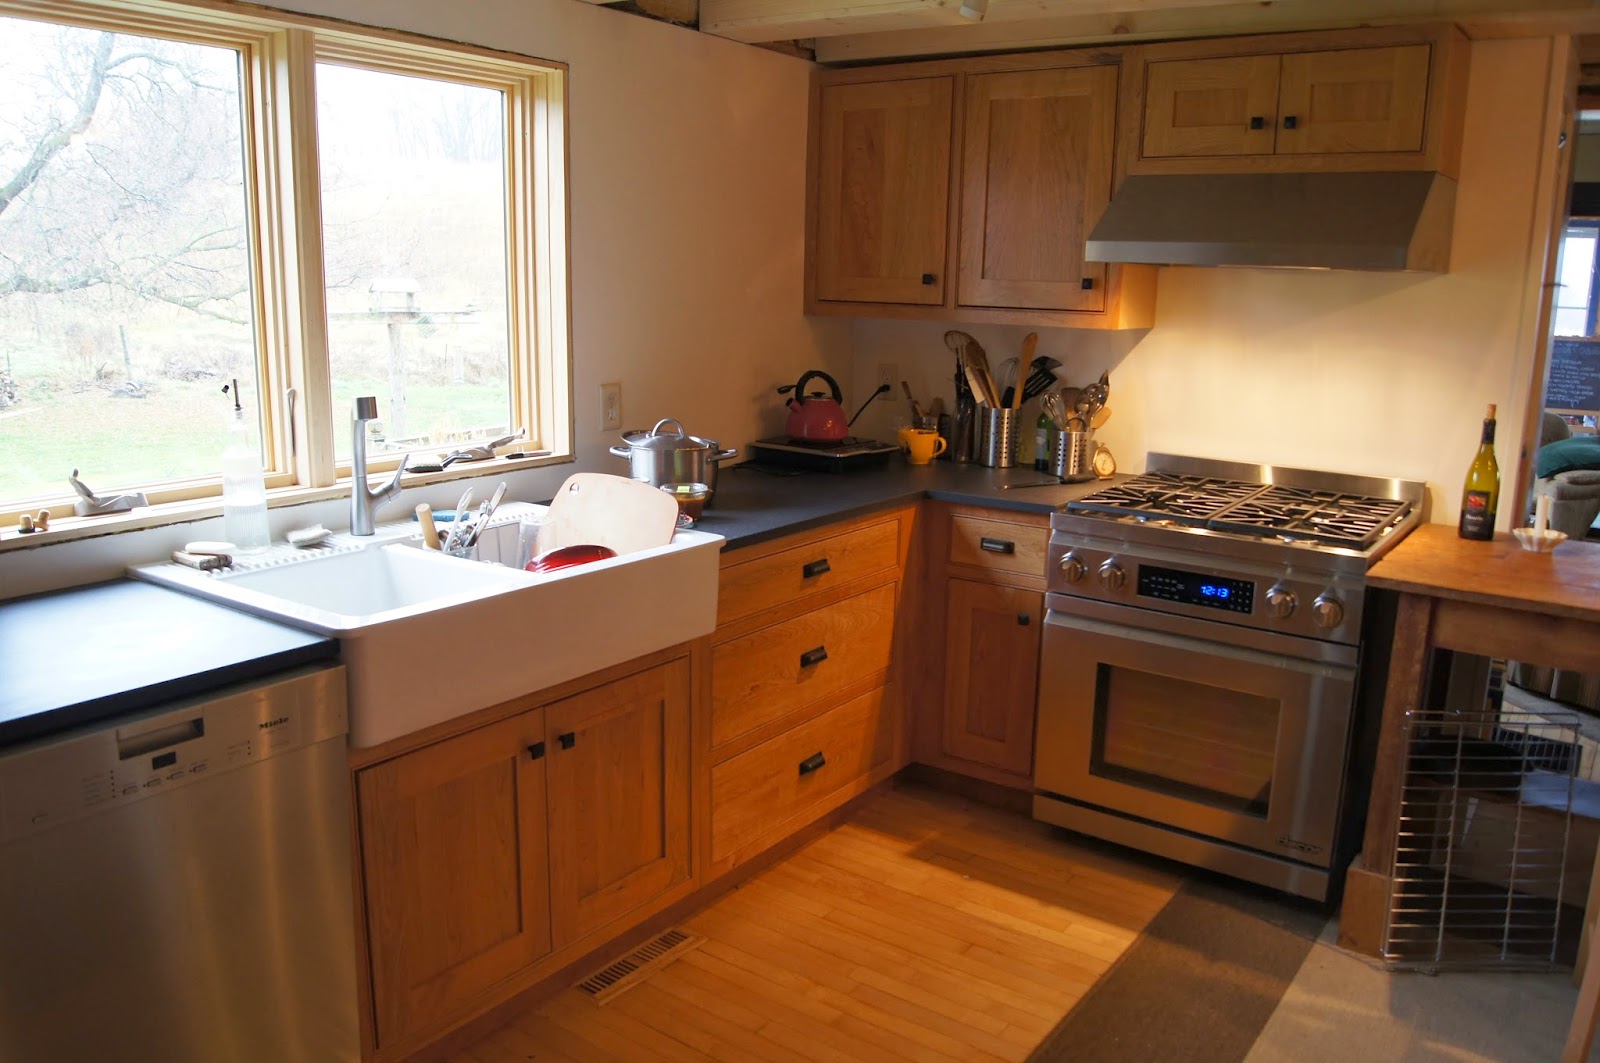
The old oak "chef's table" is a kind of bridge between the old and new kitchens; it was all we cared to save.


But now that it's (mostly, except for some cosmetic touches) finished and fully functional, and I can stand in front of the big new casement window looking out on the woods and hayfield hill, and lovingly pat the chic, eco-friendly Paperstone countertops (gunmetal), see the autumn light softly burnishing the cherry cabinets, glinting dully off the international array of stainless appliances (from Germany, New Zealand, and the U.S. of A.), I feel completely happy about how it turned out, and I feel, almost, like a grown-up, almost.  The day the cabinets (custom built by the awesome Bruce Schley out of Cedar Falls, but really reasonably priced) arrived, I called Mary, who was at work in the cities, and I said:  Honey, we have a problem; Bruce is here with the cabinets, and they're too nice for us....

The almost original kitchen; we have the wood floor installed, replacing white vinyl, before we moved in.


The new kitchen is especially amazing in contrast with what we inherited when we bought the house.  It's a nice big room, about 15 feet square, so plenty of space to work with.  But in the old kitchen everything--cabinets, sink, range--was lined up down one wall, dead-ending in a weird cul-de-sac created by a chimney, and the huge refrigerator was exiled to a distant corner of the room.  The cabinets were painted a cheery red, which helped to disguise, at least for a while, the fact that the cupboard and drawer fronts were a mish-mash of "styles," to put it nicely.  The best of the drawers were Menard's cheapest, and the worst featured wood-on-wood construction that resulted in a shower of fine sawdust raining down on everything in the cabinet below.  The counters weren't really secured to the cabinets, making vegetable chopping and bread kneading a kind of seasick experience.  The less said about the cheap electric range, where the plastic around the vent opening had melted, that kept whatever oven temp it damn well pleased, depending on its mood of the day, the better.

Indeed, enough about the bad old days.  Here's a run-down of what we did, and why, in hopes that it might be useful if you're planning a kitchen re-do someday.  And yeah, also just to show off, for sure.


We took kind of a total flyer on the countertops, which was crazy because they weren't cheap, and once they're there, they're there.  We love them. They're Paperstone, made from recycled paper bound with some miracle resin, hard as stone!  We came across them while browsing at Natural Built Home in Minneapolis.  The usual stone and composite countertop materials didn't thrill us, so we went to check out the bamboo and other recycled material surfaces at Natural Built Home, and found ourselves instead drawn to the warm matte finish of the Paperstone.  We contacted the company, ordered some samples, and said yeah, let's do it.  Paperstone, what the hell.  Our cabinet guy Bruce (a genius, did I say?) said he could cut it to size for us, so we had a 5' x 12' by 1" thick slab shipped directly to him.  It weighed over 600 pounds; luckily, Bruce has a skid steer.  The 60 square feet was way more than we needed, but getting the 5 x 12 sheet meant he could cut two L shapes to go on either side of the sink, so no seams.  Very cool.  Bruce testified to the hardness of the Paperstone material; it ruined every saw and router blade in his shop....


The sink has a story.  It is from Turkey, via Ikea.  Mary got interested in apron-front "farmhouse" sinks; I said, fine.  I wanted white after many years of stainless sinks.  The Ikea "domsjo" sink was less than half the price of similar sinks from Kohler and the like.  I went to the Twin Cities Ikea to pick one up.  It was out of stock, they didn't know when or if they were getting more.  Could they order one from another store?  No.  Could I buy it online?  No.  Would they sell me one of the display models (there were at least three on the floor)?  Negatory, good buddy.  Thanks for all the help, Ikea.

Back home, I did some research and found that an Ikea store just north of Chicago, in Schaumberg, had several in stock.  I called to see if I could buy it and have it shipped.  Nope.  Would they set one aside for me, so if we made the long drive (about 5 hours each way), we wouldn't arrive to find them sold out?  Well, they could set it aside if I bought it.  So, great, I'll buy it (whip out the Visa, ready to reel off the numbers).  But, they can't take phone orders.  For real?  The mighty Ikea cannot take a credit card phone order?  So they would set it aside if I bought it first, but I had to come to the store, which is, as I mentioned, just north of Chicago, to buy it.  And then why would I need them to set it aside...?  Thanks for all the help, Ikea!


If it seems insane to spend all day in the car just to get a kitchen sink, then you're probably someone who hasn't been through a project like this, and doesn't fully understand what I've come to call Decision Fatigue Syndrome (DFS).  This is a phenomenon reached at that point in a project when so many decisions have already been made, then unmade, remade, almost made, reneged upon, reconsidered, decided again, etc., that rather than having to make a brand new decision about, say, a freaking kitchen sink, you are more than willing to spend a full day in the car, including dealing with crazy traffic on the under-construction-for-40-miles Illinois tollway.  That's what DFS does to you.  Driving to Chicago, at least, was a finite task, over when it was over, and no more decisions to make on that front.  And yes, it was insane.

Here's an interesting thing about apron front sinks:  It's not just a cosmetic difference from the usual inset sinks.  There's actually a big size difference.  I measured.  Our old sink, a typical size from, you know, Menard's (nothing against Menard's, we're there like every other day...), measured 33 inches wide.  The new sink which looks huge, is 36 inches wide.  So, less than 10 per cent wider.  But the area of the sink basins themselves, get this, is more than 35 per cent larger.  Yes, amazing.  You can do the math yourself:  the old sink basins were 14" by 15", or 210 square inches per; new sink 15.5" by 18.5", about 287 square inches.  The difference is very apparent when you're washing stuff up in there, very spacious.  Right, enough sink geekery.
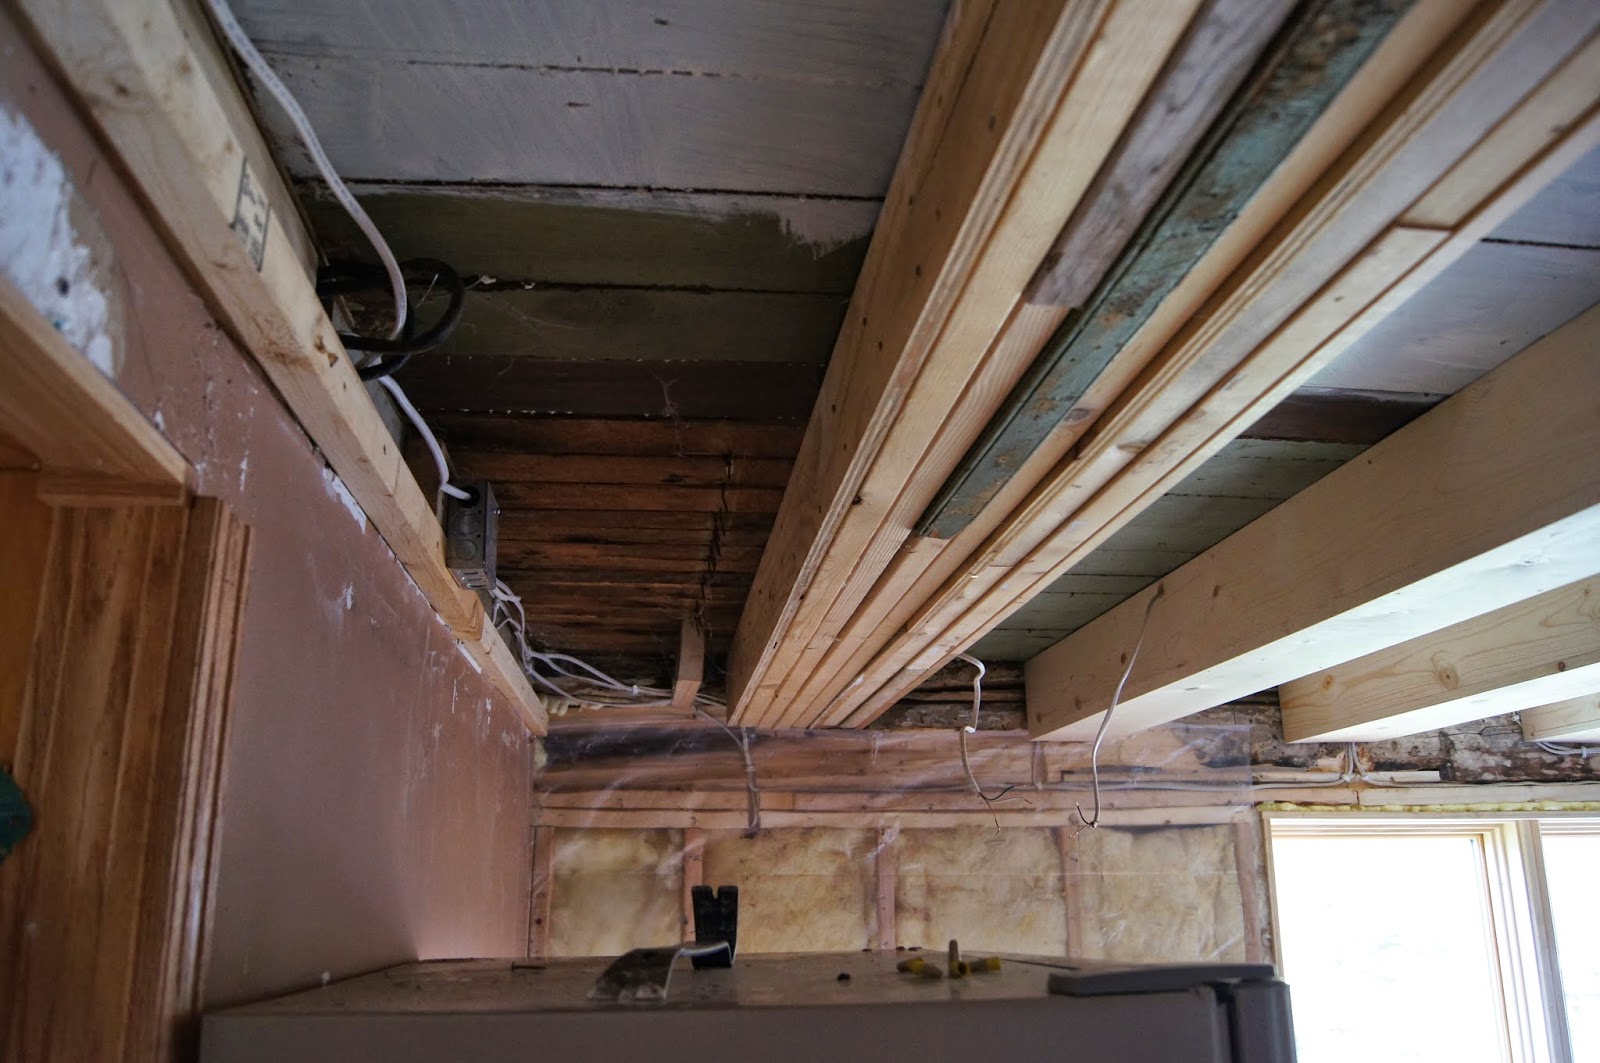
Ceiling before.

One of the biggest conundrums we faced had to do with the ceiling, which, as I said, is where we started down the rabbit hole of deconstruction.  White acoustic tiles with canister lighting, and low enough that even a shortish person could easily reach up and touch it.  Oppressive.  We knew it had to come down, and so, last January I think it was, with our friend Martha visiting and egging us on, we started pulling the tiles down, and then the one-by wood pieces that the tiles were attached to.  We had hoped to find rustic floor joists that we could clean up, paint, and leave exposed, to give an added sense of height to the kitchen ceiling.  We did find rustic floor joists--which had all been fortified with additional 2-by-6s and assorted strips of plywood glued to the old joists and also secured with a million nails.  Not so attractive.


The reason for all the retrofitting is that the original floor joists are 2-by-6s on 24-inch centers; not a lot of support there.  Even with all that additional wood tacked on the stiffen them, the upstairs floor feels a bit spongy in places.  We consulted a couple of reliable sources for an opinion about whether we could remove some of the seemingly haphazard reinforcements, and everyone said:  leave it be.  Thus, covering up the joists became the only option.  We enlisted our friends Mike and Pat Robertson to do that work, and they did a terrific job (they also installed the new window, and put skylights in our upstairs the summer before; they are very accustomed to cutting holes in our house).  These "beams" remain somewhat unfinished.  We were originally thinking to paint them, but now we're leaning toward staining them, or just giving them a clear-coat type finish.


With track lighting tucked up between the "beams," we have plenty of light without the blanket effect of typical overhead lighting.  The lights above the counter are on one switch, the lights on the other side of the room on another, with dimmers on each.  Dealing with the ceiling seemed one of the most daunting aspects of the projects, and it turned out splendidly, a real team effort.


The cabinets, as I said, are natural cherry with a clear satin finish.  They will darken gradually.  Doors and drawers are inset.  They have this "soft-close" system so you close them partway, and then they close themselves the rest of the way.  Nice, I said to Bruce, but can they make sawdust, like our old ones did?  He said he could bring me some sawdust to sprinkle here and there, when I found myself missing the old drawers.  I don't miss them, yet.  Bruce's work is just exquisite; he even used cherry plywood on the cabinet  backs and drawer bottoms.


We love our fridge.  It's weird to write that, but it's true.  It's a Fisher & Paykel, from New Zealand, counter-depth, only about 17 cubic feet but so well designed, it doesn't seem small, at all.  We stumbled upon it at an appliance store in the cities.


The salesman had shown us a number of other much larger fridges, with lots of bells and whistles, and we were still undecided.  He had gone to print up some information for us, and while we waited, we wandered, and found this sleek little fridge.  When the salesman came back we were still admiring the F & P, and we said, Hey, what about this one?  He said, Oh, that one.  Nice fridge, small.  I sell a lot of those to old people from Saint Paul.  And we said, Dude! We are old people from Saint Paul!  This is the fridge for us!


We like that the shelves go all the way across, rather than being split shelves with center brackets to impede moving things around, and that the crisper and freezer drawers come out really easily for cleaning.  We like the shallow storage areas on the door, so things fit snugly and don't rattle around and fall down when you open and close the door, as they did in the old fridge.  That it's not as deep as a regular fridge means you can see right to the back, so stuff is much less likely to disappear back there and turn into runaway science projects.  The freezer has a shallow center drawer just for ice cubes trays, or other shallow items (the other day I froze a bunch of steamed buns in one layer, on parchment paper, before moving them into a plastic storage bag).


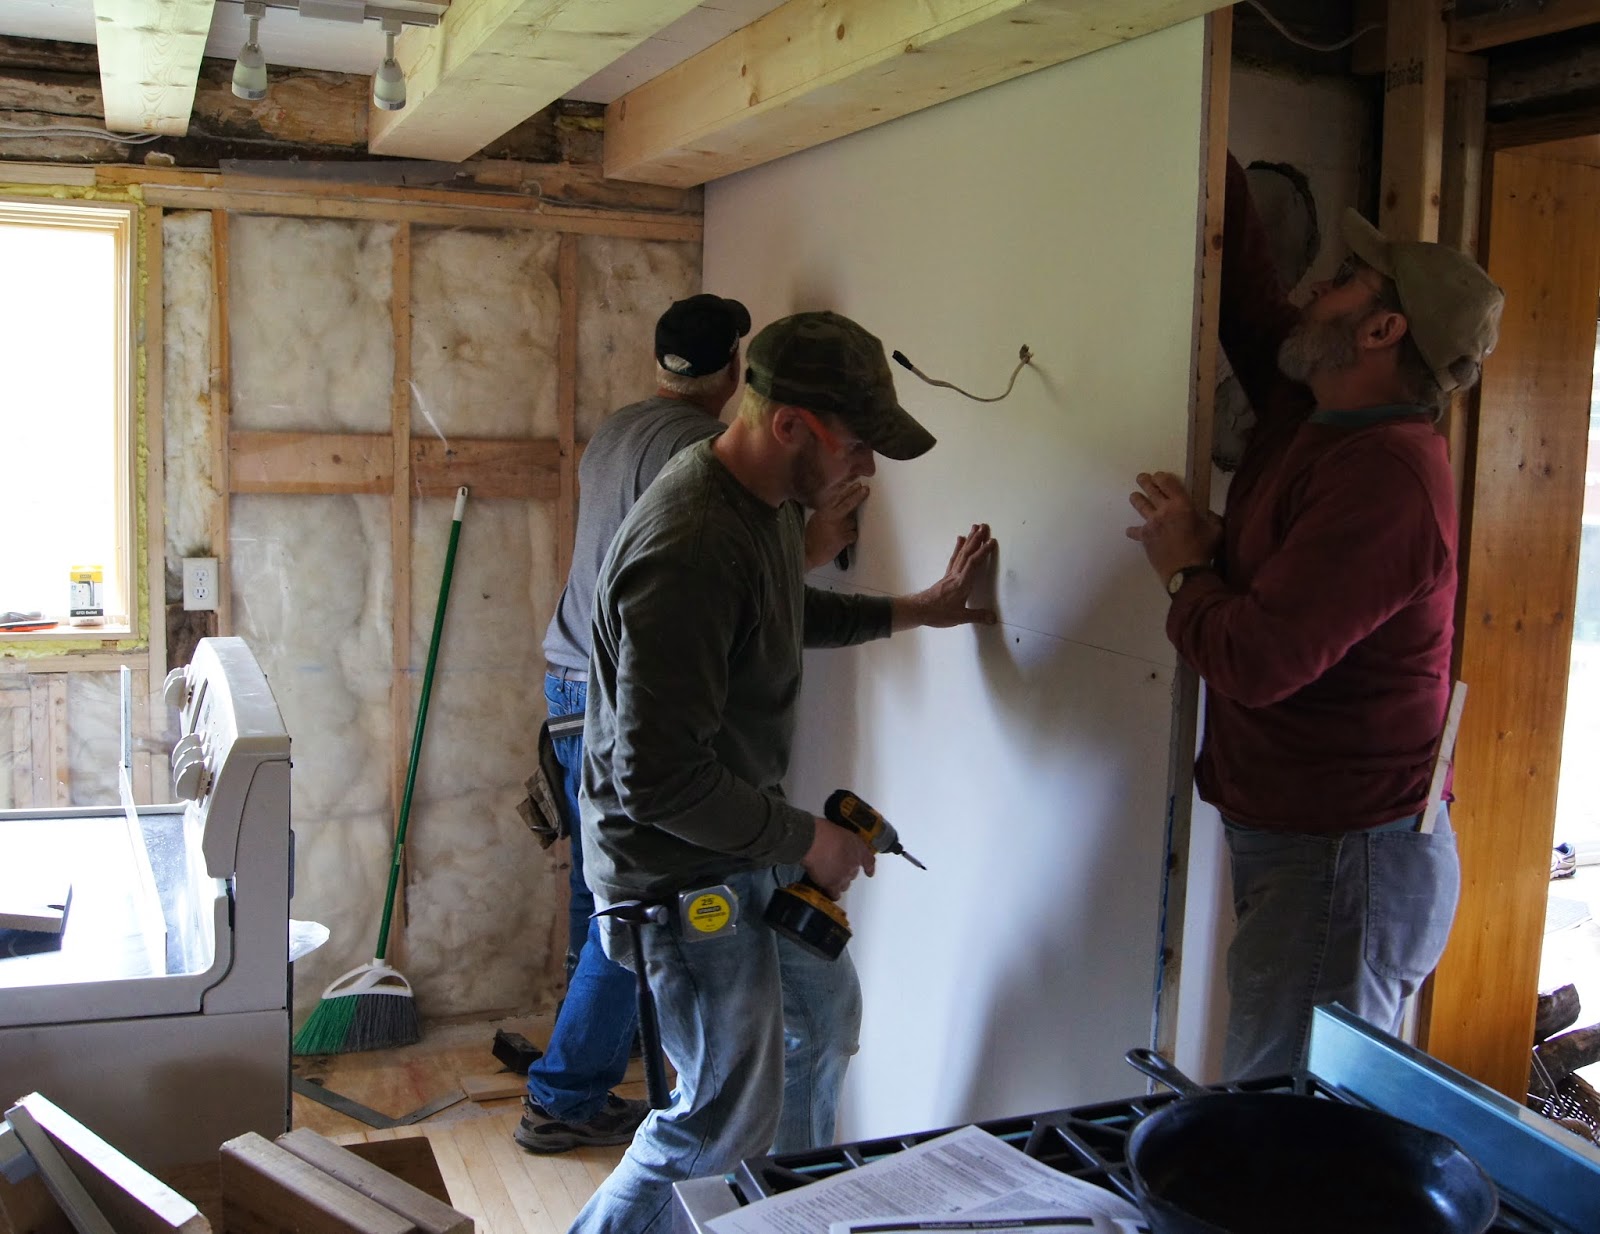
Mike and Pat and the Mike 2 putting up drywall.


Dishwasher is a German Miele brand, same thing we had in Saint Paul, and we liked it, so that was an easy decision.  The most interesting thing about it is that I got it by bidding in a radio auction put on by a Rice Lake station.  I put in the minimum bid at 8:00 in the morning, listened to the radio for five hours, and got the dishwasher for less than half retail price.  The strange thing is that this was exactly the dishwasher we were going to buy for full price, and it just happened to come up in this auction, and I think there was only one other dishwasher in the auction.  So, these things happen, sometimes, I guess.


The range is a Dacor dual-fuel, meaning electric oven and gas cooktop, also replacing what we had in Saint Paul.  We considered all options, knowing that we wanted dual-fuel, as I'm convinced that an electric oven is better for bread baking.  The Wolf and other high-end "pro" models were a little too industrial for me, though Dacor has also gone more in that direction since we purchased our previous range, a dozen or so years ago.  Also no one could really explain to me what we were getting, above and beyond the capacities of the Dacor, for the couple grand extra.  Dacor sometimes gets knocked for not being that reliable, but we used our old Dacor range brutally during our Real Bread stint, and while we did have to make some repairs, it didn't seem out of line given the years of hard use it took.  I am thrilled to be able to bring out the wok again, to have an oven that gets to temperature fast and accurately.  The convection feature is nice, though we never really used it that much on the old range.


The door is very heavy; the whole thing is heavy, well insulated.  At some level an oven is just a hot box, but I've quickly rediscovered that not all hot boxes are created equal.


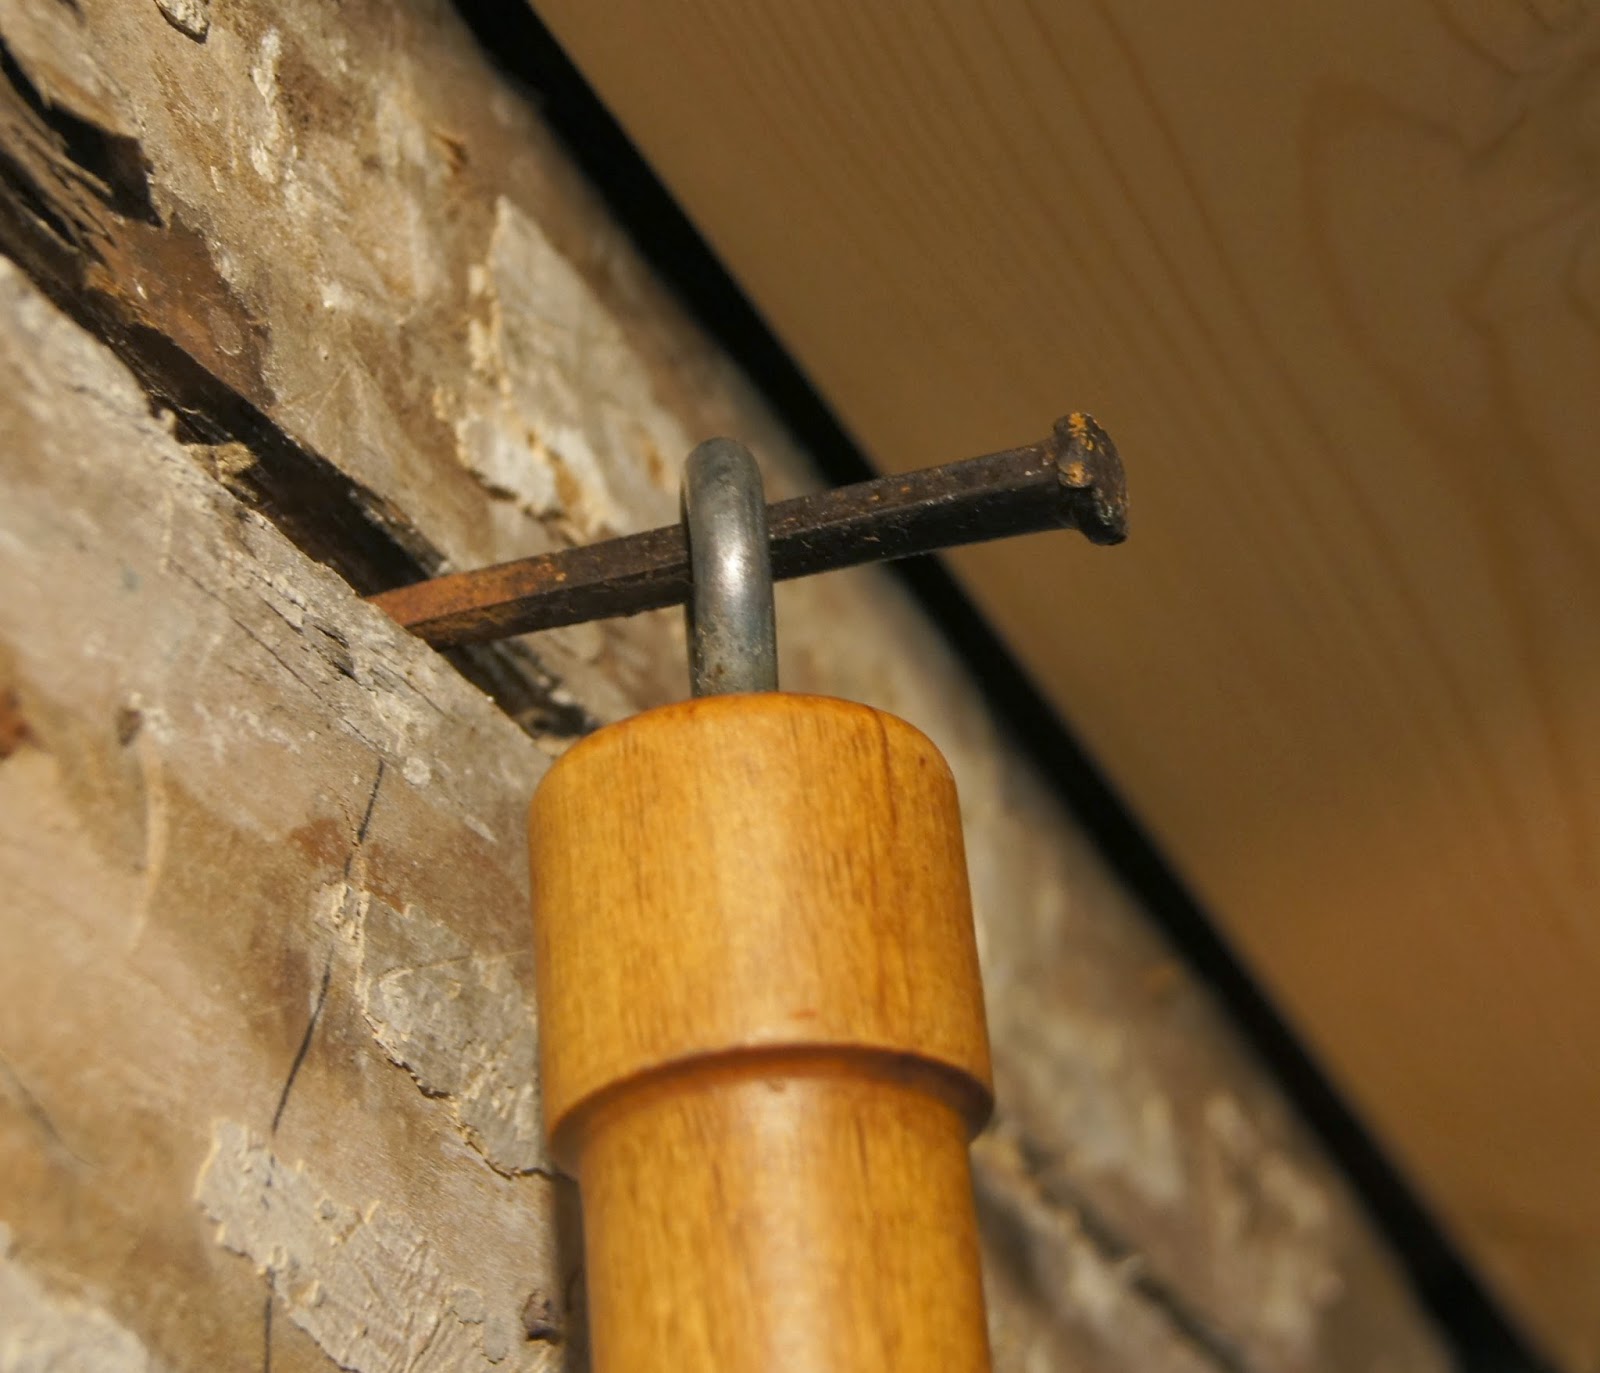
And finally, one of the coolest things that happened in the course of making our kitchen all shiny and new was discovering, and uncovering, its original bones.  We had gradually become aware that the nucleus of our house was an old log cabin, probably built in the late 1800s.  As we started removing drywall in the kitchen, it became clear that this room was that cabin.  On the east, outside wall, we found that the logs had been mostly removed and replaced with a 2-by-6 stud wall, leaving just the topmost log as a support beam.  On the interior west and south walls, the old logs were still there.  They're partially coated with what looks like flaking whitewash.  There are, for some reason, a million small nails pounded into them.  Most of the chinking is gone.


In the southwest corner of the room, you can see where the notched logs meet, forming a kind of pillar, and that, amazingly enough, is what is still holding our house up to this day.  In the course of the deconstruction we removed and saved a few old, square-cut nails from the ceiling.  I smacked a couple of these into cracks in the logs, and used them to hang our cast-iron pans and the wok (which has come out of retirement now that we have gas to cook over again, hooray!).


Overall, though there were stressful moments, and the whole thing unfolded over many months, the period of real inconvenience was fairly brief, and the results are beyond all expectations.  We need to pick up some cherry trim from Bruce for the window and a door frame, and do a few more finishing touches.  We've been slowed down on that because, just as the final practical work was being done, the plumber connecting the sink and dishwasher, and running gas to the kitchen for the range, I got sick, and Mary followed suit, as if, with the final decisions and purchases made, and no more phone calls to coordinate and schedule all the various aspects of the work, we let our defenses down, and germs rushed in....  At least we had a really nice place to cook up a pot of chicken broth to comfort our sniffles and sore throats.

I made this!  This new, yet rustic (thanks to my rustic woodworking skills) shelf unit tucks in along the side of the wood furnace chimney.

Looking from the new to the old; also note volunteer squash/pumpkin harvest on counter in messy laundry room....


Text and photos copyright 2014 by Brett Laidlaw

Thursday, September 11, 2014

Hen of the Woods Confit


The hen of the woods are starting to come in, pretty much on schedule this year--I expect to see them in early September and continuing through the month.  Last year they apparently started in mid-August, and since I wasn't tuned in, most of what I found late in August and early September were already way past their prime.  Which was a shame, because it's one of my favorite wild mushrooms, and certainly the most abundant, at least in terms of sheer weight, since a single specimen can weigh several pounds.

Not the most beautiful of specimens, but it worked well in the confit after some trimming.

The sudden influx of fungal flesh presents a problem, along with much pleasure.  It's a versatile mushroom, excellent sauteed, roasted, even grilled, and it's an amenable companion to pretty much any meat or fish.  With its firm texture it can add a meaty element to vegetable dishes, like a promiscuous ragout of the almost paralyzing variety of garden produce available now, served over polenta or noodles.  One of my favorite ways to serve it is a simple saute of hens and red onion or shallot in plenty of olive oil, tossed with noodles and sprinkled with excellent aged gouda, like Marieke.

Well-rinsed, shredded hens in the casserole with sunflower oil and tasty duck and pork fat.

So we eat a lot of it fresh when we have it, but can rarely consume it all, even after giving away a quantity.  I've yet to find a satisfactory way to preserve it.  I think some people dry it, and I should look into that some more, though that seems a last-ditch approach.  The best I've come up with so far is par-cooking it with oil, either in the fry pan or oven, then packing portions into plastic bags and freezing it.  The confit presented here today takes that approach to the extreme, cooking the mushrooms in a lot of fat for a long time.  Initial impression:  it's a winner.

After a couple hours in the oven.

I took 12 ounces of cleaned, trimmed hens, torn into shreds about an inch wide and three inches long--of course, these are going to be pretty irregular, doesn't matter.  I tossed the shreds with a teaspoon of salt, and added these to a lidded glass casserole along with:

1/2 a big shallot (2 ounces by weight) sliced
3 cloves of garlic peeled and halved lengthwise
a few sprigs of fresh thyme
10 black peppercorns
5 juniper berries, crushed
3/4 cup fat

For the fat here, I used 1/2 cup sunflower oil and 1/4 cup of a pork and duck confit blend.  Next time I'll try it with all sunflower oil.  I would add more shallots next time, too.

Stick the covered casserole in a 350 oven for an hour, tossing every 15 minutes.  Lower the heat to 300, remove the lid, and cook for another hour or so, again tossing from time to time.


The mushrooms will give off a lot of water at first.  In the long cooking this water will evaporate, and at the end the hens will wind up almost frying gently in clear, pure fat.  If you've made duck or another kind of meat confit before, this will sound familiar.  It's the exact same progression.


At the end I removed the hens from the fat, not bothering to drain them particularly well, and found that 8 ounces remained from the original 14-plus ounces of hens, shallots, etc.  And I was able to pour out a generous half cup of fat from the 3/4 cup that went in.  The hen shreds remain a firm, appealing texture, and they're imbued with the aromatic additions and the tang of flavorful fat.  I packed them into a Weck jar, and when I added back the fat, it came right to the top.  I'll keep it in the fridge for a while and see how the flavors develop.  With the next batch I may try freezing some.


For a lovely lunch on a cool breezy day, after spending the morning in the garden harvesting ahead of possible frost this weekend, I threw some of the hen confit in a pan along with some slivered jalapeno.  The hens shed a good bit of oil, and when they were hot and the chile wilted, I removed them from the pan and tossed them with a few leaves of parsley.  A little butter in the pan, and I soft-scrambled a couple of eggs.  Served with the hens on top, sliced tomatoes on the side, toasted sourdough. 

I'm ready to get back in the garden, then later perhaps into the woods again, to see if there are more hens about.


Text and photos copyright 2014 by Brett Laidlaw

Thursday, August 21, 2014

Volunteers


Most of the party crashers in our garden are both uninvited and undesirable, i.e., weeds, but some of the unexpected sproutings are are ones we actually look forward to and hope for.  These are the things that we did once plant, that went to seed in the garden, and come back for a return visit once things melt and warm up.  We refer to these plants not as weeds, but rather as volunteers, selfless, altruistic vegetables that don't have to be asked to pitch in, but show up fairly reliably, ask for little in the way of cultivation, and give their all without reserve.

Purple mustard greens are probably the most reliable volunteers in our garden.  When we lived in Saint Paul I planted them once or twice in the late 1990s, and then enjoyed their complimentary contributions for a decade and a half.  When we moved to Wisconsin we wound up bringing some compost out with us from Saint Paul, and by golly, if there weren't purple mustard seeds in there, and so the cycle has begun again.

I really enjoy the look of radish flowers, so I leave those be when they bolt, and I like pickled radish seed pods, so I pretty much leave the plants alone until, well, to be honest, probably the next spring; I've got to be better about fall garden maintenance, which makes turning things around in the spring so much easier.  At any rate, my slovenly gardening had the beneficial consequence that in earliest spring we had daikon plants shooting up in a variety of spots.

Lettuce is a common volunteer if you leave the bolted plants around long enough, and in the herb world, dill is a reliable reseeder.  Tomatoes often pop up in our compost, but they rarely amount to anything.

But the volunteers that provide both the most entertainment and nourishment are the squash plants that frequently erupt from our compost pile.  Given adequate water and space, squash and pumpkins will grow like crazy even in mediocre soil, and so it's pretty amazing what they can do when they feed on a diet of pure, well-rotted compost.  In mid June we started to see the squash emerging from one of our compost bins; probably a half dozen or more vines developed and competed for space and light.  The ones that got over the top and into the yard or meadow are now doing very, very, nicely, indeed.  Here's a little tour of our magnificent volunteer squash explosion:

Looking east.  These are all coming out of a roughly 4 by 4-foot bin about a third of the way in from the left.


The largest squash by far, with 60-pound Lily for comparison.  She stands about 2 feet at the shoulder.  This must be a Hubbard; we had one that rotted in the root cellar.

I'm guessing delicata.


And maybe carnival? 


Hanging in the adjacent bin.

Another view of the sprawl.

The volunteer squash are luring a variety of pests away from my cucumbers.

Viny ambition.

Having surmounted the wood pile.

Kabocha in there?


There's a bumblebee in there, along with what I think of as cucumber beetles.  But the beetles don't seem to be doing any harm to the squash, and must in fact be helping with pollination.


There you have it.  I'll report back when things start to assume their eventual colors and ripen.


Text and photos copyright 2014 by Brett Laidlaw

Wednesday, June 11, 2014

Weeds Worth the Pain


I'm bringing the blog out of hibernation to write in praise of one of my favorite wild greens, wood nettles, laportea canadensis.  I've probably had something to say about this under-appreciated cousin of the better known stinging nettle pretty much every spring.  My favorite time to harvest it is just after it has emerged, at 8 to 10 inches high, say, when it has little sting and you can consume the whole plant, adding it to a soup of wild greens or tossing it with pasta.  Wood nettles are usually up by the second week of May, and can be found in that infant state through the end of the month, depending upon your latitude.


I managed to gather a few harvests of baby wood nettles this year, but for most of May torrential rains and various obligations kept me out of the woods.  By the time I got back to check my wood nettle patches, most of the plants were up at least 18 inches, with their broad, delicate leaves fanning out widely, and their potent sting in full force.  I've said it before, but it bears repeating:  even though there's no sting in the name of wood nettles, there's a wicked one in the plant, worse than stinging nettles, in my opinion.  Maybe I've just had more bad experiences with them, as they tend to grow thick and tall near trout streams, and there's also an abundant patch of them guarding my favorite chanterelle patch.  They can sting you fiercely even through your jeans.  Beware!

Those little hairs deliver a potent sting in mature wood nettles.


But even though the wood nettles are getting tall now, they still provide excellent eating, which you can't really say for stinging nettles of the same size.  Before the plants flower and reach full height, which can be four to five feet, the leaves are still tender enough to make a versatile cooking green, and there's an added bonus product, what I've been calling "haricots verts du bois," the slender green beans of the woods:  it's the upper stems of wood nettles plants, which, when blanched and peeled, make a delightfully mild and crunchy vegetable.

Peeled (mostly) stems.
 In fact, you can eat the peeled stems raw, too, but a quick blanching in boiling water removes the sting and makes them very easy to handle.  I don't bother with gloves when picking the nettle tops, but long sleeves are probably a good idea, at least until you get the knack for picking them.  Wood nettle leaves grow in rather widely spaced tiers along the stem, which allows you to reach in, carefully, and grasp the stem about a foot down from the top.  Don't I get stung?  Am I possessed of digits of steel?  Yes I do, and no, I'm not.  I do feel a bit of sting on my fingertips, but the fingertips, at least mine, are not all that sensitive to wood nettles's sting.  So I take hold of the stem and bring my fingers up until I feel where the stem breaks easily.  As with asparagus, this is how I know that the stem is tender.


I bend it over to snap it, and as I pull it away the skin usually peels off from one side--that's how easily they peel.  When the leaves are big, stuffing them into my sack without getting stung is the most perilous operation.  So, yes, there's usually some pain involved, but it doesn't last long, and for me, the reward is more than worth it.

Once I get my prickly salad home, I dump the sack into a big bowl and wash it thoroughly--use tongs to agitate, but be gentle if you want to keep the stem sections intact, for they are delicate and break easily.  By this time, having been jumbled around in your sack and swished in water, a lot of the stinging capacity is gone, and then a dunk in boiling water does away with the rest.  The liquid you blanch the nettles in makes a tasty tea, similar to stinging nettles tea, perhaps a bit milder.  I add a little maple or, in this case, birch syrup to sweeten it a tad.

You'll notice that you can still see some of the little hairs on the unpeeled stem sections, even after blanching.  There's no sting there anymore, as I've said, but you may taste a little prickle on the tongue as you eat them. This may be an acquired taste; myself, I don't mind it.

The blanched wood nettle leaves can be used anywhere you'd use spinach, or young turnip or mustard greens.  To me, the flavor is much superior to spinach, and it doesn't make your teeth feel funny....  With the stems, pretend that they are wild haricots verts, or chop them into anything to which you want to add some crunch, from tuna salad to salsa to deviled eggs.


Or to soup, such as a bowl of ramen, which is a common lunch at this forager's house.  And when I say ramen, I'm talking the packaged kind with dry noodles and little flavoring packets.  But not the 29-cent kind.  No, with my dorm-room dining days well behind me, I now splurge for the 99-cent to $1.39 per package ramen.  Some of these deluxe instant lunches come with three count 'em three different little flavor packets--the powdered stuff, maybe some kind of oily or bean paste stuff, and one with bits of dehydrated vegetables.  Livin' large!


To fancy up my ramen just a bit, I sauté some kind of onion (or leek, ramp, shallot) in a bit of oil, add a good teaspoon of sambal, or better, our homemade chile-garlic paste, then add water, and the noodles.  I'll usually add about half the packet of powdered soup base (can't imagine how salty it would be if you used the whole thing, because it's pretty salty with half).  A minute or two before the noodles are done I toss in some greens, today, of course, wood nettles.  And today I also had some veiled oyster mushrooms that I found in our woods on my nettle-gathering walk yesterday.  These are a lesser oyster, for though they can get fairly large, the meat of the cap is thin, and they're pretty chewy.  Good flavor there, though, and a good textural addition.  A few slices of radish and spring onion, maybe a few drops of sesame oil and/or a dusting of hua jiao, because it's all about the garnish!  Slurp on.

Working in the outdoor forager's lab is very pleasant duty this time of year.  Forager's assistant Lily keeping half an eye on things.


Friday, March 21, 2014

Fun with Fermentation 2014


I'm putting this up for those who attended my fermented vegetables session at the Hay River Transition Initiative's 2014 Green and Traditional Skills Day, or anyone else who's interested.

Here are some of my posts dealing with the topic:

Crock-fermented vegetables

Kimchi

Mixed vegetable ferment in a gallon jar

Sauerkraut in jars

Choucroute garnie


And here are the key books in my fermentation library:

The Art of Fermentation, Sandor Katz

Wild Fermentation, Sandor Katz

Wild Fermentation is more practical and recipe-oriented; The Art of Fermentation is encyclopedic.  I reach for Wild Fermentation far more often.

Preserving Food Without Freezing or Canning, the Farmers and Gardeners of the Terre Vivante Collective

Fascinating traditional preservation techniques from the French countryside.

The Joy of Pickling, Linda Ziedrich

My go-to book for all sorts of pickles, relishes, chutneys, etc., fermented and otherwise.

That should keep you busy for a while. Go forth and ferment!

Tuesday, January 28, 2014

Winter Fuel: Porridge of Wheat Berries, Rye Berries, and Steel-Cut Oats with Dried Apple and Toasted Hickory Nuts


It was -26 here this morning, probably the coldest night of this very cold winter.  To get going on mornings like this, you need hearty sustenance, you need fuel.  Our favorite simple winter breakfast this year is this three-grain mush flavored with dried apples and toasted hickory nuts (and of course some excellent local milk, and a splash of our maple syrup).  We prepare it on the woodstove the night before, making a batch to last a couple of days.  In the morning I put a portion for two in a small saucepan, add some water and a pinch of salt, snip in some dried apples, and let it warm while we fix tea.


What I love about this porridge is that it's not just mush--it has bite, a satisfying chew, because the rye and wheat berries never totally succumb, no matter how long you cook them.  They have a natural sweetness, as well, and the apples add more subtle sweetness, along with tartness and yet another texture.  And then the hickory nuts, toasty, rich, lightly crunchy.

I think I'm ready for another bowl....

Steel-cut oats lower left, wheat berries right, rye berries top, hickory nuts, dried apple.

For four ample servings I used:

1/2 cup wheat berries
1/4 cup rye berries
3 cups water

Bring that to a boil and let it simmer a good long while, at least an hour, I'd say.  Check every 15 minutes or so to make sure all the water hasn't cooked away.  When the berries are yielding but still quite al dente, you can add the oats.

1/3 cup steel-cut oats
2/3 cup water

Add the oats and water right into the wheat and rye berries.  Cover and simmer 20 to 30 minutes, then remove from the heat and set aside.

In the morning reheat the porridge with a little added water and a couple pinches of salt, and snip in dried apple or other dried fruit--or, as mentioned above, spoon your desired portions into a small saucepan, and do likewise.  When it's hot, dish it up, add milk, maple, top with toasted nuts.  We are in love with the local hickory nuts we found at the little market in Ridgeland, but walnuts or pecans, toasted pumpkin seeds, what have you, all would add that nice contrasting crunch.

This is the kind of cold weather breakfast that could almost make you wish winter would never end.

Almost.


Text and photos copyright 2014 by Brett Laidlaw