Showing posts with label smoking. Show all posts

Friday, April 1, 2016

The Saps of Spring, 2016 Edition


March is a difficult month.  It promises spring, but often belongs equally, if not more so, to winter.  It makes you think of gardening, of growing things, but at our latitude all you can really do is pile potting mix into little pots, get the seeds of the earliest, cool season plants going—onions, leeks, lettuce, some herbs.   There are days of warm sun that tempt you to get out and till a plot, but when you turn one clump of frigid, sodden soil, you turn quickly to plan B.  Never mind, there’s always that minefield of winter-weathered dog treasures to clear, a perennial March activity that more or less sums up the spirit of the season….


Maybe this is why a lot of my March days since moving to the country have been spent drilling little holes in trees, gathering the cold, slightly sweet water that weeps out, and cooking it down to incomparable sweetness—tree syrups, both maple and birch, and even a bit of black walnut.  It’s nature’s little consolation prize for enduring these purgatorial weeks, equal parts reward and distraction.  Though sap season comes around every year, it’s always a little bit different.  And this year has been more different than most.

People on Twitter tend to get a little excited, you may have noticed if you frequent that world.  I think it’s the ability to communicate instantaneously with friends, acquaintances, and strangers alike, all across the planet, that tends to heighten reactions exponentially.  This year I saw a slew of ecstatic tweets proclaiming that the weather for the week ahead looked perfect for maple sugaring…in the middle of February.  But the trees weren’t looking at the daily highs and lows to decide how to proceed; no, the trees were still frozen solid.

I forget exactly which March Surprise this was; we had a few....

But it did transpire that warmish weather continued—there were days with record highs, with record high lows—and I did wind up tapping a few maples, as well as the big box elder (a type of maple) in our yard, and our one majestic black walnut tree, on February 21, because what the heck.  And within a few days I did have a little sap, emphasis on the little.  The trees ran sluggishly for about a day, then the weather turned seasonably cold again.  Six trees gave me about one gallon of sap, which didn’t take too long to simmer down on the wood stove into a half cup of syrup; and so began the season of passive, micro-batch syruping, which continues to this day, as I reduce another five gallons of birch sap on the woodstove and then on the range top.  I’m not going to wind up with a vast reserve of syrup, but then, I don’t really need one.  The birch, especially, is sparingly deployed, maybe a tablespoon or so at a time, in salad dressings and marinades, mainly for grilled pork.
 
Birch syrup on the final reduction.

With small amounts of sap—5 to 8 gallons at a time—I didn’t bother firing up the labor-and-smoke-intensive half-assed sap contraption I’ve used in years past.  Instead, since we’re still stoking the woodstove every day, at least in the mornings and evenings, I’ve been setting a hotel pan and our Big Blue Le Creuset dutch oven on the stove and letting the sap slowly reduce to a manageable amount, at which point I boil the dickens out of it on our kitchen range top.  You may wonder, Isn’t that a lot of humidity to be adding to your indoor environment?  Aren’t you producing great clouds of water vapor, steaming the wallpaper off the walls, and covering everything with a sticky film? 

Legitimate concerns, to which the answers are: yes, I guess it’s a fair amount of humidity, but things are generally dry this time of year, so we haven’t noticed any issues; and as we have no wallpaper on our walls, none to steam off!  Finally, no, our walls and ceiling bear no resemblance to a movie theater floor after being deluged with Mountain Dew during the kiddie matinee.  The whole idea, see, is that the sugary part remains in the pot as the water evaporates.  Even if some of the sugar escaped a furiously boiling pot, I don’t think it would go very far, the sugar molecules presumably being a good deal heavier than water vapor. 

The long and short of it is this:  I think it’s a myth, one which I myself may have helped to promulgate in the past, that cooking sap down inside has these undesirable side effects.  When I’m doing the fast, final boiling, I’ve got the vent hood running, a couple of windows cracked, and there’s no noticeable change in our indoor weather.  Also, I’ve kept checking the walls near the stove, the inside of the vent hood, for that legendary sticky film—none to be found.  Now, if I had a hundred, or even 40, 20 gallons to deal with at a time, I probably wouldn’t do it inside.  But with these small batches, it works fine.  It’s also really nice to get double duty out of the woodstove, heat for the home on chilly days, tasty syrups for the kitchen.

The Puddock hard at work, multi-tasking.

It has taken me a while, years, in fact, to start to feel comfortable using the birch syrup.  It’s completely unlike anything else I have in my pantry, so it didn’t slide easily into any particular niche.  People ask me what it’s like, and I can only give vague analogies or general descriptions that don’t capture the essence of the thing.  It’s dark, dark as molasses, and it has some molasses qualities, but it’s not thick—in its body, its “mouth feel,” it’s lighter and thinner than maple syrup.  And banish any thought that it’s like maple syrup just because it’s sugar that comes from a tree.  While maple syrup is composed of sucrose, like plain old granulated sugar, birch syrup is glucose and fructose (I think I’ve got that right).  The flavor of birch syrup is much…edgier.  There’s acidity to it, and often a little intriguing bitterness.  It’s very aromatic, with sweet, menthol, spicy, root beer type notes.  Really, if you’re interested in distinctive foods, particularly distinctive northern foods, you’ve got to try it.

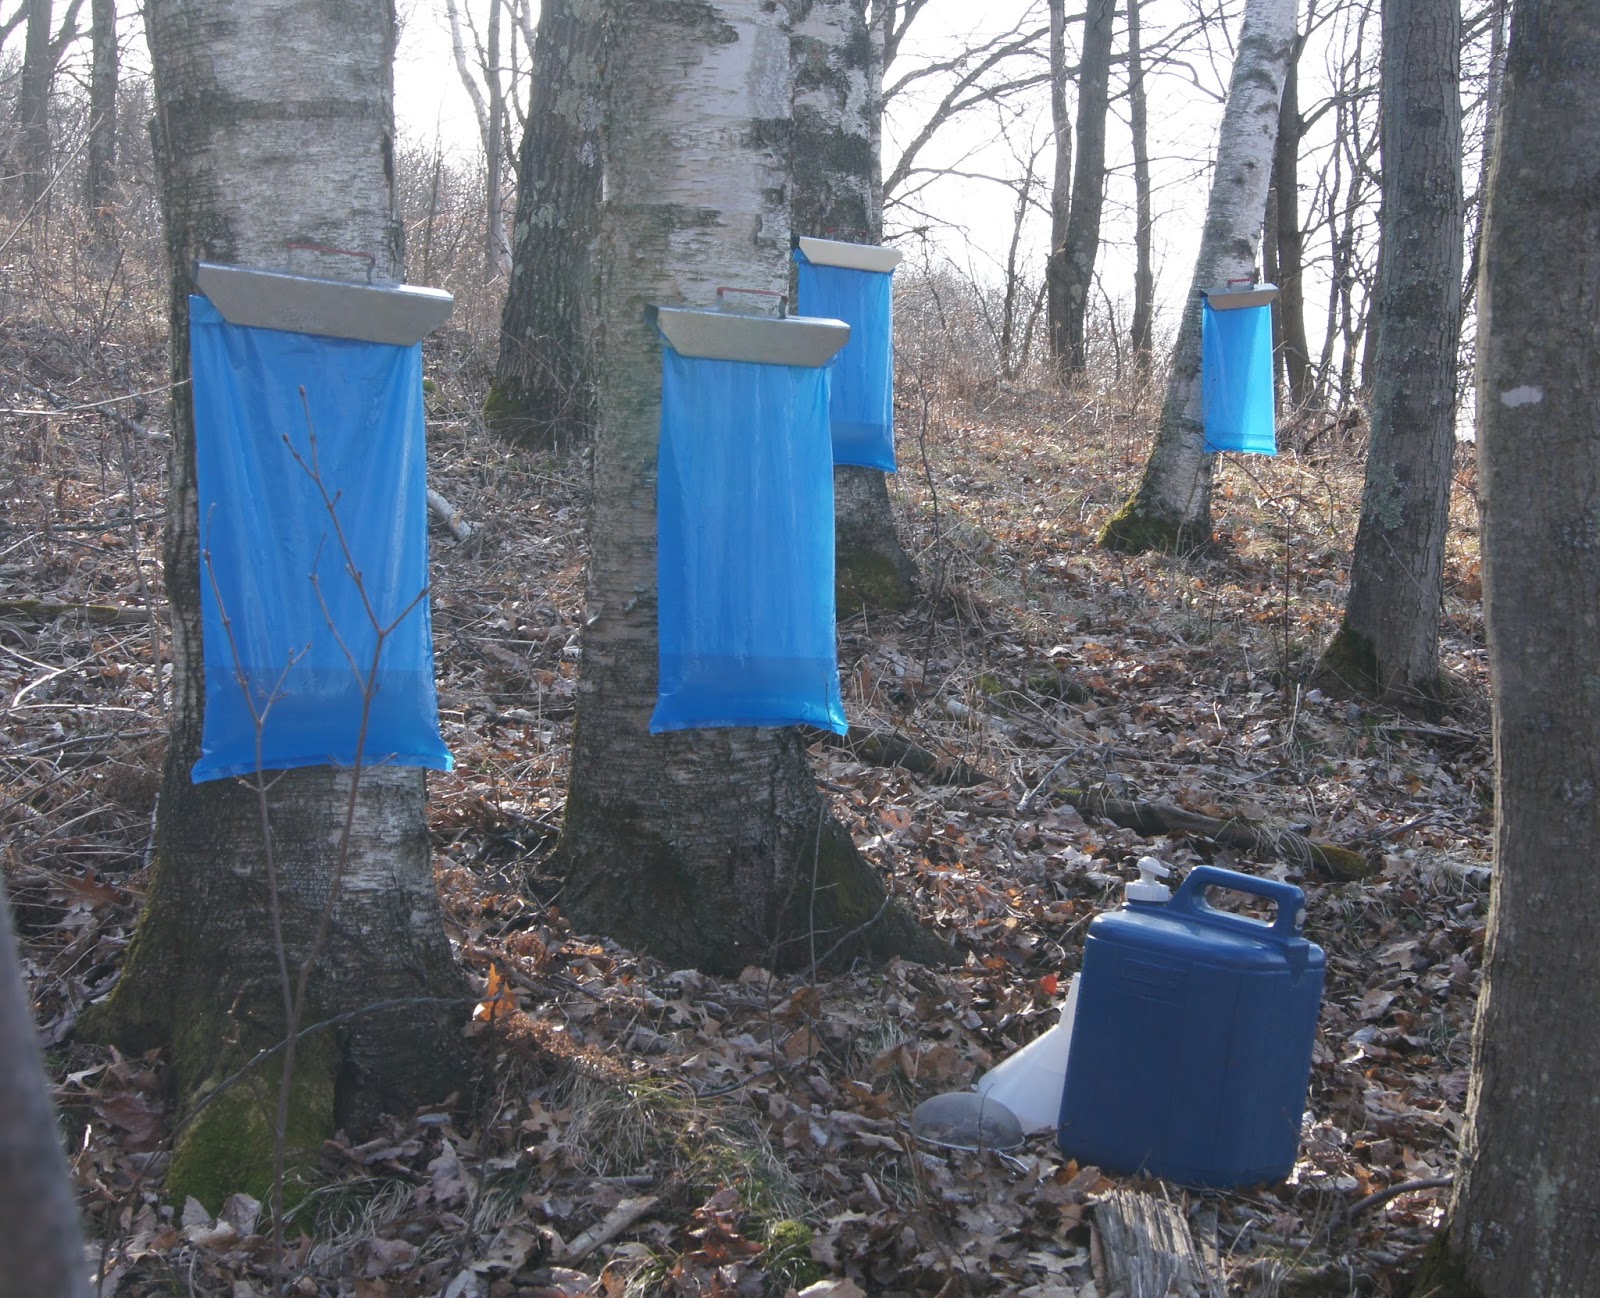
If you have access to a few birch trees, it’s easy enough to get, as long as, you know, nature cooperates.  You tap the trees exactly as you would for maple syrup, drill a little hole about 1 ½” deep, insert a tap, hang a bag, bucket, what have you, or attached food grade tubing to allow the sap to run into a container.  Then when you have a quantity, you cook it down.  And cook it down.  And cook it down….  Because, the thing about birch sap:  it’s generally less than half as concentrated in sugars as maple sap.  So if it typically takes from 30 to 40 gallons of maple sap to produce a gallon of syrup, with birch we’re talking about a roughly 80:1 ration.  Breaking that down into the smaller batches I’ve been doing, 10 gallons of sap gave me one scant pint of syrup.  

Syrup assortment: the small, very light one at center front is black walnut.

I’ve said this before, and I’ll say it again:  you can look at the numbers, even the relatively reasonable maple ratios, and think you get it, but until you actually do it, you can’t possibly understand.  Still, it’s worth it.  I go to a lot of trouble, tapping the trees, hauling the heavy sap down the hill (luckily I do get to haul it down the hill), cooking the sap down and down and down, but at the end I’ve got lovely local products to work with through the rest of the year.

And here’s a handy fact of nature:  the birch trees tend to start running as the maple run is coming to an end.  So if you have access to both kinds of trees, you can move your tapping equipment over to the birches when you’ve had your fill of maple sugaring, and the trees start to break bud, rendering the sap bitter and unusable.  Making syrup, especially birch syrup, is a labor of love, and a rite of the season, a perennial celebration of those immemorial cycles.  A lot of work and time, sure, but hey, it beats picking up dog crap….

Earlier reports from sap season:
 Sapped Out, 2013
The Sweetest Tree, 2013
Sweet Trees X3, 2015
Sweetness, Toil, and Smoke, 2010

How I have used birch syrup:

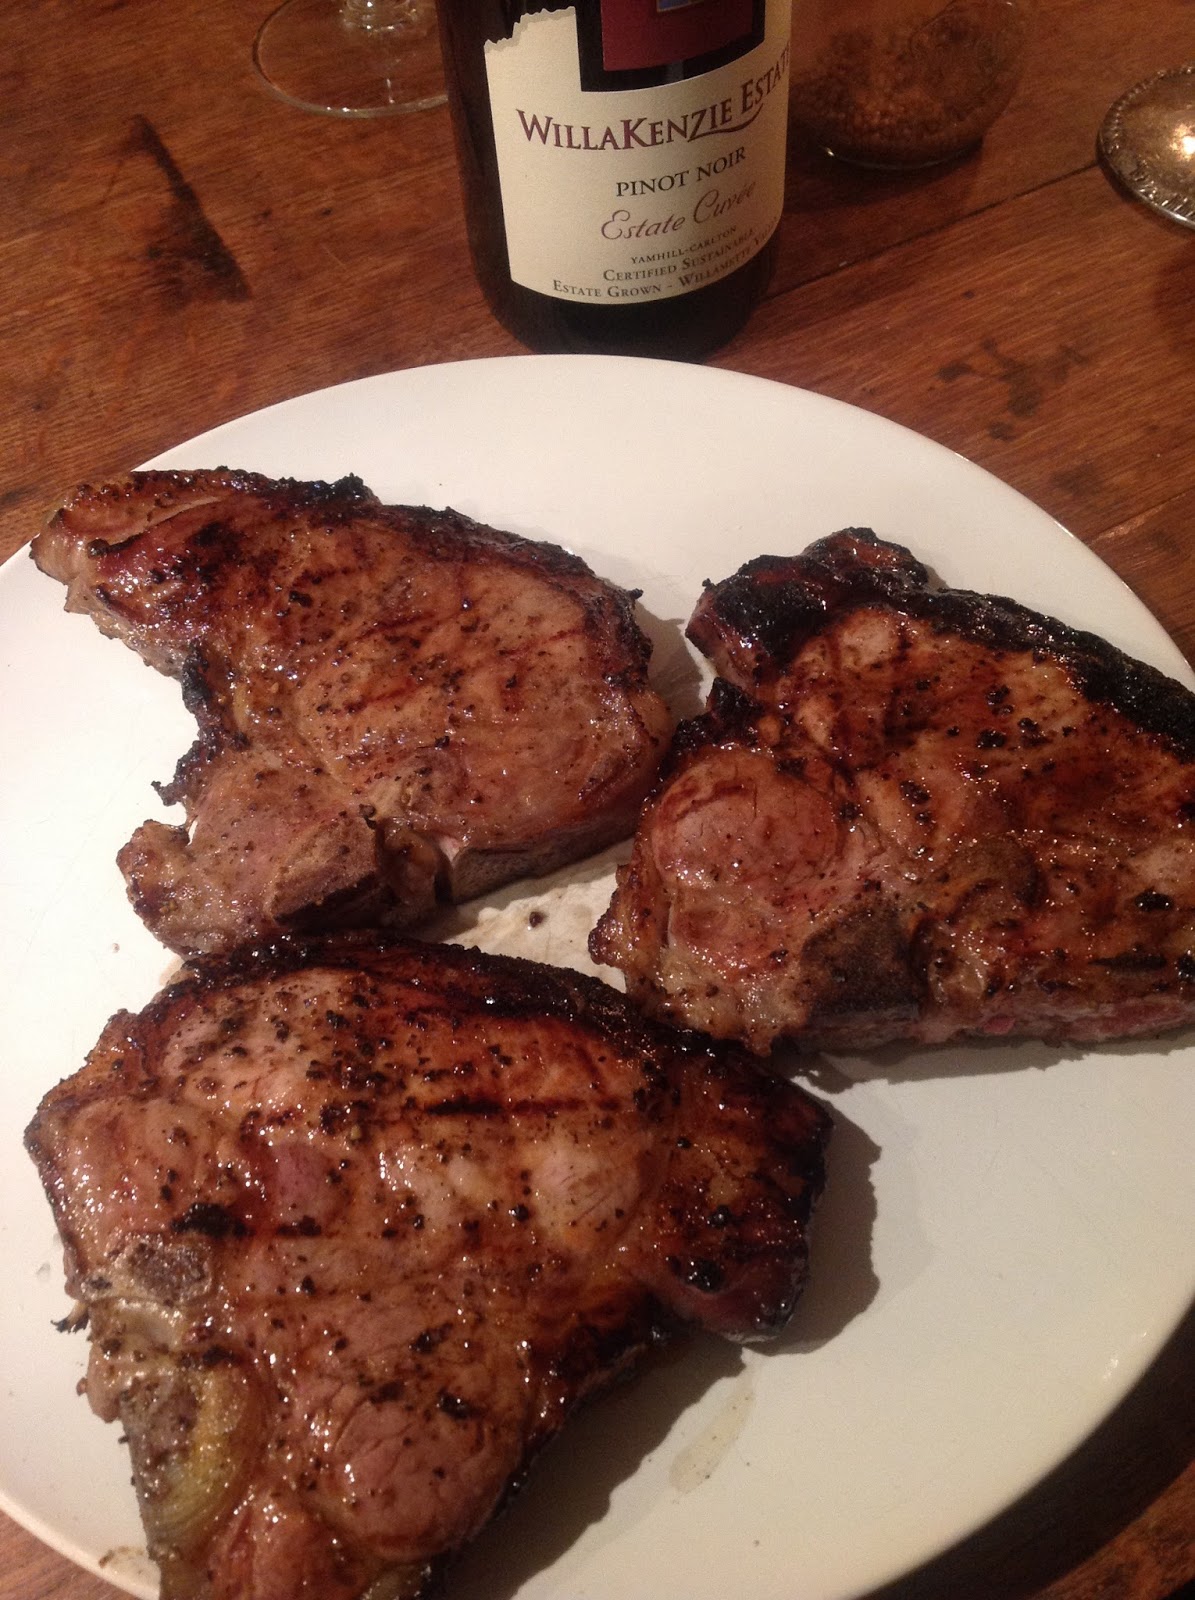
·        *  As a marinade for grilled or smoked meat:  it’s great brushed on a pork chop, which I then season simply with salt and pepper.  For some reason, the birch syrup doesn’t burn on the grill the way maple syrup or honey would.  Perhaps because the sugar composition is different.  I’ve also used it on grilled game birds, particularly woodcock.  And I’ve used it in the cure for smoked duck breast and venison with wonderful results.
Grilled red wattle pork chops in a birch syrup marinade; pork and birch have a delicious affinity.

*  In salad dressings:  just a teaspoon or two in a vinaigrette really makes its presence felt, and brings that distinctive, aromatic birch flavor to any kind of salad.
·         *  In cocktails:  1 teaspoon birch syrup, a few drops of lemon juice, 2 ounces Scotch, bourbon, or rye, stir it up, add ice, garnish with a lemon twist.  Or for the lemon substitute blood oranges in season for a cocktail I’ve dubbed “The Nasty Bruise.”  For a refreshing non-alcoholic drink, stir a couple teaspoons of birch syrup into sparkling water, add ice and perhaps a squeeze of lemon juice.

Those are the main applications I’ve found for birch syrup.  I’m having a decent year with the birch this spring, so I’ll have a good supply to experiment with through the year.  I repeat:  a little goes a long way with birch syrup.


Birch-Mustard Seed Carrot Salad

Two servings.  

1 large or 2 small carrots
2 tablespoons olive oil
2 teaspoons yellow mustard seeds
2 tablespoons lemon juice
1 tablespoon birch syrup
1 small garlic clove sliced very thin
A bit of chiffonade leek or scallion green, optional
Salt and pepper

Peel the carrots and slice them very thin—1/8” or less.   A Benriner mandoline is handy for this—watch your fingers!

Heat the oil over medium low and add the mustard seeds.  Stir them around until they just start to pop, then remove from the heat.  Add the lemon juice, birch syrup, and garlic and stir well.  Pour the dressing over the carrots, add a couple good pinches of salt and a few grinds of pepper, and stir well.  Let the salad sit for at least a half hour or up to several hours before serving.  Sprinkle the optional leek or scallion greens over top just before serving.

Maple syrup variation:  in place of the birch syrup, use 2 teaspoons of maple syrup and ½ teaspoon of Dijon mustard--I haven't actually tried this variation, but I don't see how it could be bad.


Here’s a brief record of weather, phenology, and such since syrup season began at the end of February:

Feb 27 record highs
Feb 29 1st ½ cup maple syrup done
March 1, “brittle and chill” and the trees aren’t producing sap
March 4, 3 inches of snow
March 8 red-winged blackbirds back & a scant half cup of black walnut syrup finished from 56 ounces sap—that’s all for black walnut, it didn’t produce enough sap after that to bother with
3/10 snow’s all gone and Mary notes, looking out the kitchen window, “It’s not winter anymore,” to which I reply, “It’s not spring, either.  It’s mud season.”
3/10 cooked down a tiny bit of box elder syrup, “single source”….
Shrimp on the barbie, definite grilling weather
3/11 picked garlic mustard along the Rush River at Brush Cr Rd; grilled pork chops; summery
3/12 summery; dinner at Tina’s, I wear shorts
3/16? 2” rain, thunder
3/14 woodcock return
3/17 SNOW again, grass covered
3/18 snow gone
3/22 tapped birches and they were running; seemed pretty vigorous, but didn’t get much for a few days
3/23 SNOW again! 3-4”.
3/24 snow gone!
3/27 finished the last maple, moved over to birch
3/28 5 gallons birch mostly cooked down
3/29 another 5 gallons birch gathered, mostly cooked down; sunny and warm, in shorts again
3/30 It didn’t seem that there was much sap flow, but the eight birch gave around four gallons total, which reduced gently on the woodstove overnight
3/31 The house is starting to smell birchy with the sap on the woodstove getting right down there.  It’s raining now, but the forecast is for an inch of snow by the end of the day.  April Fool!

Text and photos copyright 2016 by Brett Laidlaw


Thursday, April 30, 2015

We Smoke Our Own, 2015 edition


In the spirit of re-embracing that cyclical, perennial essence of the natural world of which food—real food—is a part, it’s probably worthwhile to take up again the basics of home smoking.  Brown trout are on the roster here, but the same basic principles apply to pretty much any kind of smoking.  To take away any stigma of the arcane or difficult about the process:  hot smoking, which is what constitutes the vast majority of home smoking, is simply indirect grilling at a fairly low temperature while adding smoke.

Trout, having been brined.

First you obtain a piece of flesh, then you cure it with a brine or a rub, next you build a fire, finally you cook that brined meat in low, smoky, indirect heat until it is well saturated with smoke, and cooked through.  It doesn’t really matter if it’s fish, pork belly, pork shoulder, chicken, venison, beef brisket.  If it’s something that spends a relatively short time in the smoke, like fish or bacon, we call it smoking; if it takes many hours to do the job, we tend to call it barbeque.  Same basic process.

So as not to overlook the obvious:  cooking with indirect heat simply means the meat is not sitting directly over the coals, as it would be when you grill a steak or a burger.  The coals are on one side of the grill, the meat on the other.  Simple as that.

Fish at the back, coals in the front.

The only difficult part of the task, in this age of constant distraction, is remembering to get your meat brined a day or two ahead, depending on size and what exactly you’re going for.  With these brown trout in the 12-inch range, an overnight wet brine is plenty.  My basic fish brine consists of 2 tablespoons each of salt and brown sugar per cup of water; that translates to ½ cup each salt and brown sugar/1 quart water.  I start with hot tap water, add the salt and sugar, stir to dissolve, let it sit until cool (or if impatient add a few ice cubes).

An instant-read thermometer stuck through the top vent gets you close enough.

The next morning, the fish sit out on a rack to dry a bit before being smoked.  In a smoker—just a regular home bbq grill, Meco my preference—maintained at around 200-250 degrees, the fish will be done in a couple of hours.  When the skin has that gorgeous reddish-gold smoky hue and the flesh feels firm to the touch, they’re ready.

For most people, the natural chunk charcoal (such as Cowboy brand) that’s widely available now will be the best choice for a heat source.  Briquets can be used in a pinch, I guess, but for god’s sake don’t start the fire with lighter fluid.  It kind of amazes me that they still sell that stuff.  A chimney starter is the way to go.

Foreground, grill purification by fire; background, why we don't buy charcoal.

These days I build a fire with local oak and use those coals as my heat source, usually adding apple wood for the smoke--the oak coals bring their own distinctive smokiness, too.  The apple wood is also locally harvested, and I just use whatever pieces are easy to obtain.  A lot of smoking guides tell you to soak your wood chips, if that’s what you’re using, and I suppose if the chips are very small this makes sense, but in general I don’t think it’s necessary; you’re trying to make smoke, not steam, and soaked chips are just going to steam until they finally dry out and burn.  I’m all for cutting out superfluous steps embedded in common practice by constant, unthinking repetition.

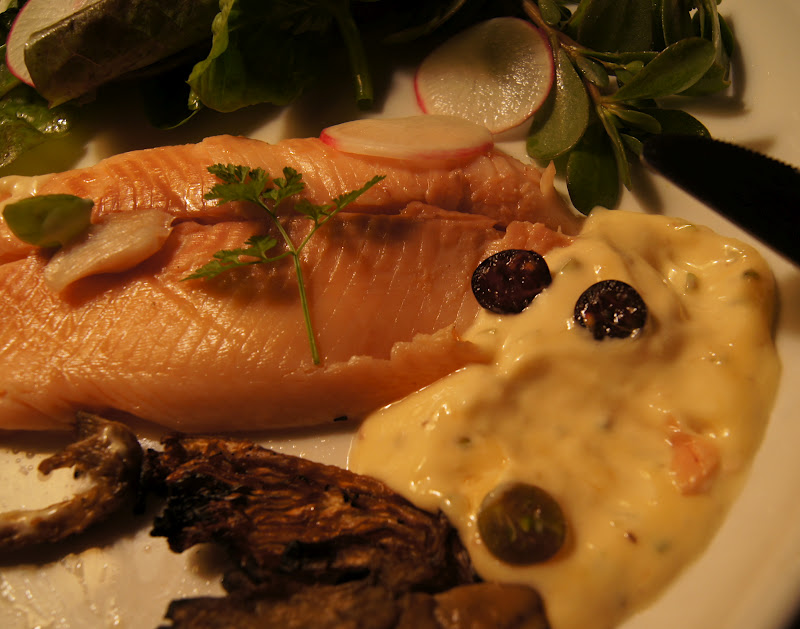
Smoked browns with celeri buttermilk rampoulade.

In general, I smoke food for the flavor—and other delectable qualities—it imparts, rather than for preservation.  With stream trout, though, extending the delicious life of the fish is part of the reason for smoking.  A fresh fish is good for four or five days (and sometimes actually improves with two or three days aging), while smoked fish will keep for two weeks or more.  I don’t feel that smoked fish freezes very well—when it’s thawed it can be watery, with a grainy texture.  Better, I think, to freeze fresh fish and then smoke it afterward, if you so desire.


Smoked trout can be a centerpiece of a plate, rounded out with a couple of salads.  And it’s a great ingredient for chowder, and appetizer spread, fish cakes, smoky trout brandade…. Many possibilities.  If you’re not a fan of the angling arts, or trout are out of season, you can always buy farmed rainbow trout, a sustainable product, and a tasty one, at that.  Also, this same method can be used with other kinds of fish—I’ve done it with Lake Superior herring, whitefish, and lake trout. 

There’s just a lot of satisfaction in smoking your own.  Have a try.

Monday, March 4, 2013

Smoking Basics (The Hay River Transition Initiative Class Handout, with Some Additional Notes)

At the third Hay River Transition Initiative's Traditional and Green Skills Day, this past Saturday, I led a seminar on basic home smoking--"Low-Stress, Small Batch Smoking," I think I called it.  There was no pre-registration for the classes this  year, so I had no idea how many people would be attending my session.  Well, there were way more people than I expected, and so I had nowhere near enough handouts to go around.  So I'm posting the notes here, and will be getting word out through the various email lists that serve this beautiful area of Near North Wisconsin.  I'm sure there's info here that the general Trout Caviar readership can benefit from, too, though much of it has appeared here before.  I've added some notes that occurred to me after I put the handout together, as well. 

                                                
____________________________
Smoking was once a common means of preserving food, and still is in many parts of the world. In modern America we smoke for flavor more than preservation, and we’ve mostly turned the job over to large, industrial producers. It’s worth relearning the basics of home smoking.

You will need:

      *  A covered barbecue grill (mine is a Meco, clamshell type, though a Weber is also fine)
     *   A smaller grill, preferably also covered, to hold hot coals to replenish the smoker
     *   Natural chunk charcoal, available at most larger grocery or hardware stores (& Menard’s)
     *   A chimney starter for the charcoal (no lighter fluid, please)
     *   Some fragrant wood, chips or chunks (I use oak and apple; in the past I’ve used maple and hickory bark)
     *   An instant-read meat thermometer, inserted in the top vent, is handy for monitoring temperature

This technique is hot smoking, as opposed to the cold smoking that produces lox and certain other delicacies. It involves cooking the pre-cured (salted or brined) meat or fish rather slowly with indirect heat in the presence of smoke.

Light a chimney starter full of charcoal. When it’s ready, dump half the charcoal in the main grill, half in the smaller. Move the coals in the main grill to one side. Add some fresh charcoal to the smaller grill, and put the lid on with the vents open just a tad, so those coals stay hot but don’t burn up too quickly.
Place some smoking wood—apple, oak, etc., a handful of chips or a chunk or two—on top of the coals in the main grill. Place the items to be smoked on the side of the grill grate away from the coals: it’s important that the food isn’t directly over the coals. Put the lid on with the vent about halfway closed. Place the instant-read thermometer in the vent opening. Adjust vent and coals to keep the temperature around 200 to 225 degrees. Replenish with coals from the smaller grill as needed. Add more smoking wood chips or chunks as needed.

Fish of up to a pound will be done in 1 ½ to 2 hours; bacon in chunks of 1 to 1 ½ pounds will be done in 2 to 3 hours. Turn the meat or fish over every 45 minutes or so. At temperatures this low (even though it’s called hot smoking), it’s hard to overcook the foods. If, after smoking for the times designated, you’re not sure the food is fully cooked, just place it in a 200-degree oven for another thirty minutes.

It’s as simple as that. Once you’re comfortable with the basics, there’s no end of resources—books, TV series, classes, etc.—to take you on myriad smoking adventures. (One book I really like is Peace, Love, and Barbecue by Mike Mills.)

Some notes:

     *   Many smoking recipes tell you to soak the smoking wood. I don’t. The point of the smoking wood is to produce smoke, not steam.
      *   Remove the lid from the smaller grill about ten minutes before you want to add fresh coals to the larger grill. This step allows air in to perk up those coals, which are merely smoldering.
     *   While the salting and smoking provide a certain amount of preservative qualities, the finished products of these recipes are not intended for long-term storage. The bacon can be frozen, but the fish should be eaten promptly.

Home-Smoked Trout


I usually smoke brown trout because that’s mostly what I catch. If you’re buying trout, it will probably be farmed rainbow trout. I’ve also used this brine and method on lake trout and herring.

In a medium saucepan, heat 4 cups water and add ½ cup salt and ½ cup brown sugar, stirring to dissolve.

Remove from heat and let cool. I have added cracked peppercorns and/or herbs to the brine.  Try different flavorings if you like.

A 12-to-14-inch fish is ideal for smoking, but smaller or larger ones can be smoked, too. Just brine and smoke for a longer or shorter time, depending on size.  Given those ideal 14-inch trout, brine them, refrigerated, overnight. Fish smaller than 12 inches can take up sufficient brine in 4 to 6 hours. A couple of hours before you plan to smoke, remove the fish from the brine, rinse in cold water, and set them on a wire rack set over a baking sheet. Using wooden picks—first snip off the sharp ends so they don’t go right through the flesh—prop open the body cavity of the fish to allow them to smoke and cook evenly. Smoke at 200–220 degrees for 2 hours.

[Note:  I almost always smoke bone-in fish, but for this class I could only get butterflied rainbow trout--well, if I had planned ahead I could have order whole fish from either Star Prairie or Bullfrog "Eat My Fish" Trout Farm, but you know how things go sometimes.  I took the same approach with the butterflied fish as I would with bone-in fish, and...the results were not good.  Because the flesh of the boneless fish was more accessible to the brine, and had been cut up a bit in the boning process, the fish turned out much too salty--also, I left them in the brine too long when a round of errands kept me away from home longer than expected.  Since the final product was both  unpalatable and unattractive, I didn't even bring the fish to class--but I should have, to show that 1) even an experienced smoker can make mistakes, and 2) it's okay; it's just a couple of fish.  And, since the theme this year is "Charge ahead, fall down, get up, repeat," I turned lemons into lemonade, as it were, by turning my raggedy, too-salty trout into:

Delicious Smoked Trout Spread

1 smoked rainbow trout (it's okay if it's a bit too salty to eat on its own...(!))
Cream cheese
Hellmann's mayonnaise
1 scallion, chopped
Freshly ground black pepper

Remove the skin and any remaining fins and bones from the trout, and flake the fish into a bowl.  Add a couple of tablespoons of cream cheese, and mash the fish and cheese together until incorporated.  Add a generous tablespoon of mayonnaise and mix well.  Stir in the chopped scallion and pepper to taste.  Serve on crackers.

Moral of the story:  You can indeed smoke butterflied fish or fillets, but adjust the brining time accordingly.  Those butterflied trout of mine spent a good six to eight hours in the brine, but an hour on two would have done the trick.  These were small, thin-fleshed fish.  Another option for small, boneless fish or fillets would be to reduce the amount of salt in the brine, say to 1/3 or even 1/4 cup per quart of water, instead of 1/2 cup.]

 Home-Smoked Bacon

2 pounds pork belly
1/4 cup maple syrup or brown sugar
3 tablespoons salt

Rub the pork belly with the maple syrup, sprinkle salt on all sides, and let cure in the refrigerator for 24 hours, turning occasionally.  For the brown sugar cure, mix the sugar and salt and pat it evenly on all sides of the meat.
The next day, rinse off excess salt, pat dry, and smoke at 200–225 degrees for 2 to 3 hours. The bacon will be both smoked and fully cooked. If you are unsure about whether the bacon is cooked at this point, you can set your mind at ease by placing the bacon in a 200-degree oven for 30 minutes.  A meat thermometer inserted into the bacon should read 160 degrees. 
            I refrigerate my bacon wrapped in parchment paper, then placed in a small cotton sack, rather than in a plastic bag.  This allows air circulation and prevents mold and spoilage. [Note:  If  your bacon is properly cured and smoked, it will slowly continue to dry-cure when stored this way, turning into something rather like prosciutto or guanciale, the dry-cured Italian pork jowls; a few slices of this intensely flavored meat adds great depth to soups or stews, or can be thinly sliced and eaten on its own]  For freezing, use plastic zip bags.

[Note:  When I do demos like this I usually bring in pork belly in three different states of preparation:  raw, so folks can just see what the raw ingredient looks like; cured, having spent a day in a maple sugar and salt bath, because you can often see a change in the color and texture of cured meat from raw; and then I'll have a cured piece already in the smoker/grill so they can see the set-up.

When I get home with all these various meats, I'll usually freeze the raw belly, and the smoked piece becomes our in-use bacon, and then there's the cured but un-smoked piece left over.  Since by this time I've spent plenty of time having my person soaked in smoke, I usually turn that cured belly into roasted, smoke-free bacon--it's really a treat.

Pan Roasted Bacon simply involves cooking that cured belly slowly so that it has time to render a lot of fat and become tender, without burning the sugars from the maple syrup in the cure.  So, you just place the belly, fat side down, in a casserole or gratin dish, and roast it in a 300-degree oven for two to three hours, maybe more.  Turn it a couple of times while it roasts.  You should see a lot of fat rendering off, and the belly will turn a beautiful burnish golden brown.  After 2 hours it will be cooked, but you can let it go longer--depends on how tender you like it; I tend to cook it at least 3 hours.

And yesterday, since I'm mad for cooking on our new woodstove, I did a stovetop version that turned out great.  I placed the belly in a cast-iron skillet and let it sit most of the day on top of the stove, turning it from time to time.  I covered it at times, so it steamed a bit, and when the stove was too hot I set the skillet on a trivet.  At the end of the day we made Asian-style noodle soup with a broth made from the carcass of a smoked chicken (see below), with a couple of slices of that roasted belly on top, and we felt we were slurping in the best noodle shop around.]

[Note 2:  Since home-smoked bacon contains no unpleasant chemical ingredients, preservatives or colorings, the fat that accumulates when you cook it will be a lovely pure, creamy white, and full of flavor.  It's a great ingredient for cooking eggs or sauteing vegetables, or for using in place of shortening or oil in things like tortillas or biscuits.]

Smoke-Roasting


This is my own term for the process of grilling and roasting meats at somewhat higher temperatures than the hot smoked method described above.  I generally use it for pork—shoulder or country-style ribs—or chicken.  I have no specific recipes for this, because I tend to do it a little differently each time.  The basic method is this:
A few hours before you’re going to cook (or the night before), season the meat generously.  Salt is necessary, pepper is almost obligatory; I love thyme, so I’ll toss in a few sprigs of it most of the time—other herbs can also be used.  I may add a couple of crushed cloves of garlic, some sliced onion or shallot, sliced fresh or crushed dried chilies.  I’ll sometimes add spices like cumin, allspice, or fennel.  A spice blend that the French call quatre épices (“four spices,” though it often contains five or six) is excellent with pork or fowl.  Use it sparingly, as it can be overpowering.  This makes enough to last a good while:
           
2 teaspoons ground coriander
2 teaspoons ground allspice
1 teaspoon ground ginger
1 teaspoon ground cinnamon
½ teaspoon grated nutmeg
1/8 teaspoon ground cloves
           
 You can go for a dry rub, or more of a marinade, adding a bit of wine, beer, or cider, or just a little gloss of oil. 
            Prepare coals in your barbecue just as if you were going to grill, but spread the coals out over only half the grill.  Brown the meat well over direct heat, then move it to the area away from the coals.  Add some smoking wood to the coals, close the lid, and let the meat finish cooking in the smoky heat.  For either chicken pieces or country-style ribs, I’d give it at least 45 minutes, but a bit longer won’t hurt. 
            Sometimes at the end of the cooking I’ll boost the coals and crisp up the meat just prior to serving.  Smoke-roasted meats aren’t brined to the same extent as hot-smoked ones, and aren’t made for keeping.  Enjoy them hot from the grill, and use up any leftovers within a few days.

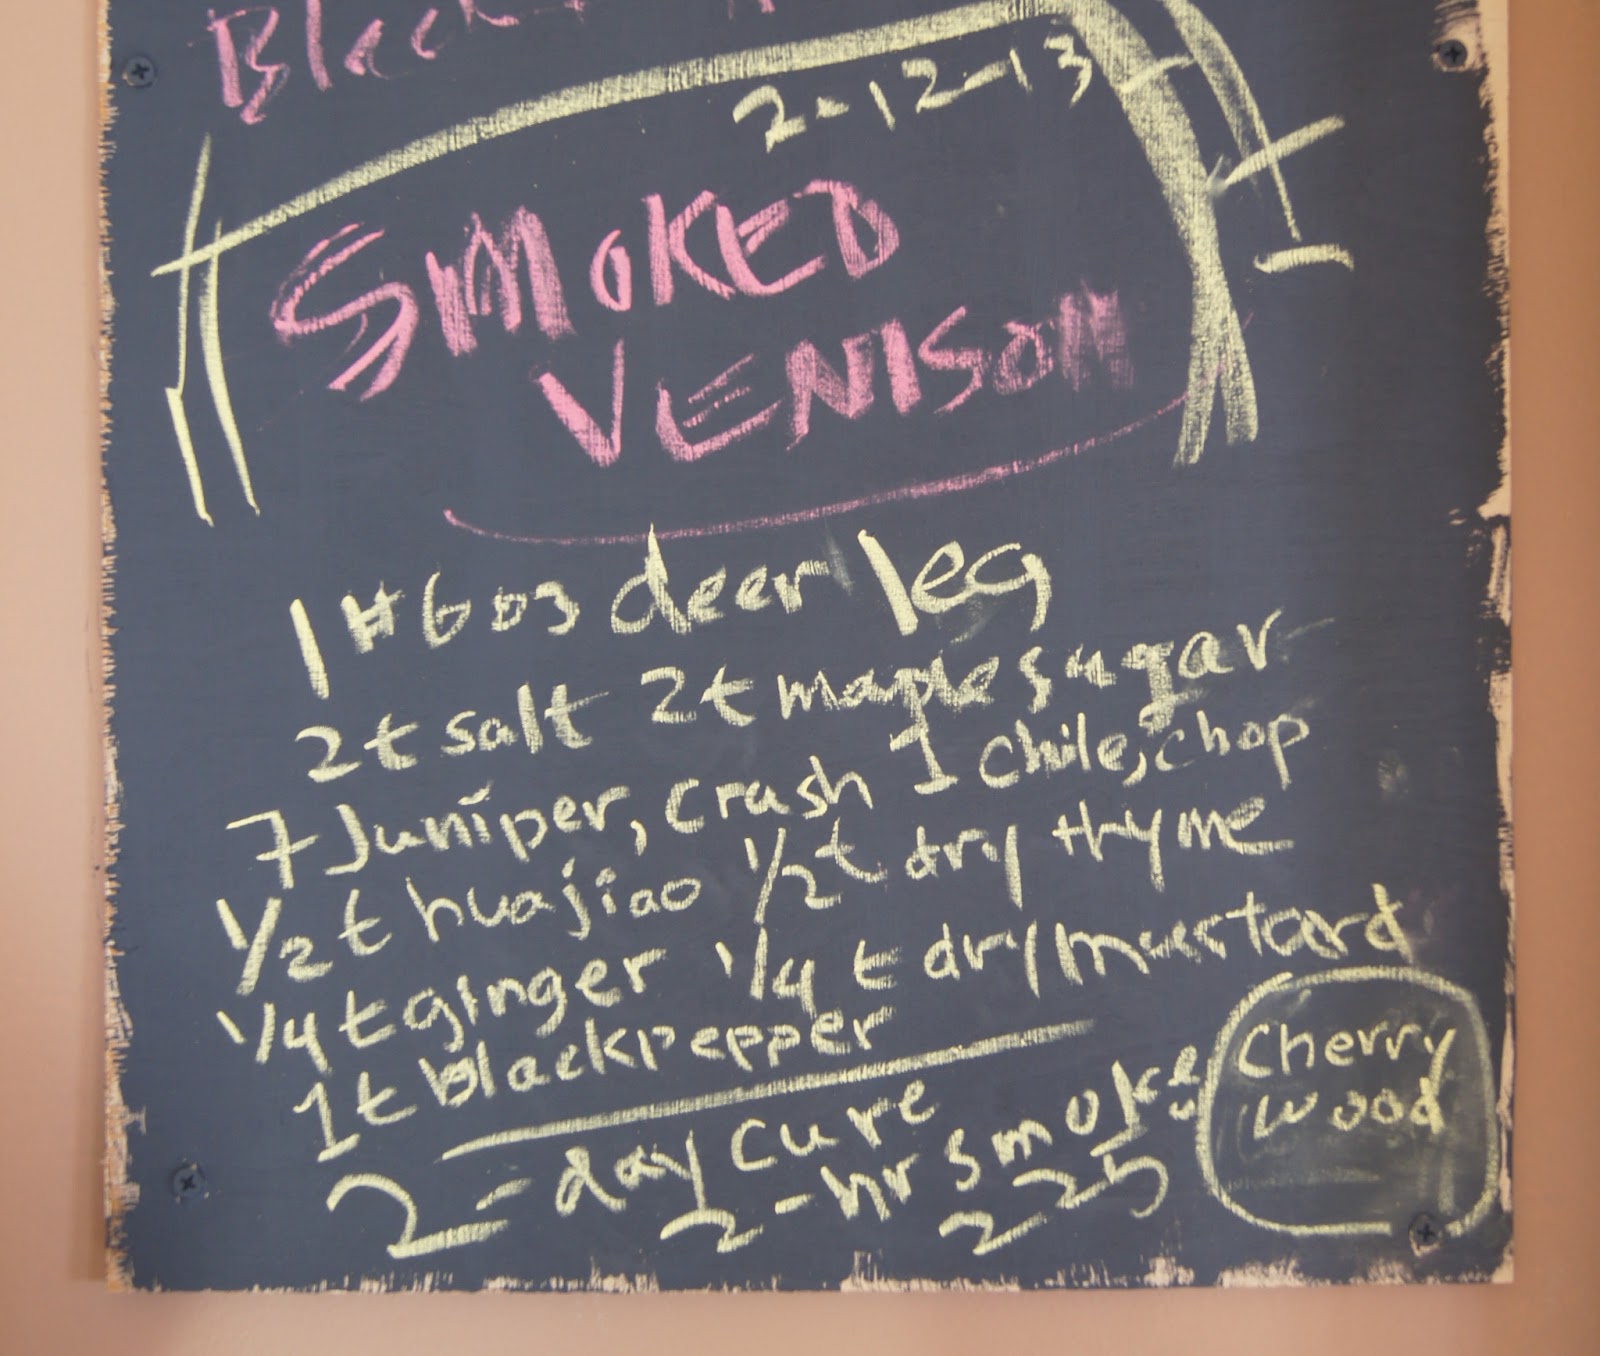
Smoked Venison “Pastrami”

2 teaspoons salt
2 teaspoons maple sugar or brown sugar
7 juniper berries, crushed
1 dried red chile, crumbled
¼ teaspoon powdered ginger
½ teaspoon ground roasted Sichuan pepper
½ thyme, fresh or dried
¼ dry mustard
1 teaspoon freshly ground black pepper
1 ½ - 2 pounds venison roast

Mix all the dry ingredients and rub them all over the roast.  Cover with plastic wrap and refrigerate for 2 to 3 days, turning a couple of time per day.  Smoke at 225 for 2 to 2 ½ hours.  I used wild black cherry wood when I made this, but any aromatic hardwood will work—apple, oak, maple.

Smoked Pork Shoulder Roast


1 tablespoons salt
1 tablespoon white or brown sugar
½ teaspoon dried thyme
½ teaspoon paprika
½ teaspoon freshly ground black pepper
1 – 2 to 2 ½ pound pork shoulder roast, with or without bone

Mix all the dry ingredients and rub the mixture evenly over the pork.  Refrigerate for at least 12 and up to 24 hours.  Smoke at 225 for 3 to 4 hours.  The internal temperature should be at least 160; finish in a low (250-275) oven if need be.

[Note:  This is excellent sliced thin and tucked into warm tortillas or Chinese steamed buns, with a fresh slaw and a bit of sauce or sour cream, depending on which ethnic direction you want to take it.  It's also wonderful served on a nice fresh roll, with perhaps a slick of mayo and some slices of dill pickle.

I prepared a small roast like this teh day before the class, to show and sample; it was the last preparation of the day, and well after dark by the time I got it going.  I smoked it for about 2 1/2 hours, then put it in the oven at 260 for an hour or so.  It turned out great.  I wouldn't call this dual-fuel method cheating, but rather, taking advantage of technologies both ancient and modern....  ]
 

Sichuan-Spiced Smoked Chicken

3 to 4 pounds chicken—you can use a whole, butterflied, or quartered chicken
1 tablespoon salt
1 teaspoon ground roasted Sichuan pepper
1 teaspoon freshly ground black pepper
1 tablespoon maple syrup
1 tablespoon soy sauce
1 dried red chile, crumbled
½-inch piece fresh ginger root, peeled and minced
3 garlic cloves, minced

Mix all the seasonings and rub the mixture over the chicken.  Refrigerate for 24 hours, turning the chicken occasionally in the marinade.  Prior to smoking, remove the chicken from the marinade and let it drain on paper towels.  Smoke at 250 for 3 ½ to 4 hours, until a meat thermometer inserted at the thigh reads 165. (You can put it in a 250-275 oven for the final hour--in fact, until you gain some experience with smoking poultry, I would recommend this method.  Undercooked poultry is something to be strenuously avoided.)

[Note:  This turned out a wonderfully fragrant and succulent bird.  I love Asian flavors in smoked poultry, but you could use more neutral seasonings if you like--white or brown sugar or honey could be used instead of the maple syrup.  If you omit the soy, add another 1 1/2 teaspoons of salt.  In summer I'll grab handfuls of fresh herbs for the marinade.

We've used this as a filling for steamed Chinese buns, and in quesadillas.  Yesterday, while the pork belly pan-roasted on the woodstove (see above), I also simmered a pot of smoked chicken stock which made the basis for a delicious noodle soup supper.  The concept was a chicken broth with pho-style flavors.  I stripped the meat off the bones and set it aside.  In a 3-quart saucepan I placed the bones, wing-tips, and some of the skin that had fallen off, along with:

several slices of fresh ginger root,
a couple cloves of garlic, crushed,
half an onion, sliced,
half a carrot, chopped,
2 or 3 whole cloves,
3 points of a star anise,
a teaspoon of whole Sichuan peppercorns (hua jiao),
a dried red chile, broken in half,
a few black peppercorns,
8-10 dried black mushrooms

I covered all with 2 quarts of water (about).  It simmered very gently all day.  It was reducing too much at the start so I added a little more water and covered it with the pot lid just ajar.  At the end I poured the contents of the saucepan through a colander into a big mixing bowl to remove the large solids, washed my saucepan, and poured the broth back into the pan through a sieve lined with a piece of old dish towel--this makes an excellent cheesecloth substitute, a superior one, in fact.  From the solids in the colander I retrieved the mushrooms, sliced them and returned them to the broth.

We boiled up some thin Chinese noodles, blanched some sliced red cabbage and julienne carrots; warmed some of the smoked chicken meat and slices of pork belly in a skillet; divvied it all up and garnished with sliced scallions and ground roasted Sichuan pepper.  I made a dipping sauce for the meats from soy, Chinese dark vinegar, sugar, chile oil, a minced clove of garlic, more Sichuan pepper, and I thinned it with a little water.] 


Beef Jerky


1 pound lean beef, such as top round
1 teaspoon salt
1 tablespoon soy sauce
1 tablespoon maple syrup
1 tablespoon canola oil
1 tablespoon water
1 teaspoon sambal oelek chile paste  (or sriracha, or a few shakes of Tabasco sauce)
1 clove garlic, minced
½ teaspoon freshly ground black pepper

Slice the meat against the grain into ¼-inch slices.  In a large bowl combine all the other ingredients.  Add the beef and mix well.  Refrigerate for 6 to 8 hours, stirring occasionally.
Lay the beef slices out on a metal cooling rack with a 1/2-inch or smaller grate.  It’s okay if they overlap a bit at the beginning, since they’ll shrink as they smoke, and you can spread them out partway through.  Place the rack on the grill grate in your grill/smoker.  Smoke at 225 for 2 hours, or until the jerky is done to your taste. You can finish it in a low oven to your desired chewiness.

______________________________________

Some material in this handout is quoted from Trout Caviar: Recipes from a Northern Forager by Brett Laidlaw, copyright 2011, published by the Minnesota Historical Society Press

All material copyright 2013 by Brett Laidlaw

Friday, February 22, 2013

Smokey Deer


We’ve been on a steady venison diet here lately, thanks to one happy occurrence—the generous gift of a leg of venison from a friend—and one less fortunate one—the freezer dying on our spare fridge in the basement.  The venison had been in our freezer since it was passed along to me last fall, and as I was going to have to thaw it out all at once, I was waiting for the right moment.  But sometimes you choose your moment, and sometimes it is thrust upon you.  Hence, necessity being the mother of invention and all that, I got to work processing.  I was not a very experienced deer meat cook when I walked upstairs with that dripping, leg-shaped package; I’m a much more confident one now.

In the last three weeks I’ve prepared venison goulash, seared rye-crusted medallions, and that pan roast, which I’ve put to use in numerous ways.  But by far the most interesting and delectable preparation was this smoked venison “pastrami”.


I started by breaking the leg down into its component muscle groups.  Not all cuts of meat consist of a single muscle, of course—many are cross-sections of several groups.  But I don’t have a meat saw, and taking it apart at the seams, as it were, was the easiest, most logical thing to do.  I wound up with about a pound and a half of the dense meat from the shank, and several nice lean pieces from the upper leg, each around a pound and a half, also.  What looked at first like an enormous hunk of deer flesh yielded 8 or 9 pounds of usable meat—oh, and another pound-plus of trimmings, which the dogs greatly enjoyed.


To see what I was dealing with, I sliced off a small piece from each chunk and fried them briefly to assess the flavor and texture.  There were variations—this one a little more tender, this one a bit livery, etc.—but all were relatively tasty and tender.  They were, in effect, no different from something like the sirloin or top round cuts of beef.  The shank meat was destined for goulash.  From the other pieces I selected one to do the pan roast, and set a long, tenderloin-shaped cut aside to make medallions, and the last piece, more or less rectangular and about two-inches thick in the middle, I decided to smoke.

I cured it with a dry rub, and went for some fairly aggressive seasonings.  Here’s the recipe (chalkboard paint is fun…):


Hua jiao, once again, is Sichuan pepper, in this case the dry-roasted and ground up kind.  Ginger is the dry spice, chile a dried red one.  I used locally produced maple sugar, but you could substitute brown sugar in the same amount, or maple syrup, say 1 ½ tablespoons.  I massaged the meat with the seasonings and stuck it in the fridge for a couple of days, turning it several times.  Not a lot of liquid came off. 

Then I smoked it in my trusty Meco grill for about two hours at about 225, and I used wild black cherry as the main smoking wood, something I haven’t tried before. The end result was a delightful confluence of happenstance and experiment. I had no idea what the final product would look or taste like.  It smelled fantastic coming off the grill, and when I cut into it I was amazed at the color.  The taste is deep, layered, mysterious, and wild, but with a delicate texture that makes it seem refined, as well.  Really cool stuff.  What it reminded me of most was pastrami, which is smoked corned beef, so I guess that makes sense.


I have cooked slices to serve with eggs and polenta, and that was good, but I think it’s best straight up, on a slice of toasted country bread.  The sauce gribiche variation I came up with to accompany it doesn’t detract.  This is a really good time of year to dip into the pickle pantry for fresh and crunchy flavors.  The rhubarb pickles I made last summer have mellowed really nicely.  The sauce is composed of:

A grated hard-cooked egg
Dollop of Hellmann’s mayonnaise
A minced pickled ramp and a little of the pickling brine
Same amount minced pickled rhubarb
6 or 7 minced milkweed bud “capers”
A half teaspoon or so of sambal

I’ll run down the other preparations in another report.  All were worth recreating.

Text and photos copyright 2013 by Brett Laidlaw


Thursday, October 4, 2012

Fried Trout & Chowder


The Feast of the Fishes continues as we work our way through my catch of closing week.  It was a remarkably benign week of weather for the end of September--a bit of a disappointment, really, as I enjoy fishing at least one day at season's end in a chill rain, which clears the river of most other fisherfolk, and seems to pique the trout's appetite.  With clear, sunny skies and daytime highs pushing well into the 70s, the weather didn't really make one think of chowder--except that mornings started out in the low 30s, and sunset saw the temperature drop quickly into the 40s.  It was weather I'd associate more with a high, dry mountain climate than with valley life here in Near North Wisconsin.  The long story short: though the afternoon sun had me thinking of grilling, I knew that by suppertime we'd be pulling on the wool socks and sweatshirts; so I made chowder.


My first thought as I started to prep the dish was to do something a little fancy, a bit "deconstructed," if you will--with large pieces of bacon and thick slices of potato in a sort of "chowder sauce," the fish cooked separately.  That proved to be just too much to think about at the end of the day, so I made a fairly traditional chowder. The only divergence was that I fried the fillets of trout and served them atop the chowder, rather than simmering the fish in the soup; I like the crisp skin of a well fried trout very, very much.

Oh, and I did get a bit creative with the garnish, because (all together now!), "It's all about the garnish!"  I peeled and seeded a Green Zebra and a red tomato and chopped these roughly--a concasse, which is a nice French cooking word to know.  I also fried some shredded kale in the pan I cooked the trout in, cooked it quite crisp.


I've heard brook trout referred to as "northwoods bacon," and with these little babies the analogy is easy to see.  It's especially nice when you can have bacon with your "bacon."  That's actually a brown trout tidbit I'm holding.


If you're not starting with whole fish, and therefore don't have the frames to add flavor to the soup, use fish, chicken, or vegetable stock instead of water--or just don't worry about it, as the bacon and all the vegetables will provide quite a bit of flavor on their own.


Fried Trout & Chowder


2 ounces slab bacon, cut into 1/2-inch cubes
1/2 small red onion, sliced longitudinally
1 small leek, well washed and sliced, white and light green parts
1/4 cup fresh fennel bulb in 1/4-inch dice
1/4 celery root in 1/4-inch dice
1 small jalapeno chile seeded and chopped fine
1 heaping tablespoon flour
1 1/2 cups water
1 1/2 cups whole milk
fresh thyme
salt and pepper
2 small trout, about 8 ounces each, filleted, save the frames
2 medium red potatoes, in 1/2-inch cubes
1 medium Green Zebra tomato, peeled, seeded, chopped
1 medium red tomato, peeled, seeded, chopped
6 leaves kale, thick stem removed, sliced into 1/2-inch ribbons


Start to render the bacon slowly in a medium saucepan over medium heat.  If the bacon is lean and not giving up much fat, add a bit of cooking oil.  Add the onion and leek as the bacon begins to brown.  Cook a few minutes until the onion is translucent.  Add the fennel, celery root, and jalapeno, and cook, stirring, for two minutes.  Sprinkle the flour over the vegetables and stir it in to the fat in the pan.  Cook, stirring, for about a minute.

Combine the water and milk and gradually add it to the pan, scraping with a wooden spatula to dissolve the flour into the liquid.  When all the liquid is added, add the fish frames--bones and heads--to the pan, bring to a boil, and simmer for 15 minutes.  Fish out the fish frames; save the cheeks for garnish.  Add the potatoes and a couple sprigs of fresh thyme.  Add a couple generous pinches of salt.  Simmer another 15 minutes or so, until the potatoes are tender.  Taste for salt and add a few grinds of black pepper.

Season the fillets with salt and pepper.  Fry them in just a bit of oil--or bacon or duck fat--over medium-high heat, skin side down, for about three minutes, until the skin is nicely browned.  Flip them and finish cooking flesh side down for about two minutes.  Add a little more oil or fat to the pan, and fry the kale until it is crisp.

Serve a ladle or two of the chowder out into wide soup plates, top with the fried fish, garnish with the cheeks, both tomatoes, and kale, and serve.

Wednesday, June 27, 2012

"It's as if there's something in there that you may never get again, so you don't want to eat it too fast, but you can't stop eating it."

Smoked Trout with Gooseberry Mayonnaise, Grilled Wild Oyster Mushrooms, and Garden Forage Salad


Sometimes the path to a delectable plate of food is short and direct, and sometimes it wanders through an unexpected forage, a sorrel juice swamp, fatigue-induced lowering of expectations, and several happy discoveries before arriving at its destination. This is a case of the latter circumstances.

 The first thing I must confess to: I DID NOT CATCH THE TROUT. No, indeed, I purchased it. Farm-raised rainbow trout from the  Bullfrog "Eat My Fish" trout farm south of Menomonie. See, a writer contacted me asking for a recipe to accompany an article on fly fishing along the Ice Age Trail in Wisconsin. I said, can do, but I didn't want to recycle a recipe. To come up with a new preparation, I needed trout. But with all the recent rain, our streams are flowing bank-full, unfishable. So it was off to the fish farm, which I'd been meaning to visit, anyway. It's a totally charming spot not far from the confluence of the Red Cedar and Chippewa Rivers, and I look forward to a return visit on a weekend when the music is playing and they're cooking up shore lunch trout fries.


I bought four fish. Two of them I grilled and served over market and garden greens with a bacon and spring onion jam. It was great, but that is not the dish I'm writing about today. With the two remaining trout, I had an ambitious plan: one I would grill, and serve with a gooseberry sauce that appears in Judith Jones's memoir, The Tenth Muse ; the other I would poach, and serve with a mayonnaise in which sorrel juice would take the place of lemon. The mayonnaise was an idea I'd been toying with since I started having fun with rhubarb juice. I'd been planning to make that complex meal on Sunday night.


Sunday morning Mary and I loaded the bikes on the car and drove to Downsville (not far from the fish farm, in fact) to take a ride on the Red Cedar State Trail--our first ride together of the year, and a perfect day for it. I had not planned to forage, but sometimes you seek out wild food, and sometimes wild food is thrust upon you. The first thing we encountered was elderberry bushes in bloom. No surprise there, as we had noticed the pretty white umbels along the roadways. We stopped to savor the flowers' delicate aroma, then moved on.


We didn't get far before the gooseberries caught our eye, big patches along a considerable stretch of the trail. We had no bags or other containers (except what our lunch was packed in), so we picked a few handfuls and dropped them into Mary's pannier. Black cap raspberries were also starting to ripen, and we tasted a few of those before moving on (I walked into a patch of wood nettles trying to get at some of the black caps, and was reminded that one ignores the stinging qualities of those innocuous-looking plants at one's own peril--I was scratchin' and pedalin', pedalin' and itchin'...).

We made it without further incident or delay to the end of the Red Cedar trail, where it joins the Chippewa River State Trail, very near where the two rivers meet. The Chippewa drains a considerable watershed, and it was high and roiling after all the June rain. Usually by midsummer the Chippewa meanders sweetly along broad sandy beaches--it always makes me think of the Loire River in France; if only west central Wisconsin were home to the lovely restaurant/inns that are so prevalent in the Loire. It's an up-and-coming wine area, but I honestly don't know where I'd go in this area to enjoy a meal with any kind of French finesse.

Well, we had sandwiches, hard-cooked eggs, and sweet little carrots from the farmers market. But before our déjeuner pique-nique, we were lured to the trailside bushes again by what I first thought were black currants, but which turned out to be ripe gooseberries--the two plants are, of course, very closely related. We picked gooseberries for a while, and also gathered about a cup of black caps--we ate the eggs as an hors-d'oeuvres to free up a container. The day's last foraging surprise came in the form of two clumps of white on a dead standing elm. I made a U-turn and quickly confirmed that they were oyster mushrooms. I used my bike pump to thrash a path through the nettles (succeeded in being stung, nonetheless--you can't say I'm one to learn from painful experience...), reached the tree, and was able to knock both clumps off with a dead branch--one flew off into the nettles, but the other I nimbly snatched before it hit the ground. Both were in reasonable condition (more than I could say for myself) when I put them in my bag--just a few of those beetles that seem to always inhabit oysters.


We ate our sandwiches in a shady spot where a spring trickled out of a limestone wall and made a little cascade as it flowed toward the river. We made it back to the farm in mid-afternoon (after a stop for a root beer float at the Menomonie DQ, utterly satisfying). It was a lot of sun and activity for us oldsters who hadn't been on the bikes much. I took a nap. When I got up I took a shower. I started thinking, grilled trout poached trout sorrel mayonnaise gooseberry sauce.... I started thinking, "Plan B." We had some chicken andouille in the freezer from Seward Co-op. I said to Mary, honey, we're having sausage tonight.

But the thought of those trout in the fridge was nagging me. I'd bought them on Thursday, now it was Sunday, three days later, and they still smelled fine, but another whole day.... I wasn't sure they'd be delicious simply grilled by Monday night. Into the brine they went, to get all tasty for a date with the smoker on Monday.

Late Monday afternoon I built a cottonwood fire while the trout rested after being removed from the brine. I love a homemade mayonnaise with smoked trout, and I still had that sorrel idea in mind. I gathered a few leaves of sorrel from the planter on our deck, chopped them roughly, whizzed them up in the mini-chop with a bit of water. Sieved the resulting slurry, and...oh, baby, that was some nasty stuff. The raw, unsweetened rhubarb juice was pretty harsh, but this stuff was in the chemical weapons department.  Once the initial shock subsided, I took another whiff. It smelled a bit like the rhubarb juice, and very, very strongly like fresh-mown grass--so I wonder if that was precisely the smell of chlorophyll.  I think I'm going to leave the sorrel alone until after a few fall frosts have mellowed it.

At any rate, we were now at Plan C level...or was it D? Enter gooseberries. Judith Jones's gooseberry sauce is an extremely basic concoction of berries, sugar, and water. Intriguing in its simplicity. I was still hankering for mayonnaise. So I took a half cup of gooseberries, half green and half ripe, and put them in the mini-chop with a quarter cup of water, whizzed it up, strained it. Gooseberries have a lot of pectin, so my juice was more of a puree. But it smelled and tasted good, tart but a little sweet. I added half a teaspoon of sugar. That gave me three tablespoons of puree.


I proceeded with my mayonnaise, omitting the mustard I usually start with.  My oil was half plain canola and half Smude cold-pressed sunflower oil.   It took a bit more whisking and slightest dribbling of oil at the start to get the emulsion started, and once started it was looser than usual, but that turned out to be a plus. When the oil was half in I added some of the puree, then near the end the rest, along with a couple pinches of salt. I separated the finished sauce into two ramekins, and to one added a few green gooseberries finely minced, so one ramekin was smooth and one was chunky. Mary and I agreed that we preferred the chunky. The gooseberry flavor was subtle, but there.  I think if I had cooked the berries briefly to extract more of a juice, it might have given a stronger gooseberry flavor, but I don't necessarily think it would have been better.


Here's what Mary said about this mayonnaise at dinner (and she had only had less than one glass of Sancerre--the perfect wine, as it happens, to accompany smoked trout with gooseberry mayonnaise): It's as if there's something in there that you may never get again, so you don't want to eat it too fast, but you can't stop eating it. 


As for the rest: The Bullfrog trout that we had grilled had seemed a little bland compared to stream trout; the smoked fish, however, was some of the best I've ever had. That had to do partly with the moist, fatty flesh of those rainbows, and partly with the cottonwood smoke, another happy accident brought about by the fact that we have all these cottonwood logs lying around the yard. I'd been impressed by the grilling qualities of the wood, so decided to give smoking with it a try. It had a subtler flavor than the apple I usually use, more like Pacific Northwest alder-smoked salmon. (I was about to write that that might make sense, since alder and cottonwood are in the same tree family, but a quick Google reveals that they are not closely related.) It was beautifully smoked fish, moistly sweet and savory, and delicious with a dab of mayonnaise or without.


The grilled oyster mushrooms: Mary said it before I could: Bacon for vegetarians. I had tossed them with a bit of sunflower oil, salt and pepper, and grilled them until well brown. Fungi cum bacon, say no more.

The salad: A proud achievement for us, our first salad entirely from our new gardens. It required a bit of foraging/weeding in the form of the succulent purslane, which will be appearing in many more salads this summer, as it is abundant in our garden, and delightful on the plate, with a refreshing crunch and a lemony twist. Pea tendrils, whoever knew you could eat these, back in the day? I first tasted them when I was teaching in Chengdu, more than twenty years ago, now, and then literally jumped for joy the first time I saw them at the Saint Paul Farmers Market. Now they're everywhere, and more than a bit trendy. I consider it forage, and delicious. Then some red leaf lettuce, bit of sliced radish.  It was dressed with some  Hay River Pumpkin Seed Oil, a bit of our homemade cider vinegar, and a little coarse salt.


 Many detours later, then, a memorable meal.  I hope to get back down to the Red Cedar Trail to gather more berries. Right at the trailhead there's a sign saying that the public is welcome to gather mushrooms, berries, and nuts from this state-owned land. It says to leave the flowers alone, so I'll get my elderflowers elsewhere. They're blooming like crazy now.


Text and photos copyright 2012 by Brett Laidlaw