Showing posts with label pickles. Show all posts

Tuesday, April 26, 2016

The Ramps Report 2016


Those of us who have been tuned in to the world of local and seasonal eating for a while probably have a complex, somewhat complicated relationship with ramps.  Those “wild leeks” of springtime that have perfumed loamy woodlands and Appalachian kitchens for generations in relative obscurity leapt into the culinary limelight 20 or so years ago, and have been hogging center stage ever since.  I recall seeing them mentioned more and more often in reviews of New York restaurants in the late 1990s, then noticing them for sale (at what seemed like an exorbitant price) in Twin Cities food co-ops, and then came the big Ah-ha! moment when, walking the banks of a favorite trout stream, I was brought up short by a powerful garlic-chivey smell and looked around to find that I was standing in a veritable field of ramps, their crushed leaves under my wading boots sending up what was, to me, an incredibly appetizing aroma.


Thus began my journey along what one might call the stages of grief/stations of the cross for ramp lovers in the foodie 21st century.  Fascination and infatuation at first meeting, then falling big time for this humble but compelling new crush; then the skepticism, eye-rolling at the sudden bandwagoning crowds, the farmers market shoppers clamoring, the fancy chefs pandering; disillusionment—was I a fool to fall so fast, so hard, for a love that had turned fickle and trendy?; then acceptance: hey, it’s a stinking wild onion, it’s delicious, and when you pick it yourself, it’s free, and ridiculously abundant when you know where to look—get over it. 


I’ve reached acceptance now, indeed, a state of near ramps nirvana, if you don’t mind my mixing gastro-religious metaphors in reference to a common woodland weed.  I went fishing with my friend Tom during Minnesota’s opening weekend for the regular (i.e., kill ‘em & grill ‘em, hook ‘em & cook ‘em) trout season a week ago Sunday, and while the fishing was pretty good, the foraging was even better.  The warm start to spring meant that the ramps were already well up and sizable.  We each took home a sack, and I’ve been cooking with them nearly every day since.

Opening weekend trout stream rice bowl with ramps, cress, and of course, trout, brown.

While I’ve come up with a number of ramp-specific recipes over the years, now I tend to treat them like any other allium (that is, onion or lily family member, ramps being allium tricoccum), as a versatile aromatic.  So I’ve sautéed them to build a nice base for ramen stock, thrown a handful into a quesadilla, strewn slivers atop a pizza, sweated with other aromatics to flavor a pilaf—you get the idea.


Yesterday I did a little pickling, putting up one pint of ramp bulbs per this versatile method, setting a quart to ferment in a simple salt-water brine.  Looking through my blog index I find that I might have more recipes involving ramps than just about any other ingredient.  As far as that gnarly, evolving relationship with ramps goes, I guess I’m fully committed.


Charred Ramp and Watercress Soup


I used Madeleine Kamman’s cabbage cream soup as a template.  Serves 2 as a main course, 4 as a starter

2 ounces salt pork or pancetta, in 1/3” dice (or 2 tablespoons cooking oil)
10 good ramps, well cleaned
1 small potato, about 4 ounces, peeled, cut in small dice, and rinsed, and well drained
4 cups loosely packed watercress (about 4 ounces), leaves and stems, well rinsed (especially if it’s wild cress) and roughly chopped
3 cups chicken stock
Salt and freshly ground black pepper

Optional garnish: croutons, good yogurt, cream, or thinned sour cream

Separate the ramp greens from the stem-bulb sections and set aside.  Slice the stem-bulb sections crosswise into 1/4-inch pieces.

If using salt pork/pancetta, render the pork cubes gently over medium-low heat until they have given up much of their fat and started to brown.  Remove the cubes from the pan and set aside.  Pour off—but save!—the fat, and return 2 tablespoons to the pan.
If you don’t have salt pork or pancetta, heat 2 tablespoons oil.

Turn the heat to medium-high and add the chopped ramps, then the potato.  Cook, stirring frequently, until the potato begins to brown and the ramp pieces take on color—indeed, we are looking for some of the ramp bits to become quite dark, even black.  Just don’t burn the crap out of it so it all turns ashy and bitter.

Getting good color.

When the potato is golden, the ramps nicely colored/charred, add the chicken stock, then the cress, a couple good pinches of salt, and a few grinds of pepper.  Bring to a simmer, cover, and cook at a gentle bubble for 10 minutes, stirring occasionally.

Chiffonade (cut in thin ribbons) the ramp greens, and add half of them to the soup at the end of the 10-minute simmer.  Let the soup cool for a few minutes, then purée, using either an immersion blender, a regular blender, or, with great care and caution, a food processor.

The soup can be made to this point up to several days ahead.  Just before serving, reheat the soup and serve garnished with the recrisped salt pork/pancetta cubes, croutons from good, honest bread, perhaps a swirl of yogurt (I’m fond of goat yogurt), and the remaining ramp leaf chiffonade, or as you please.


Text and photos copyright 2016 by Brett Laidlaw

Thursday, January 28, 2016

Zesty, Rootsy Winter Pickles


With fresh local vegetables becoming more and more widely available to us year-round, even here in the Frozen North, there’s no reason that pickling season has to end with the first frost.  Co-ops and winter farmers markets are burgeoning these days with locally grown vegetables in great variety.  Yes, they’re mostly roots, but what an abundance and variety of roots, from black, watermelon, beauty heart, and daikon radishes, to turnips in several colors, rutabagas, beets red and golden, celery root, sweet potatoes, carrots, parsnips.   

What’s great about this is:  Fresh, locally grown produce, in the middle of frikkin’ winter!  What’s less awesome is:  They’re all pretty much radishes and turnips!


Personally, I like radishes and turnips, but a steady diet of them through the long cold months becomes pretty monotonous.  A little pickling is a good way to change up the flavors and textures of these hearty, assertive roots.  And for winter pickling, I tend to lean to the East.  So here are two easy Asian pickles to make in small batches and enjoy alongside a bowl of ramen, a rice bowl meal, or as part of a regular Chinese meal, or just to nosh on at will. 


The first, Sichuan Pao Cai (Pickled Vegetables) is something I’ve made off and on for a long time, and something I would often order at the little restaurants in the alleys outside the university gates when I taught English at Sichuan University in Chengdu, waaayyy back in 1989-90.  A little dish of pao cai would be served bathed in chile oil (hong you) and a dash of soy sauce.  The pickles in Chengdu were always pink, I’m not sure why.  Recently I came across a fabulous recipe for a chile oil scented with wonderful aromatics.  I’m now addicted to it, and here’s the recipe, from Elaine Luo's excellent China Sichuan Food website--you'll find the red oil (hong you) recipe in the larger wonton recipe.

The other is a super quick pickle of thinly sliced radish (but you could sub/add turnip or carrot or what have you) in a simple mixture of soy sauce, vinegar, and sugar, with a little ginger and garlic for added depth.  To me, the sweet/sour/salty flavor combination of sugar/vinegar/soy is crazy delicious.  I could drink it like broth, but it would do weird things to the inside of my mouth, I fear, so I enjoy it in moderation and in pickles. 

This can be whipped up at the last minute, or made a day or two ahead.  It loses some freshness if left to sit too long, but it’s not going to go bad.  I often make up a small quantity to liven up rice bowl dinners.  With small radishes I tend to slice them very thin on the Benriner, while with larger radishes like a big daikon, I might shred instead.


Sichuan Pao Cai (Pickled Vegetables)

Makes one quart

You can use pretty much any firm vegetables in this pickle.  In winter it’s going to be mainly roots—red beets are the only one I would probably avoid; they would take over the pickle, both in color and taste, and also, they’re just not very Chinese.  In summer you could use green beans, cucumbers, peeled, diced broccoli stems, the thick white center rib of napa cabbage or bok choi.  My veg mixture for this batch was black radish, daikon, rutabaga, kohlrabi, cabbage core, and another radish, the one that’s pink inside, I don’t know the name, a friend had picked it up for me.  

This recipe is adapted from Mrs Chiang's Szechwan Cookbook, a key book in my cooking history.

4 cups firm vegetables in ½-inch dice, about a pound
6 – ¼-inch slices ginger root
2 or more dried red chiles—I used 2, as these particular chiles are VERY HOT!!!
½ teaspoon whole hua jiao (Sichuan peppercorns)
1 ½ cups water
1 tablespoon salt
2 teaspoons sugar
1 tablespoon rice wine or dry sherry
1 tablespoon cider or rice wine vinegar

Combine everything except the diced vegetables in a small saucepan, and heat just to dissolve the salt and sugar.  In a quart jar, layer ginger slices, chiles, and vegetables.  Pour in the brine, put a lid on it, and allow to ferment at cool room temperature for 3 or 4 days. You’ll see the brine start to become cloudy, and bubbles will rise from the depths when you open the jar.  When they are fermented to your taste, refrigerate.  The pickles will keep indefinitely.


Soy-Pickled Radish Slices

A mild radish, such as daikon or watermelon, is best in this pickle, which can be used almost right away, or refrigerated to mellow for a few days.  I used my Benriner Japanese mandoline to slice the radishes, but you can also slice them very thin with a sharp knife.

About 2/3 cup thinly sliced small radishes, or shredded larger ones
1 teaspoon finely shredded ginger root
1 small clove garlic, crushed, optional
2 tablespoons soy sauce
1 tablespoon water
4 teaspoons cider or rice wine vinegar
2 teaspoons sugar

Combine the radish slices, ginger, and garlic, and place them in a small jar—half-pint will do.  Combine the rest of the ingredients, stirring well to dissolve the sugar.  Pour this mixture into the jar with the radishes, put the lid on, give it a little shake.  Let stand at least 30 minutes before serving, or refrigerate for later use.  Will keep at least a week.

Friday, March 21, 2014

Fun with Fermentation 2014


I'm putting this up for those who attended my fermented vegetables session at the Hay River Transition Initiative's 2014 Green and Traditional Skills Day, or anyone else who's interested.

Here are some of my posts dealing with the topic:

Crock-fermented vegetables

Kimchi

Mixed vegetable ferment in a gallon jar

Sauerkraut in jars

Choucroute garnie


And here are the key books in my fermentation library:

The Art of Fermentation, Sandor Katz

Wild Fermentation, Sandor Katz

Wild Fermentation is more practical and recipe-oriented; The Art of Fermentation is encyclopedic.  I reach for Wild Fermentation far more often.

Preserving Food Without Freezing or Canning, the Farmers and Gardeners of the Terre Vivante Collective

Fascinating traditional preservation techniques from the French countryside.

The Joy of Pickling, Linda Ziedrich

My go-to book for all sorts of pickles, relishes, chutneys, etc., fermented and otherwise.

That should keep you busy for a while. Go forth and ferment!

Friday, December 13, 2013

Back With More Sandwiches


Where would this blog be without smorrebrod?  This year, at least, it would be pretty sparse.  Pretty sparser.

The open-face sandwich idea intrigues and delights me for three main reasons:

As a baker, I love pretty much any meal based on bread, and I enjoy the challenge of coming up with breads that work particularly well with this kind of dish.  In this case the bread was a sourdough rye to which I added some part-fermented apple cider and some Wisconsin sorghum syrup.  I used some starter I had sitting around on the kitchen counter for a while, not very well refreshed, so the dough was very, very slow to rise, especially now that the temperature in our kitchen is generally in the low 60s.  I decided to embrace the idea of slow bread.  I let the dough proof for over 24 hours, then put it in loaf pans where it rose at a glacial pace for several hours more.  And then I baked it in quite a slow oven, 350 if I recall correctly, adding steam both in the form of ice cubes tossed in at the beginning and middle of baking, along with a pan of water set on a rack under the stone.  It baked for around an hour, and the end result was a notable success, though I say so myself.  It just begged to be presented in an elegant Nordic fashion, so here we are.


As a cook, I find smorrebrod gratifying because of the way the bread canvas invites creativity in the toppings, which are not hidden as the filling in a regular sandwich would be.  Pretty much anything can serve as smorrebrod topping--vegetable salads, smoked or pickled fish, eggs, cheese, various sorts of charcuterie.  There's really no wrong topping except maybe PB&J, and someone could probably find a clever way to make that work, too.  This versatility makes smorrebrod ideally suited to local, seasonal eating, from early spring's first flush of wild foods through the garden glut of summer, harvest abundance, root cellar and pickle cabinet foraging.  The three sandwiches on the plate here all are based on meat:  a rustic paté of pork with chicken livers, bacon, and hickory nuts; a silky, rich chicken liver mousse; and wonderful venison backstrap roasted to medium rare in a salt dough.


And last, as an inveterate garnisher, I love the opportunity that smorrebrod provides to come up with finishing touches that complete the dish in both pretty and appetizing ways.  We have a joky saying here, "It's all about the garnish!"  And while plate prettifying can quickly turn precious, I think there's a serious point there.  In some ways it's the care taken in finishing touches that make the difference between a bowl of grub to be scarfed down and a plate of food that delights at many levels.  Garnishing, to me, really is an important part of cooking, and something quite different from slapping a sprig of parsley and a slice of lemon on every plate that leaves the kitchen.


For the venison, I more or less followed this recipe for venison baked in a salt-dough crust.  I didn't bother with searing the meat, and I skipped the sauce--though I did preserve the juices that gathered at the bottom of the crust, which I thinned with a bit of chicken stock to make a little jus in which I bathed my meat prior to placing it on the bread.  Before I wrapped the meat up in the salt dough, I rubbed it with a paste composed of garlic, thyme, parsley, black pepper, some home-ground chile powder, and sunflower oil.  I baked it at 375 for about 25 minutes, let it rest in the crust for 30 minutes or so after baking.  It was superb, and I would definitely do it again.  The salt from the crust permeated the meat without making it overly salty, and seemed to carry the other flavors from the rub deep into the meat.  The garnish here is a pesto of flat leaf parsley from our garden--the last fresh harvest before the brutal cold came down a couple of weeks ago--garlic, of course, lemon, Minnesota sunflower oil, and toasted hickory nuts.


The nuts were a delightful, surprising find, picked up at the little market in Ridgeland, the town nearest to us.  As we were checking out one day I noticed this plastic zip bag on the counter near the cash register and, ever-curious forager that I am, I took a closer look.  Turned out the bag was full of beautiful hickory nut halves, harvested from the market owner's in-laws' tree near Tomah, WI.  The bag held a pound of nuts for the amazing low price of $9.99.  Sold.  We've been enjoying these rich, sweet nuts in lots of different ways.  The flavor is like pecans but better, to my taste.


The chicken liver mousse I prepared following (again, more or less; I almost always stray from a recipe somewhere along the way) a recipe from Madeleine Kamman's In Madeleine's Kitchen.  It's an unctuous concoction of livers, a good bit of butter, shallots, onions, a splash of scotch whisky (my substitute for the called-for brandy), finished with some cream and sour cream that have been whipped together.  For seasoning I added thyme, a pinch of that home-ground chile powder mentioned above, Sichuan pepper (hua jiao), and a pinch or two of cumin.  The garnish here is all about our tree crops:  I combined chopped dried apple with apple cider vinegar and our maple syrup, set it on the warming ledge at the back of our woodstove for the apples to soften and take up the sweet and sour flavors.  Then I added chopped fresh apple and a pinch of two of salt, and a little more of that chile powder (it's so wonderfully sweet and fragrant, with a definite but not overpowering heat, I find myself putting it in everything).  It's a simple sort of relish or chutney, which cuts the richness of the mousse and complements its flavor wonderfully.  Big win.


The pork paté is a variation on this one I made a couple of years ago.  I used more of the hickory nuts in this one, in lieu of the chestnuts.  I skipped the breadcrumbs, used a bit more chicken liver, an additional egg yolk.  I put all the meats through the coarse grinder on my KitchenAid twice, then through the fine blade once; the texture of the paté is excellent, just what I'm looking for, and nothing that anyone would dare to call meatloaf.  The garnish here was a pre-made one, pickled cabbage and peppers from The Joy of Pickling.  It's kind of a sweet and sour pickle, made pretty much the same way as bread & butters.  With the rich and savory paté it was a nice change from the traditional cornichons.


We've been enjoying this little frenzy of charcuterie making for a week or so now, and at lunch today we inaugurated the freshly painted upstairs room where we had skylights installed last summer.  We just recently got trim put on the skylights, everything primed, then painted, including the very rustic floor.  We've done a lot to this house since we moved in, nearly two years ago now, but this room has probably seen the greatest transformation, from a veritable cave of a room to this light-filled space, cheering even on a dull gray day like today.  There's never an end to the projects with an old house like this, but it's gratifying to put on own stamp on our home.  In many ways it's already unrecognizable from the house we bought in early 2012; and yet, so much more to do....  Well, one thing at a time.


Text and photos copyright 2013 by Brett Laidlaw


Friday, February 22, 2013

Smokey Deer


We’ve been on a steady venison diet here lately, thanks to one happy occurrence—the generous gift of a leg of venison from a friend—and one less fortunate one—the freezer dying on our spare fridge in the basement.  The venison had been in our freezer since it was passed along to me last fall, and as I was going to have to thaw it out all at once, I was waiting for the right moment.  But sometimes you choose your moment, and sometimes it is thrust upon you.  Hence, necessity being the mother of invention and all that, I got to work processing.  I was not a very experienced deer meat cook when I walked upstairs with that dripping, leg-shaped package; I’m a much more confident one now.

In the last three weeks I’ve prepared venison goulash, seared rye-crusted medallions, and that pan roast, which I’ve put to use in numerous ways.  But by far the most interesting and delectable preparation was this smoked venison “pastrami”.


I started by breaking the leg down into its component muscle groups.  Not all cuts of meat consist of a single muscle, of course—many are cross-sections of several groups.  But I don’t have a meat saw, and taking it apart at the seams, as it were, was the easiest, most logical thing to do.  I wound up with about a pound and a half of the dense meat from the shank, and several nice lean pieces from the upper leg, each around a pound and a half, also.  What looked at first like an enormous hunk of deer flesh yielded 8 or 9 pounds of usable meat—oh, and another pound-plus of trimmings, which the dogs greatly enjoyed.


To see what I was dealing with, I sliced off a small piece from each chunk and fried them briefly to assess the flavor and texture.  There were variations—this one a little more tender, this one a bit livery, etc.—but all were relatively tasty and tender.  They were, in effect, no different from something like the sirloin or top round cuts of beef.  The shank meat was destined for goulash.  From the other pieces I selected one to do the pan roast, and set a long, tenderloin-shaped cut aside to make medallions, and the last piece, more or less rectangular and about two-inches thick in the middle, I decided to smoke.

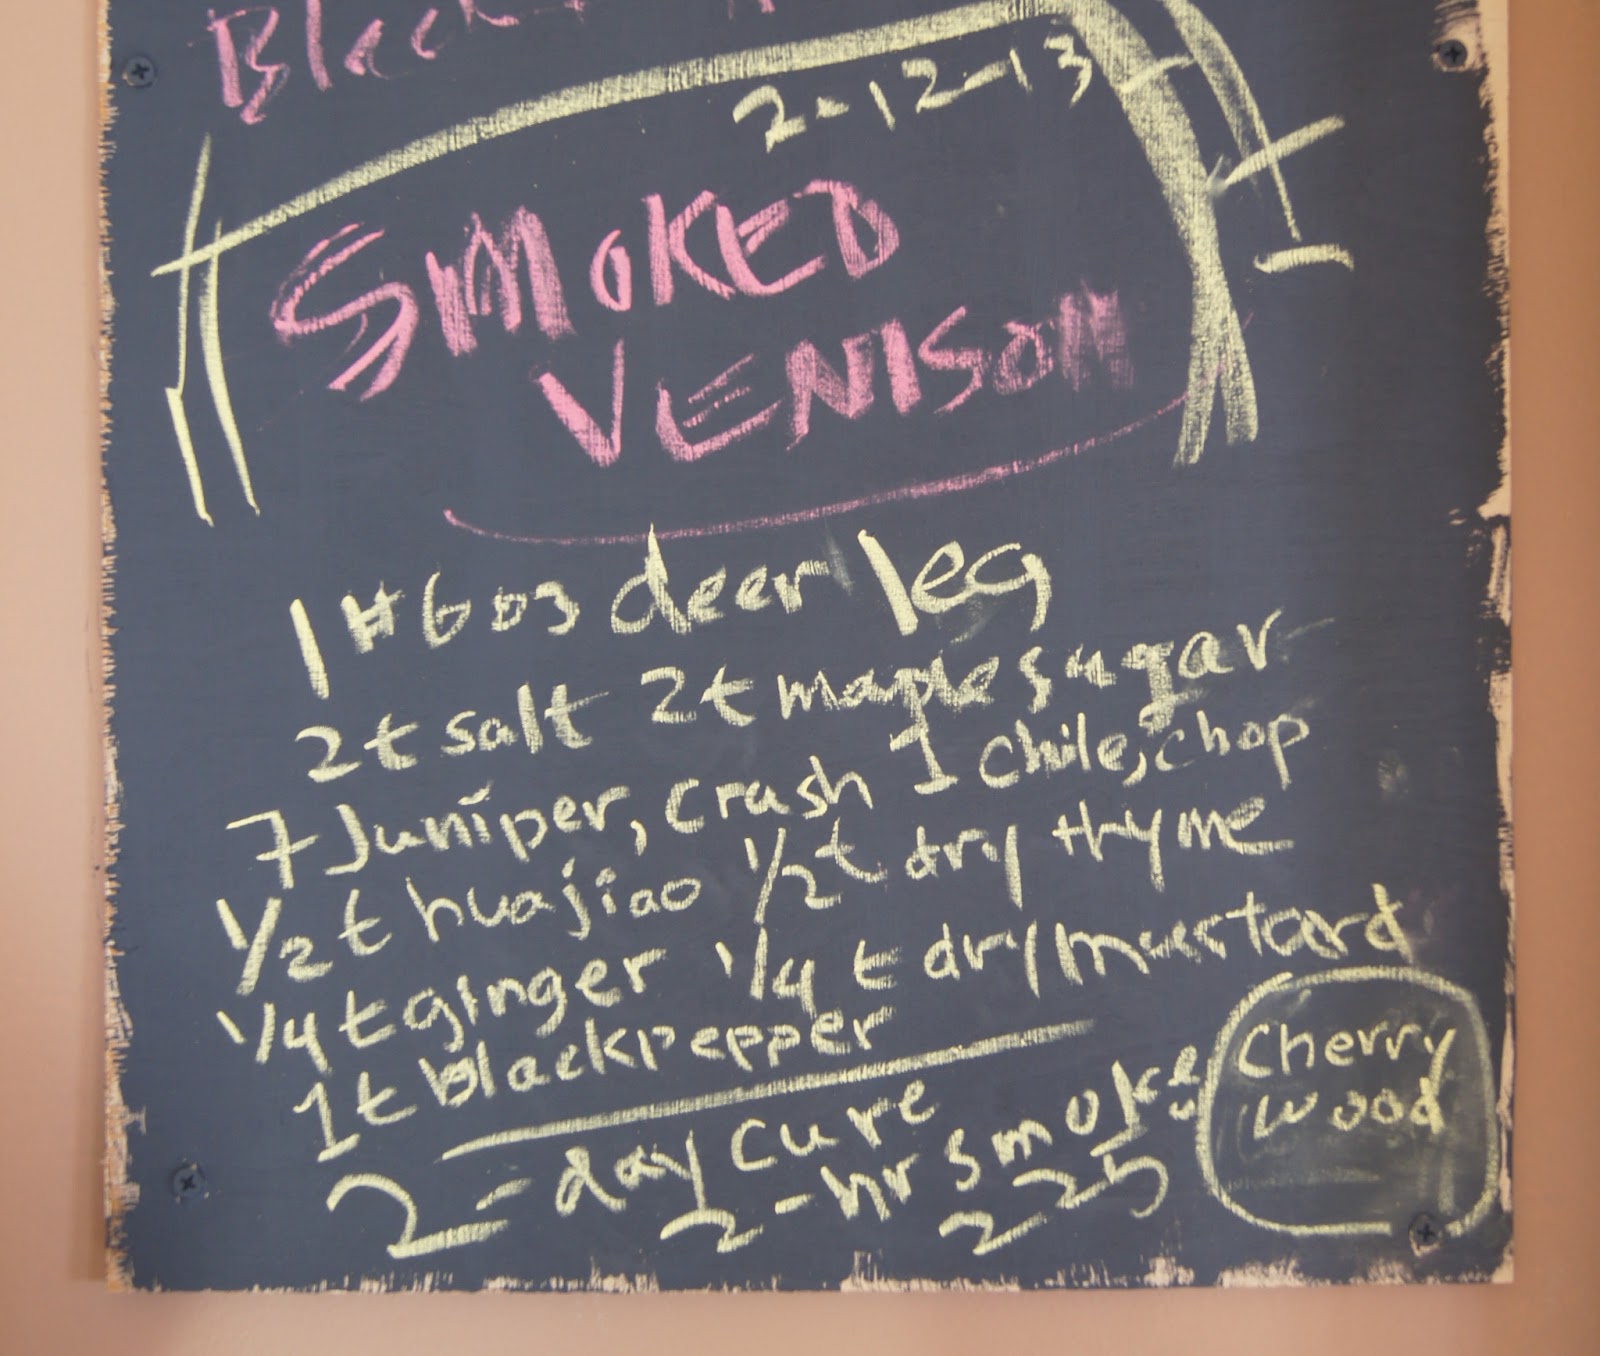
I cured it with a dry rub, and went for some fairly aggressive seasonings.  Here’s the recipe (chalkboard paint is fun…):


Hua jiao, once again, is Sichuan pepper, in this case the dry-roasted and ground up kind.  Ginger is the dry spice, chile a dried red one.  I used locally produced maple sugar, but you could substitute brown sugar in the same amount, or maple syrup, say 1 ½ tablespoons.  I massaged the meat with the seasonings and stuck it in the fridge for a couple of days, turning it several times.  Not a lot of liquid came off. 

Then I smoked it in my trusty Meco grill for about two hours at about 225, and I used wild black cherry as the main smoking wood, something I haven’t tried before. The end result was a delightful confluence of happenstance and experiment. I had no idea what the final product would look or taste like.  It smelled fantastic coming off the grill, and when I cut into it I was amazed at the color.  The taste is deep, layered, mysterious, and wild, but with a delicate texture that makes it seem refined, as well.  Really cool stuff.  What it reminded me of most was pastrami, which is smoked corned beef, so I guess that makes sense.


I have cooked slices to serve with eggs and polenta, and that was good, but I think it’s best straight up, on a slice of toasted country bread.  The sauce gribiche variation I came up with to accompany it doesn’t detract.  This is a really good time of year to dip into the pickle pantry for fresh and crunchy flavors.  The rhubarb pickles I made last summer have mellowed really nicely.  The sauce is composed of:

A grated hard-cooked egg
Dollop of Hellmann’s mayonnaise
A minced pickled ramp and a little of the pickling brine
Same amount minced pickled rhubarb
6 or 7 minced milkweed bud “capers”
A half teaspoon or so of sambal

I’ll run down the other preparations in another report.  All were worth recreating.

Text and photos copyright 2013 by Brett Laidlaw


Friday, June 1, 2012

Country Lunch


I didn't do any plowing (much less ploughing) this morning, but I did haul a couple of loads of stuff to the sheds (still unpacking and organizing here), set up the compost bin, did some soil mining (digging topsoil from the pasture to fill planters and raised beds), and planted a washbucket full of herbs (chervil, basil, thyme, parsley) on the deck, so I was feeling pretty accomplished, and very hungry.  I felt I had earned a ploughman's lunch.


Some leftover biscuits (Mary's delectable handywork) I set to warm in the solar oven (Mary also made that, at a  Hay River Transition Initiative workshop a couple weeks ago).  Sliced some lovely aged cheddar and threw down a few curds.  Spooned up a newly minted salsa composed of  pickled rhubarb, pickled ramps, and dried apple.  I was thinking of this as a chutney originally, but since it's entirely uncooked, I think salsa, or maybe relish, is the more apt term.  Here's how that came together:


1/2 cup chopped dried apples
3 pickled ramp bulbs and
1/4 cup pickled rhubarb, both chopped small
1 tablespoon of the ramp brine
1/2 tablespoon of the rhubarb brine
1 tablespoon sunflower oil

Mix all let sit and few hours or overnight.

A glass of our home-fermented cider was de rigeur.  This was actually cold-fermented cider, which is to say:  it was simply fresh apple cider that hung around in the fridge long enough to ferment, turn slightly fizzy and a bit alcoholic.  That's how simple cider making can be.  If you want to try this yourself, just be sure to check on your fermenting cider occasionally and take off the cap to release excess pressure.  This makes a really refreshing beverage provided you've started with excellent, unpasteurized cider free of preservatives.

I think that pickles fall into roughly two categories, in terms of how they are used:  there are those meant to be eaten as is, such as bread & butters, sour dills, watermelon pickles, etc.; and there are those that are most valuable as ingredients in other dishes.   Some pickles--cornichons, for example--go both ways.  The rhubarb and ramp pickles definitely fall into the second category.  I can't see myself going to the fridge to grab a snack of a ramp bulb or rhubarb stick, but they'll be great to have on hand to add zip and flavor to dressings, potato salads, sauces and relishes.

Right.  That was really good.  Now, where did I put my plough?


Text and photos copyright 2012 by Brett Laidlaw

Wednesday, May 23, 2012

A Bit of a Pickle


Just a bit, nothing too strenuous.  This is how I like to can, a couple pints, half-pints here and there, and by the end of the summer I usually have a good assortment.  Pickles are amusements; they should be as enjoyable to make as they are to eat (that's right, like Jiffy Pop).  I did two half-pints of ramp bulbs today, and a pint each of asparagus and rhubarb.  The ramps will be garnish for Ramp-A-Tinis (a wild Gibson), and will be chopped to make pickled ramp ranch (originally a David Chang  concept, which I adapted into a rhubarb ramp ranch inspired by Tory Miller's Madison restaurant Graze; I offer this in full disclosure, as I've been spouting off about bloggers adapting recipes on another site recently)  .

But let's get on with it, or I'll spend more time describing the pickles than it took to make them.  The asparagus is also an excellent cocktail garnish (vodka martini, bloody mary), and will certainly be welcome on a Thanksgiving relish tray.  The rhubarb--who knows.  I had a bit of brine leftover, we have this giant rhubarb patch, it seemed worth a try.

The brine:

2 cups water
1 cup cider or rice wine vinegar
3/4 cup sugar
Scant 2 tablespoons salt
3 whole cloves
2 small dried red chilies, seeds removed (or leave them in if you like it really hot)
1 teaspoon black peppercorns

Combine all in a non-reactive saucepan and bring to a boil.  My method tends to vary, but what I did today was to add the ramp bulbs as the brine came to a boil, and blanch them for a couple of minutes.  Then I turned the heat off, added the asparagus, and left it for just a minute.  Prior to the blanching I had trimmed the pieces so they would fit their respective jars, half pint size for the ramps, pint for the asparagus.

For the rhubarb, I set the cut-to-length pieces flat side down and halved them the long way, to allow the brine quicker and fuller access.  I'll let you know how it turns out.

Don't let pickling intimidate you, it needn't be daunting.  I don't bother to process these kinds of pickles, usually; I just pop them in the fridge and check back in a week or two to see how they're coming along.  Small batch pickling is, literally, no sweat.

Text and photos copyright 2012 by Brett Laidlaw

Thursday, July 7, 2011

Tasty Buds


I'm going to make a bold prediction:  milkweed will be the new ramps, the hot wild food that will grab the attention of chefs and home cooks alike.  And may I say, should this come to pass, it will be long overdue.  Whether you love, loathe, or linger in indifference toward ramps, it's hard to dispute the fact that they have become a bit overexposed, have held an exceedingly long reign over our springtime culinary imagination.  I think this may be because, as wild foods go, ramps are particularly reliable, abundant, and affordable.  Not everyone will shell out the $30-plus a pound for wild mushrooms, but a bunch of ramps at $2.50 per gives a lot of flavor for the dollar. 

Restaurant chefs know exactly when they'll be able to get ramps, and the cachet this wild springtime food gives to local-seasonal menus is a bargain for them, as well.

Milkweed is equally abundant as ramps--maybe moreso--it has a longer season, and it's edible in several forms, from shoots, to buds, flowers, smallish pods, and the immature silk that Sam Thayer calls "milkweed cheese."  It is, indeed, thanks to Thayer that I, and many others, have come to know and appreciate the culinary qualities of this long misunderstood plant.  It was thought for a long time, and by many so-called experts (including the venerable Euell Gibbons), that milkweed was inherently bitter, and that any form of it therefore required cooking in several changes of water simply to make it palatable.  In a thorough and utterly convincing essay (the first of his work that I encountered), Thayer laid that notion to rest.  I won't bother to paraphrase further what you can read for yourself right here.

So far the milkweed parts I've worked with have been the flower buds and small pods.  Our Wisconsin land must be rife with the shoots in spring, since it's rife with mature plants right now (our Saint Paul front yard has a nice crop, too), but I haven't managed to catch them at that stage.  What I've mainly done with both buds and pods, other than just munch on them, desultorily, during walks around our land, is to pickle them.  That's how I spent most of my day today.


I gathered maybe a quart of the bud heads (I doubt that's botanically accurate, but it will do), giving each a little shake as I picked it to dislodge any insects--many insects like milkweed, not just monarch butterflies.  My fingertips became sticky with the latex that gives milkweed its name, but I was able to rinse it off easily when I was done; I believe that Thayer reports a somewhat caustic effect from longer exposure of skin to the latex.  Once I got the buds home, I rinsed them thoroughly, then chilled them in the refrigerator overnight.  That actually seemed to have firmed them when I came back to them.  This afternoon I used a paring knife to cut the buds off the flower head, a pleasant little chore accomplished while watching "The People's Court."  I didn't bother about the little tails that remained attached to the buds; they're edible, as well, and likely will largely disappear after pickling.


I applied three different methods to preserving them. First, I took about three-quarters of a cup of buds and mixed them with nearly a tablespoon of coarse salt--fleur de sel, in my case. I bottled them and will refrigerate them. I imagine these may ferment somewhat and develop a bit of pungency with time. I hope so. Another cup I immersed in the sweet and sour and salt brine described here--I used the larger, "purpler" ones for this; these ready-to-open buds had a slightly sweet and floral taste that I thought might come through in that brine. The rest, a scant cup, I will prepare in the "cornichon method" also described in that post.

The flavor of unseasoned milkweed is nowhere near as assertive as that of ramps--but then, outside the allium world, what is?  It's mild, green, a bit like lightly steamed green beans, I'd say.  The buds have a nice crisp "pop" when you bite into them, the small pods, as well.  Up to an inch or so in size the pods remain tender enough to steam or stir-fry.  The uses of the silk, that "cheese," I have yet to explore.

I've been calling these pickled buds milkweed "capers," but I think I'll drop that term.  Nonetheless, you can use them in most of the places you'd use something like a caper--in salad dressings, to flavor an egg salad or deviled eggs, sprinkled over grilled or fried meat or fish.  I'm going to mix some into mayonnaise tonight, along with some chopped pickled ramps, to make a wild tartar sauce to serve with fried whitefish.

I would never advise anyone to use this blog, or any simple descriptive or photographic source, as a field guide to wild edibles--always consult a good field guide or two or four, or a trusted friend who knows about these things.  That caution registered, milkweed is among the easiest of wild foods to identify.  The buds will be on the plants for another week or two.  As you can see from the photos here, some have already bloomed.  It's not the sort of thing one wants to subsist on, but milkweed provides many opportunities through the spring and summer to get a delightful, safe taste of wild foods.

Milkweed:  It's the new ramps.  You read it here first.


Text and photos copyright 2011 by Brett Laidlaw

Wednesday, July 6, 2011

Quick, Pickle! (Freezer Dill Cukes in Strawberry Vinaigrette)


I got thinking about pickles thanks to my friend Tom's recent post over at marthaandtom.com .  There hasn't been a lot around to pickle so far this year.  I did up a jar of ramps earlier in the spring, and I wanted to do some asparagus, but thought I might have missed the boat.  The Minneapolis Farmers Market came through for me--at the North Lyndale site on a weekday morning I was able to find excellent asparagus, along with hothouse cucumbers, snow peas, strawberries, and green garlic.  All of the above were put to use in a quick pickling session that produced a half pint each of pickled asparagus and snow peas,* and a quick cucumber pickle inspired by my friend Tata's method (see below).

The asparagus and snow pea pickles were quick in that they took little time to make, though they need to cure a few days to develop best flavor.  This is my main pickling M.O. these days, a sort of stealth/guerilla approach that allows me to get some pickles in jars before I realize I'm "preserving" or embarking on a "canning" endeavor. 


Fact is, I rarely process anything anymore (and never much did).  I don't make large batches of anything, prefer freezing my excess tomatoes rather than canning them, and have an extra fridge in the basement, purchased to hold cases of butter and many dozens of eggs during our market baking days.  So the few jars of cornichons, bread & butters, ramps, etc., that I put up go into that basement fridge, where they keep just fine.  If our apple and blackberry crops come through this year, as it's seeming they will, I'll devote a few days to jam and jelly making, for sure, but the processing kettle doesn't really see a lot of use here.

The strawberries hereabove mentioned didn't get pickled, per se, but they did meet up with vinegar and other things in a dressing for a rather oddball, but tasty and refreshing, salad.  We've had really, really fragrant, wonderful strawberries this year, mainly from Wisconsin, and I'd been thinking about ways to use them other than the usual sweet applications--not to say I have anything against strawberry shortcake, strawberries over ice cream, or, in an inspired Bide-A-Wee breakfast one-off, butter-toasted croutons with strawberries, cream, and maple syrup.

The notion of a strawberry vinaigrette intrigued me, but I didn't know what to serve it with.  I thought of blanched English peas, but they didn't seem substantial enough, and I thought the dressing would slide right off those smooth little orbs; snow peas, likewise, seemed too slippery.  I was stymied.  Then I read Tom's post, and I remembered Tata's quick freezer pickles, and I thought, Hmmm....  Seemed dicey, but if I wanted to use the strawberries in a savory way, I couldn't hedge my bets.  I can well imagine that the combination of strawberries, dill, and garlic will turn a few heads, but stick with me a minute. 

I think this hinges on how we think of fruits and their uses, and how we categorize flavors.  I got the idea last summer to put cucumbers and crab apples together in a pickle, and it was wonderful.  I thought then, and I was thinking in preparing this salad, that I was combining disparate elements, fruit and vegetable, but then I thunk again:  I do not know how all this shakes out botanically, but a cucumber is by nature what we widely consider a fruit, to wit, a melon.  It's a pale watermelon without the sweetness.  It's a juicer, milder zucchini.  In Chinese, of which I know a smidgen, and most of it food-related, the relationship is clear:  cucumber, huang gua (yellow melon); zucchini, nan gua (south[ern] melon); winter melon, dong gua (winter melon).  (I don't know what the Chinese for watermelon is, but I'm going to fling out a guess:  xi hong gua, literally "western red melon."  I'll Google it later.)  A salad of watermelon with feta cheese is in danger of becoming a cliché before it's time; strawberries and cucumbers might just work.

In fact, it worked very well indeed.  Combined with tart and savory things in the dressing, the berries expressed their tart and fragrant side.  Napping the chilled, salty, garlicky cukes, the vinaigrette provided a delightful counterpoint.  I think this would be good on blanched or quick-pickled green beans, too.  Perhaps they'll overlap for a week, so I can give that a try.

I tried the combination in a different variation this past weekend at Bide-A-Wee, tossing cucumbers with green garlic, goat yogurt, cider vinegar, olive oil, salt and pepper, and topping that with sliced strawberry and salted milkweed flower buds--excellent.

It's worth noting that these quick salted pickles contain no vinegar--the combination of a vinaigrette on a vinegar pickle might be a little much.  Perhaps some intrepid soul will try that out and report the results.

The freezer pickles are good on their own, beside a burger or sandwich (hell, I'm sure you know how to eat a pickle...).  The dressing, too, could simply go over mixed greens--a gutsy salad, with some arugula, cress, mizuna, mustard, what-have-you, would be best, I think.


Strawberry Vinaigrette

1/2 cup chopped very ripe strawberries
1 tablespoon cider vinegar (preferably unpasteurized)
3 tablespoons canola or grape seed oil
1 teaspoon honey
pinch salt
a few grinds of black pepper
a good pinch of espelette or cayenne pepper

Combine all in a blender or mini food processor.  Blend until smooth.

Tata's Quick Freezer Garlic Dill Pickles

1 large cucumber
a few sprigs of fresh dill, chopped
2 cloves garlic, thinly sliced
coarsely ground black pepper, about 1/2 teaspoon
1 teaspoon salt
 Coarse salt, like French gray sea salt, or fleur de sel flakes

Peeling lengthwise, take a few strips of the cucumber skin off with a vegetable peeler, leaving a few strips of skin intact, creating a striped effect.  Halve the cucumber lengthwise and remove the seeds.  Cut each half into three long strips, then cut the strips into two-inch lengths.  In a quart zip bag combine everything but the strawberries, close the top and mix everything together thoroughly.  Place the bag in the freezer for 23 minutes.  Remove the bag from the freezer and mix again.  Leave it in the fridge until you're ready to finish the salad--or just use it as a pickle.

To make the salad, dump the cucumbers into a mixing bowl, dill, garlic, and all.  Pour off any liquid that has accumulated.  Toss with the vinaigrette.  To each portion add a few slices of fresh strawberries and a sprinkle of coarse salt.  Serve.

______________________________
*I put up the asparagus and snow peas in the brine described here , except that I made the brine with a little more salt and a little less sugar than that recipe calls for. Also, to the asparagus I added chile, garlic, black peppercorns, and a good sprig of dill (volunteering willingly in my garden this year); to the snow peas I added chile, garlic, Sichuan peppercorns, and a couple slices of ginger. A jar of each was quick to make, though these are not "quick pickles" in the way Tom uses the term. They need to cure for a week or so to be really nicely pickled, and I'll just keep them in the fridge and use them up within a few weeks.


Text and photos copyright 2011 by Brett Laidlaw

Friday, March 18, 2011

Am I Blue?/Treasure from the Larder


To end the week simply and cheesily: A lovely wedge of Ader Kase Reserve from Seymour Dairy Products over in eastern Wisconsin, Outagamie County. Salty, tangy, rich and creamy. Nice cheese. Accompanying, pickled crab and ramp chutney, a snap to make if you have the pickles.

Here's how you do the ramps.

And here the crabs.

We'll be back in the woods harvesting ramps again in no time. The crabs will be a bit longer. Pruning is on tap for this weekend; tapping is on tap, too, as it's maple syrup time.

Sappily yours,

Brett


Pickled Crab & Ramp Chutney
Makes one half-cup

Treasure from the larder. Excellent with a wedge of blue cheese at meal's end, as consort to a grilled cheese sandwich, or alongside pork any way.

5 or 6 pickled ramp bulbs, rinsed, cut in half the long way, sliced 1/4-inch thick (1/4 cup)
1 tablespoon canola or sunflower oil
4 or 5 pickled crabapples, cored and chopped, 1/2 cup
Pinch salt
2 tablespoons liquid from the pickled crabapples
2 teaspoons liquid from the pickled ramps

Cook the ramps very gently, without browning, until they start to soften, four to five minutes. Add the rest of the ingredients, and simmer very gently, uncovered, stirring frequently, until the chutney thickens, three to five minutes. Remove to a small bowl, cool, cover, and refrigerate. Best if it sits for a few hours before serving.


Text and photo copyright 2011 by Brett Laidlaw


Thursday, February 17, 2011

Escabeche, A Pretty Little Pickle


We're safely past the midpoint of February, and the big thaw continues. I'm hoping to be able to pluck the first wild watercress of the year this weekend, and getting some seeds started--for leeks, head lettuces, cabbage--may be optimistic, but not out of the question.

The root cellar continues to provide carrots, squash, potatoes, parsnips, leeks; from the freezer, tomatoes, wild mushrooms, corn; the fruits of my fermentations still give us sauerkraut, red kale/kimchi/seaweed, and sour beets. It's all good, and a good variety, when you look at it. Nothing could tempt me to indulge in asparagus or green beans, from the grocery store. For one thing, it wouldn't be an indulgence--those spring and summer veg in winter always taste weird to me. (I'll confess a weakness for guacamole, though; the avocadoes have been really good lately.)

What I start to miss this time of year is the freshness, the brightness of vegetables straight from the garden or market. The braising pot is my dear friend, but now and then my teeth need a workout, my palate needs a jolt.

Enter the escabeche: I'm sure I use the term quite loosely. It's generally applied, I think, to fried fish added to a vinegary marinade, then cooled. Or it may mean the marinade, per se. Which may include vegetables, or not. For me it's a quick hot pickle, eaten immediately, though it will keep. (Something about the word itself makes me think of fast: Vite, vite! Pronto! Escabeche!) It is particulary good with fish, like this trout with springtime escabeche of ramps and asparagus.

And then the other night we were preparing to broil a couple of Lake Superior herring fillets that would be served with a mildy hot chili oil vinaigrette (I'm cravin' a lot of spice these days), and I wanted something fresh and crunchy and tart.

Down to the basement for a carrot and a parsnip. Cuisinart makes a rare appearance: into the tube, slicer attachment installed, a carrot, a small parsnip (both peeled), a large clove of garlic, a small red onion.

Dump all that into a small saucepan, add about three tablespoons of olive oil, half that of cider vinegar, and some chili--I'd been soaking some lovely chilies kept from the market last summer, Red Rocket, I believe, so I added one of those, chopped. You could crumble in any dried red chili, heat to suit, or add a teaspoon of sambal. A grind of black pepper, good pinch of sea salt.

I just brought that up to a boil, turned off the heat, covered the pot, let it sit until we were ready to eat. It was just the thing against the soft and flavorful fish napped in my piri-piri style sauce (I made that recipe with olive oil, using half the amount of oil called for).

The pickle will keep a few days, and it was good with a chicken sandwich. The vegetables can be whatever's on hand--celery or celery root, fennel (a fave), green beans sliced, and I imagine an apple wouldn't be bad in this, at all. The piri-piri sauce will keep a while, as well--it was originally made to dress the grilled chicken that wound up in the sandwich....

Keep 'er rollin'.


Text and photo copyright 2011 by Brett Laidlaw

Tuesday, August 24, 2010

A Report Upon the State of My Pickle, August 2010


I was intimidated by pickling and canning for a long time. Two things generally put me off on the whole process: First was the impression that it requires rigorous adherence to a systematic, scientific method to ensure proper results, lest in consuming said results, you die. Since I am not particularly good at reading directions or following instructions, it seemed much better to leave it to Gedney's.

The second discouraging facet of home canning has always been the fact that the glut of food begging to be pickled and canned arrives mid-summer, in the dog days' heat and humidity of late July and August, and who wants to be stuck in a sauna-like kitchen peering into steaming cauldrons when it's 90 with a dewpoint of 75? Pas moi, bien sur.

So I avoided delving into this arcane, sweaty, potentially deadly realm for years, but I was always jealous of those who had mastered it, who held the keys to this alchemy, who could endure the physical rigors of that sweat-lodge vision quest, who could make beautiful things out of the humblest materials, a lousy cucumber, salt, spoiled cider or wine. Those people were better than I, I was certain--smarter, stronger, more enlightened, more moral and pure.

And, they got dilly beans to snack on with their beer.

I finally overcame my reluctance to pickle around 15 years ago, I guess, spurred by an over-abundance of suyo long cucumbers from the garden. Ordinary overgrown cukes I have no trouble consigning to the compost bin. A well-formed suyo long cucumber, though, is such a magnificent thing--dark green, beautifully curved, bristly, ridged, sometimes growing to nearly a foot-and-a-half long--I couldn't bear to toss them or see them rot in the crisper. I gave a lot away, but I still had too many. I opened up the stained red-checked cover of the Better Homes and Gardens and found a recipe for bread & butters. It didn't seem too complicated. I made up a batch that filled a couple of quart jars. There was no steaming cauldron involved. I just stuck the jars in the fridge, and they kept all year, until the cucumbers were overwhelming the garden again. Now, was that so hard?

That experience set me down the path of small-batch canning, an approach much more like cooking than it is like the Industial-Scale Food Preservation that "home canning" had always implied for me. I have a few stand-bys--the bread & butters, French cornichons, sour dills--but each year I like to try a few new things.

Of course, it's generally the fruits or vegetables that you have the most of that you wind up looking for ways to preserve. For me, this year, that has meant taking a pickle to some wild foods that I hadn't preserved this way before: ramps, fiddleheads, chanterelles, milkweed pods.

I started with the ramps, wrote about it here. That Momofuku-inspired brine has become my go-to recipe for quick pickles. I did a jar of ostrich fern fiddleheads and ramps with that same brine, and I used it on the milkweed pods you see here in the little pottery dish:


Those pods are about an inch long, maybe a little longer, some of them. I blanched them in salted water for a couple of minutes before immersing them in the brine, and they've cured nicely in the last three or four weeks. They have a really interesting texture--nice sort of popping crunch to them--and the flavor is very like green beans.

Here's that brine again:

2 cups water
1 cup apple cider vinegar (or rice wine vinegar)
3/4 cup sugar
scant 2 Tbsp salt
2 small dried red chilies, seeds removed (or leave them in if you want more heat)--optional
1 tsp black peppercorns, also optional

And of course you could add other flavors, garlic, herbs, etc.

In the jar at top left in that picture, those are tiny milkweed pods that I turned into "Bide-A-Wee capers," preserving them the same way I do cornichons: toss with a good amount of salt and let sit overnight; rinse next day and place in a jar with a few peppercorns, some tarragon, a clove of garlic; boil vinegar enough to cover (I'm always using cider vinegar now, since we have so much home-made); the following two days, pour the vinegar into a small saucepan, bring to a boil, pour back over the pods. After that refrigerate and use as you would use capers. I can't wait to make a beurre noisette with some of those milkweed capers, to spoon over a grilled trout. I haven't been fishing much at all this summer, with the heat, and the streams often blown out from heavy rains.

With my excess chanterelles I made a soy sauce pickle based on a Momofuku recipe (just tasted those, and they're great); and a vinegar-blanched and packed in oil with garlic, chili, and herbs; and a jar of chanterelles in the manner of Polish pickled mushrooms. The last two preparations were from Linda Ziedrich's excellent The Joy of Pickling .

In the picture at the very top, that's my favorite pickle of the summer--cukes and crabs in the brine as above, without the peppercorns, with a little fresh Bulgarian carrot chili in place of the dried chili. This is a wonderfully simple, extremely refreshing pickle. The cucumber and the apple seem to sort of swap flavors after a few days in the brine--the apples have a bit of a watermelon rind taste to them, the cuke chunks become tart-sweet and a little fruity. Really good. I'm on my second batch. These should be eaten within a week or so of making them.

To make them, you just quarter and core a few crabapples or other small, firm, tart apples; cut a few pickling cukes into 1 1/2- to 2-inch lengths, and quarter those--and if they're very seedy trim off some of the seeds; make the brine as above, pour over the apple and cuke pieces packed into a jar with some chili, if you like. Refrigerate for a day before eating, and consume within a week. While the weather stays summery, that shouldn't be a problem.

After four days in the country I came back to Saint Paul to find my cucumbers in a state of riot. I just picked a heaping salad spinner full, to go with the half-a-crisper that's been awaiting company and a coolish day to get pickled. So this afternoon I'll be revisiting the classics I mentioned above--the bread & butters, cornichons, and Russian sour dills. Also on my radar: fermenting some kale, beets, and good old sauerkraut in anticipation of winter soups and choucroutes.

I hope you're getting your pickle on nicely this summer, and I'd love to hear about your favorite preserving recipes, too--pickles, canned goods, fermented stuff, jellies, or jams, whatever.

Cheers, and happy pickling to you.


Text and photos copyright 2010 by Brett Laidlaw