Monday, March 4, 2013

Smoking Basics (The Hay River Transition Initiative Class Handout, with Some Additional Notes)

At the third Hay River Transition Initiative's Traditional and Green Skills Day, this past Saturday, I led a seminar on basic home smoking--"Low-Stress, Small Batch Smoking," I think I called it.  There was no pre-registration for the classes this  year, so I had no idea how many people would be attending my session.  Well, there were way more people than I expected, and so I had nowhere near enough handouts to go around.  So I'm posting the notes here, and will be getting word out through the various email lists that serve this beautiful area of Near North Wisconsin.  I'm sure there's info here that the general Trout Caviar readership can benefit from, too, though much of it has appeared here before.  I've added some notes that occurred to me after I put the handout together, as well. 

                                                
____________________________
Smoking was once a common means of preserving food, and still is in many parts of the world. In modern America we smoke for flavor more than preservation, and we’ve mostly turned the job over to large, industrial producers. It’s worth relearning the basics of home smoking.

You will need:

      *  A covered barbecue grill (mine is a Meco, clamshell type, though a Weber is also fine)
     *   A smaller grill, preferably also covered, to hold hot coals to replenish the smoker
     *   Natural chunk charcoal, available at most larger grocery or hardware stores (& Menard’s)
     *   A chimney starter for the charcoal (no lighter fluid, please)
     *   Some fragrant wood, chips or chunks (I use oak and apple; in the past I’ve used maple and hickory bark)
     *   An instant-read meat thermometer, inserted in the top vent, is handy for monitoring temperature

This technique is hot smoking, as opposed to the cold smoking that produces lox and certain other delicacies. It involves cooking the pre-cured (salted or brined) meat or fish rather slowly with indirect heat in the presence of smoke.

Light a chimney starter full of charcoal. When it’s ready, dump half the charcoal in the main grill, half in the smaller. Move the coals in the main grill to one side. Add some fresh charcoal to the smaller grill, and put the lid on with the vents open just a tad, so those coals stay hot but don’t burn up too quickly.
Place some smoking wood—apple, oak, etc., a handful of chips or a chunk or two—on top of the coals in the main grill. Place the items to be smoked on the side of the grill grate away from the coals: it’s important that the food isn’t directly over the coals. Put the lid on with the vent about halfway closed. Place the instant-read thermometer in the vent opening. Adjust vent and coals to keep the temperature around 200 to 225 degrees. Replenish with coals from the smaller grill as needed. Add more smoking wood chips or chunks as needed.

Fish of up to a pound will be done in 1 ½ to 2 hours; bacon in chunks of 1 to 1 ½ pounds will be done in 2 to 3 hours. Turn the meat or fish over every 45 minutes or so. At temperatures this low (even though it’s called hot smoking), it’s hard to overcook the foods. If, after smoking for the times designated, you’re not sure the food is fully cooked, just place it in a 200-degree oven for another thirty minutes.

It’s as simple as that. Once you’re comfortable with the basics, there’s no end of resources—books, TV series, classes, etc.—to take you on myriad smoking adventures. (One book I really like is Peace, Love, and Barbecue by Mike Mills.)

Some notes:

     *   Many smoking recipes tell you to soak the smoking wood. I don’t. The point of the smoking wood is to produce smoke, not steam.
      *   Remove the lid from the smaller grill about ten minutes before you want to add fresh coals to the larger grill. This step allows air in to perk up those coals, which are merely smoldering.
     *   While the salting and smoking provide a certain amount of preservative qualities, the finished products of these recipes are not intended for long-term storage. The bacon can be frozen, but the fish should be eaten promptly.

Home-Smoked Trout


I usually smoke brown trout because that’s mostly what I catch. If you’re buying trout, it will probably be farmed rainbow trout. I’ve also used this brine and method on lake trout and herring.

In a medium saucepan, heat 4 cups water and add ½ cup salt and ½ cup brown sugar, stirring to dissolve.

Remove from heat and let cool. I have added cracked peppercorns and/or herbs to the brine.  Try different flavorings if you like.

A 12-to-14-inch fish is ideal for smoking, but smaller or larger ones can be smoked, too. Just brine and smoke for a longer or shorter time, depending on size.  Given those ideal 14-inch trout, brine them, refrigerated, overnight. Fish smaller than 12 inches can take up sufficient brine in 4 to 6 hours. A couple of hours before you plan to smoke, remove the fish from the brine, rinse in cold water, and set them on a wire rack set over a baking sheet. Using wooden picks—first snip off the sharp ends so they don’t go right through the flesh—prop open the body cavity of the fish to allow them to smoke and cook evenly. Smoke at 200–220 degrees for 2 hours.

[Note:  I almost always smoke bone-in fish, but for this class I could only get butterflied rainbow trout--well, if I had planned ahead I could have order whole fish from either Star Prairie or Bullfrog "Eat My Fish" Trout Farm, but you know how things go sometimes.  I took the same approach with the butterflied fish as I would with bone-in fish, and...the results were not good.  Because the flesh of the boneless fish was more accessible to the brine, and had been cut up a bit in the boning process, the fish turned out much too salty--also, I left them in the brine too long when a round of errands kept me away from home longer than expected.  Since the final product was both  unpalatable and unattractive, I didn't even bring the fish to class--but I should have, to show that 1) even an experienced smoker can make mistakes, and 2) it's okay; it's just a couple of fish.  And, since the theme this year is "Charge ahead, fall down, get up, repeat," I turned lemons into lemonade, as it were, by turning my raggedy, too-salty trout into:

Delicious Smoked Trout Spread

1 smoked rainbow trout (it's okay if it's a bit too salty to eat on its own...(!))
Cream cheese
Hellmann's mayonnaise
1 scallion, chopped
Freshly ground black pepper

Remove the skin and any remaining fins and bones from the trout, and flake the fish into a bowl.  Add a couple of tablespoons of cream cheese, and mash the fish and cheese together until incorporated.  Add a generous tablespoon of mayonnaise and mix well.  Stir in the chopped scallion and pepper to taste.  Serve on crackers.

Moral of the story:  You can indeed smoke butterflied fish or fillets, but adjust the brining time accordingly.  Those butterflied trout of mine spent a good six to eight hours in the brine, but an hour on two would have done the trick.  These were small, thin-fleshed fish.  Another option for small, boneless fish or fillets would be to reduce the amount of salt in the brine, say to 1/3 or even 1/4 cup per quart of water, instead of 1/2 cup.]

 Home-Smoked Bacon

2 pounds pork belly
1/4 cup maple syrup or brown sugar
3 tablespoons salt

Rub the pork belly with the maple syrup, sprinkle salt on all sides, and let cure in the refrigerator for 24 hours, turning occasionally.  For the brown sugar cure, mix the sugar and salt and pat it evenly on all sides of the meat.
The next day, rinse off excess salt, pat dry, and smoke at 200–225 degrees for 2 to 3 hours. The bacon will be both smoked and fully cooked. If you are unsure about whether the bacon is cooked at this point, you can set your mind at ease by placing the bacon in a 200-degree oven for 30 minutes.  A meat thermometer inserted into the bacon should read 160 degrees. 
            I refrigerate my bacon wrapped in parchment paper, then placed in a small cotton sack, rather than in a plastic bag.  This allows air circulation and prevents mold and spoilage. [Note:  If  your bacon is properly cured and smoked, it will slowly continue to dry-cure when stored this way, turning into something rather like prosciutto or guanciale, the dry-cured Italian pork jowls; a few slices of this intensely flavored meat adds great depth to soups or stews, or can be thinly sliced and eaten on its own]  For freezing, use plastic zip bags.

[Note:  When I do demos like this I usually bring in pork belly in three different states of preparation:  raw, so folks can just see what the raw ingredient looks like; cured, having spent a day in a maple sugar and salt bath, because you can often see a change in the color and texture of cured meat from raw; and then I'll have a cured piece already in the smoker/grill so they can see the set-up.

When I get home with all these various meats, I'll usually freeze the raw belly, and the smoked piece becomes our in-use bacon, and then there's the cured but un-smoked piece left over.  Since by this time I've spent plenty of time having my person soaked in smoke, I usually turn that cured belly into roasted, smoke-free bacon--it's really a treat.

Pan Roasted Bacon simply involves cooking that cured belly slowly so that it has time to render a lot of fat and become tender, without burning the sugars from the maple syrup in the cure.  So, you just place the belly, fat side down, in a casserole or gratin dish, and roast it in a 300-degree oven for two to three hours, maybe more.  Turn it a couple of times while it roasts.  You should see a lot of fat rendering off, and the belly will turn a beautiful burnish golden brown.  After 2 hours it will be cooked, but you can let it go longer--depends on how tender you like it; I tend to cook it at least 3 hours.

And yesterday, since I'm mad for cooking on our new woodstove, I did a stovetop version that turned out great.  I placed the belly in a cast-iron skillet and let it sit most of the day on top of the stove, turning it from time to time.  I covered it at times, so it steamed a bit, and when the stove was too hot I set the skillet on a trivet.  At the end of the day we made Asian-style noodle soup with a broth made from the carcass of a smoked chicken (see below), with a couple of slices of that roasted belly on top, and we felt we were slurping in the best noodle shop around.]

[Note 2:  Since home-smoked bacon contains no unpleasant chemical ingredients, preservatives or colorings, the fat that accumulates when you cook it will be a lovely pure, creamy white, and full of flavor.  It's a great ingredient for cooking eggs or sauteing vegetables, or for using in place of shortening or oil in things like tortillas or biscuits.]

Smoke-Roasting


This is my own term for the process of grilling and roasting meats at somewhat higher temperatures than the hot smoked method described above.  I generally use it for pork—shoulder or country-style ribs—or chicken.  I have no specific recipes for this, because I tend to do it a little differently each time.  The basic method is this:
A few hours before you’re going to cook (or the night before), season the meat generously.  Salt is necessary, pepper is almost obligatory; I love thyme, so I’ll toss in a few sprigs of it most of the time—other herbs can also be used.  I may add a couple of crushed cloves of garlic, some sliced onion or shallot, sliced fresh or crushed dried chilies.  I’ll sometimes add spices like cumin, allspice, or fennel.  A spice blend that the French call quatre épices (“four spices,” though it often contains five or six) is excellent with pork or fowl.  Use it sparingly, as it can be overpowering.  This makes enough to last a good while:
           
2 teaspoons ground coriander
2 teaspoons ground allspice
1 teaspoon ground ginger
1 teaspoon ground cinnamon
½ teaspoon grated nutmeg
1/8 teaspoon ground cloves
           
 You can go for a dry rub, or more of a marinade, adding a bit of wine, beer, or cider, or just a little gloss of oil. 
            Prepare coals in your barbecue just as if you were going to grill, but spread the coals out over only half the grill.  Brown the meat well over direct heat, then move it to the area away from the coals.  Add some smoking wood to the coals, close the lid, and let the meat finish cooking in the smoky heat.  For either chicken pieces or country-style ribs, I’d give it at least 45 minutes, but a bit longer won’t hurt. 
            Sometimes at the end of the cooking I’ll boost the coals and crisp up the meat just prior to serving.  Smoke-roasted meats aren’t brined to the same extent as hot-smoked ones, and aren’t made for keeping.  Enjoy them hot from the grill, and use up any leftovers within a few days.

Smoked Venison “Pastrami”

2 teaspoons salt
2 teaspoons maple sugar or brown sugar
7 juniper berries, crushed
1 dried red chile, crumbled
¼ teaspoon powdered ginger
½ teaspoon ground roasted Sichuan pepper
½ thyme, fresh or dried
¼ dry mustard
1 teaspoon freshly ground black pepper
1 ½ - 2 pounds venison roast

Mix all the dry ingredients and rub them all over the roast.  Cover with plastic wrap and refrigerate for 2 to 3 days, turning a couple of time per day.  Smoke at 225 for 2 to 2 ½ hours.  I used wild black cherry wood when I made this, but any aromatic hardwood will work—apple, oak, maple.

Smoked Pork Shoulder Roast


1 tablespoons salt
1 tablespoon white or brown sugar
½ teaspoon dried thyme
½ teaspoon paprika
½ teaspoon freshly ground black pepper
1 – 2 to 2 ½ pound pork shoulder roast, with or without bone

Mix all the dry ingredients and rub the mixture evenly over the pork.  Refrigerate for at least 12 and up to 24 hours.  Smoke at 225 for 3 to 4 hours.  The internal temperature should be at least 160; finish in a low (250-275) oven if need be.

[Note:  This is excellent sliced thin and tucked into warm tortillas or Chinese steamed buns, with a fresh slaw and a bit of sauce or sour cream, depending on which ethnic direction you want to take it.  It's also wonderful served on a nice fresh roll, with perhaps a slick of mayo and some slices of dill pickle.

I prepared a small roast like this teh day before the class, to show and sample; it was the last preparation of the day, and well after dark by the time I got it going.  I smoked it for about 2 1/2 hours, then put it in the oven at 260 for an hour or so.  It turned out great.  I wouldn't call this dual-fuel method cheating, but rather, taking advantage of technologies both ancient and modern....  ]
 

Sichuan-Spiced Smoked Chicken

3 to 4 pounds chicken—you can use a whole, butterflied, or quartered chicken
1 tablespoon salt
1 teaspoon ground roasted Sichuan pepper
1 teaspoon freshly ground black pepper
1 tablespoon maple syrup
1 tablespoon soy sauce
1 dried red chile, crumbled
½-inch piece fresh ginger root, peeled and minced
3 garlic cloves, minced

Mix all the seasonings and rub the mixture over the chicken.  Refrigerate for 24 hours, turning the chicken occasionally in the marinade.  Prior to smoking, remove the chicken from the marinade and let it drain on paper towels.  Smoke at 250 for 3 ½ to 4 hours, until a meat thermometer inserted at the thigh reads 165. (You can put it in a 250-275 oven for the final hour--in fact, until you gain some experience with smoking poultry, I would recommend this method.  Undercooked poultry is something to be strenuously avoided.)

[Note:  This turned out a wonderfully fragrant and succulent bird.  I love Asian flavors in smoked poultry, but you could use more neutral seasonings if you like--white or brown sugar or honey could be used instead of the maple syrup.  If you omit the soy, add another 1 1/2 teaspoons of salt.  In summer I'll grab handfuls of fresh herbs for the marinade.

We've used this as a filling for steamed Chinese buns, and in quesadillas.  Yesterday, while the pork belly pan-roasted on the woodstove (see above), I also simmered a pot of smoked chicken stock which made the basis for a delicious noodle soup supper.  The concept was a chicken broth with pho-style flavors.  I stripped the meat off the bones and set it aside.  In a 3-quart saucepan I placed the bones, wing-tips, and some of the skin that had fallen off, along with:

several slices of fresh ginger root,
a couple cloves of garlic, crushed,
half an onion, sliced,
half a carrot, chopped,
2 or 3 whole cloves,
3 points of a star anise,
a teaspoon of whole Sichuan peppercorns (hua jiao),
a dried red chile, broken in half,
a few black peppercorns,
8-10 dried black mushrooms

I covered all with 2 quarts of water (about).  It simmered very gently all day.  It was reducing too much at the start so I added a little more water and covered it with the pot lid just ajar.  At the end I poured the contents of the saucepan through a colander into a big mixing bowl to remove the large solids, washed my saucepan, and poured the broth back into the pan through a sieve lined with a piece of old dish towel--this makes an excellent cheesecloth substitute, a superior one, in fact.  From the solids in the colander I retrieved the mushrooms, sliced them and returned them to the broth.

We boiled up some thin Chinese noodles, blanched some sliced red cabbage and julienne carrots; warmed some of the smoked chicken meat and slices of pork belly in a skillet; divvied it all up and garnished with sliced scallions and ground roasted Sichuan pepper.  I made a dipping sauce for the meats from soy, Chinese dark vinegar, sugar, chile oil, a minced clove of garlic, more Sichuan pepper, and I thinned it with a little water.] 


Beef Jerky


1 pound lean beef, such as top round
1 teaspoon salt
1 tablespoon soy sauce
1 tablespoon maple syrup
1 tablespoon canola oil
1 tablespoon water
1 teaspoon sambal oelek chile paste  (or sriracha, or a few shakes of Tabasco sauce)
1 clove garlic, minced
½ teaspoon freshly ground black pepper

Slice the meat against the grain into ¼-inch slices.  In a large bowl combine all the other ingredients.  Add the beef and mix well.  Refrigerate for 6 to 8 hours, stirring occasionally.
Lay the beef slices out on a metal cooling rack with a 1/2-inch or smaller grate.  It’s okay if they overlap a bit at the beginning, since they’ll shrink as they smoke, and you can spread them out partway through.  Place the rack on the grill grate in your grill/smoker.  Smoke at 225 for 2 hours, or until the jerky is done to your taste. You can finish it in a low oven to your desired chewiness.

______________________________________

Some material in this handout is quoted from Trout Caviar: Recipes from a Northern Forager by Brett Laidlaw, copyright 2011, published by the Minnesota Historical Society Press

All material copyright 2013 by Brett Laidlaw

Friday, February 22, 2013

Smokey Deer


We’ve been on a steady venison diet here lately, thanks to one happy occurrence—the generous gift of a leg of venison from a friend—and one less fortunate one—the freezer dying on our spare fridge in the basement.  The venison had been in our freezer since it was passed along to me last fall, and as I was going to have to thaw it out all at once, I was waiting for the right moment.  But sometimes you choose your moment, and sometimes it is thrust upon you.  Hence, necessity being the mother of invention and all that, I got to work processing.  I was not a very experienced deer meat cook when I walked upstairs with that dripping, leg-shaped package; I’m a much more confident one now.

In the last three weeks I’ve prepared venison goulash, seared rye-crusted medallions, and that pan roast, which I’ve put to use in numerous ways.  But by far the most interesting and delectable preparation was this smoked venison “pastrami”.


I started by breaking the leg down into its component muscle groups.  Not all cuts of meat consist of a single muscle, of course—many are cross-sections of several groups.  But I don’t have a meat saw, and taking it apart at the seams, as it were, was the easiest, most logical thing to do.  I wound up with about a pound and a half of the dense meat from the shank, and several nice lean pieces from the upper leg, each around a pound and a half, also.  What looked at first like an enormous hunk of deer flesh yielded 8 or 9 pounds of usable meat—oh, and another pound-plus of trimmings, which the dogs greatly enjoyed.


To see what I was dealing with, I sliced off a small piece from each chunk and fried them briefly to assess the flavor and texture.  There were variations—this one a little more tender, this one a bit livery, etc.—but all were relatively tasty and tender.  They were, in effect, no different from something like the sirloin or top round cuts of beef.  The shank meat was destined for goulash.  From the other pieces I selected one to do the pan roast, and set a long, tenderloin-shaped cut aside to make medallions, and the last piece, more or less rectangular and about two-inches thick in the middle, I decided to smoke.

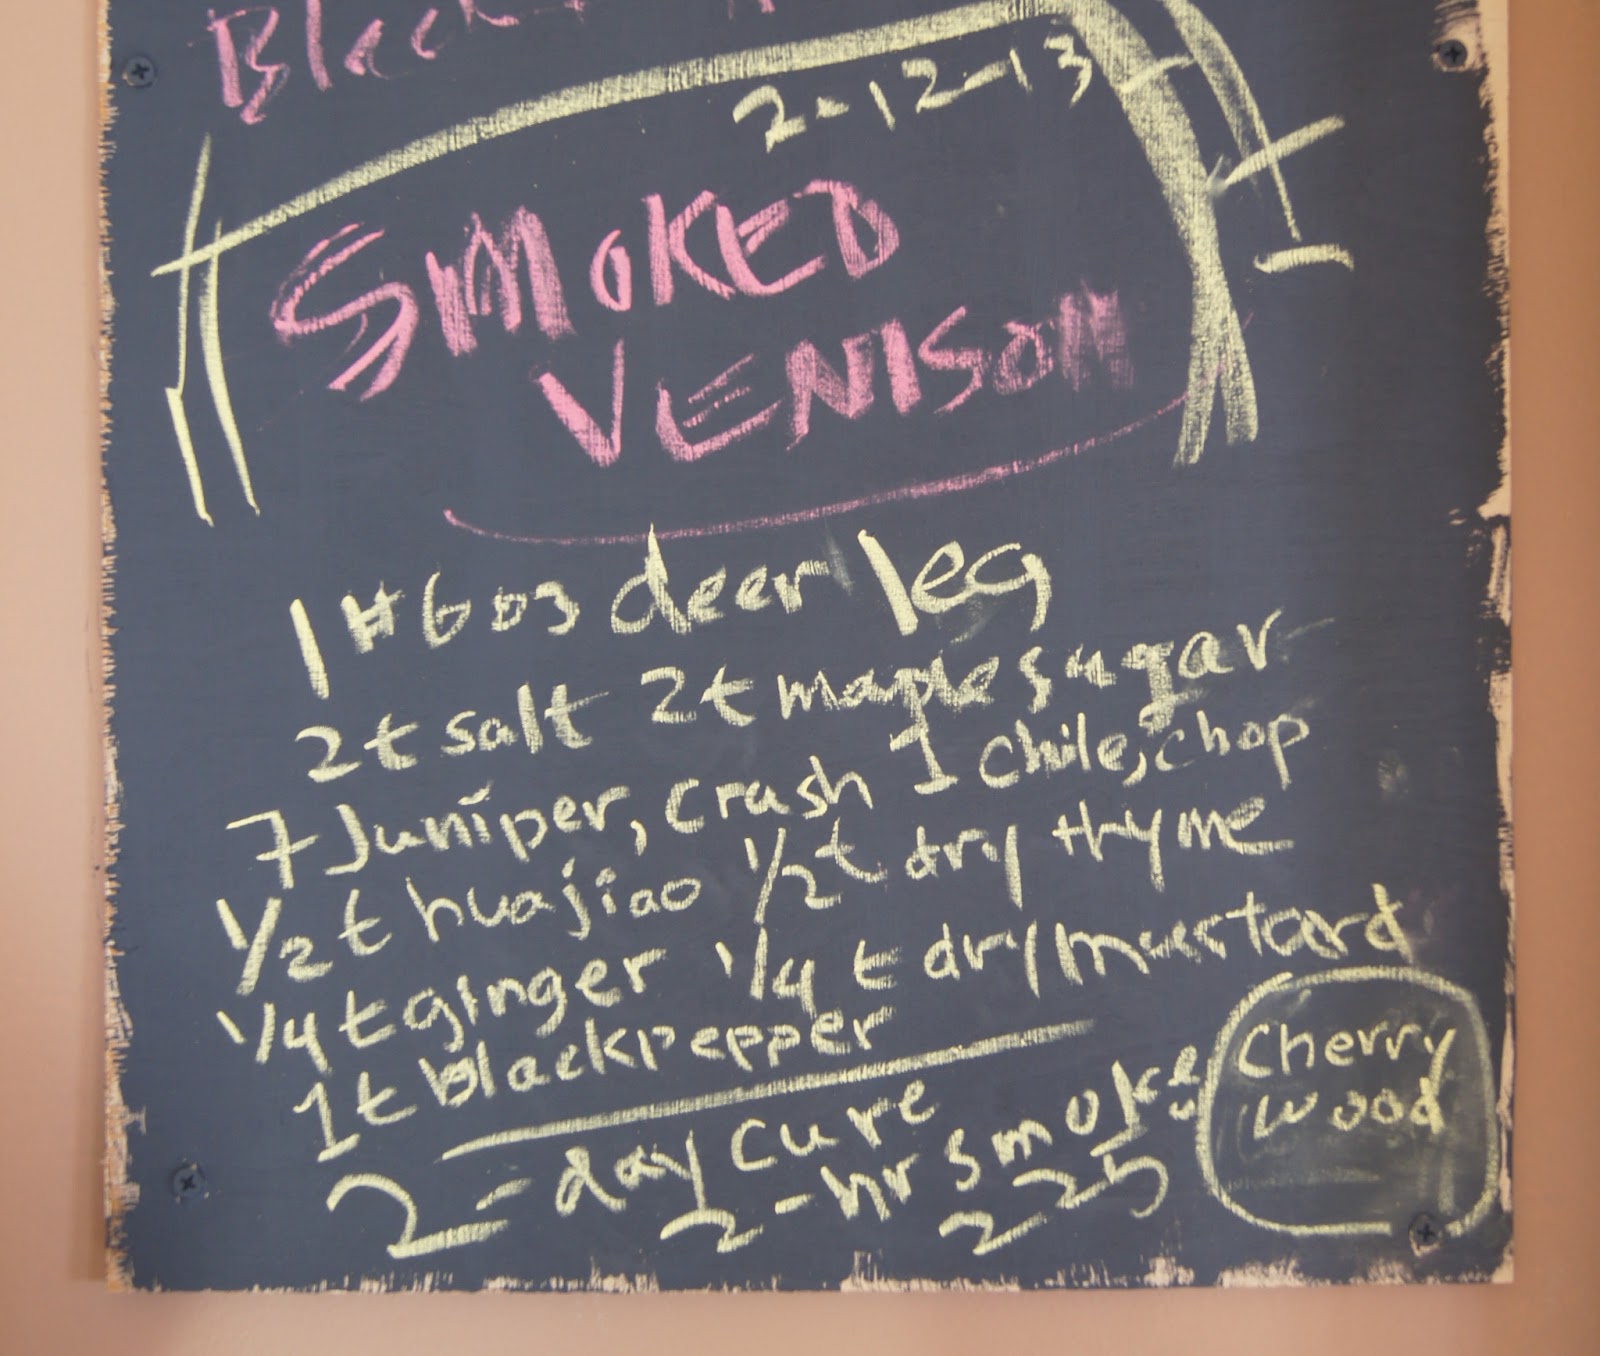
I cured it with a dry rub, and went for some fairly aggressive seasonings.  Here’s the recipe (chalkboard paint is fun…):


Hua jiao, once again, is Sichuan pepper, in this case the dry-roasted and ground up kind.  Ginger is the dry spice, chile a dried red one.  I used locally produced maple sugar, but you could substitute brown sugar in the same amount, or maple syrup, say 1 ½ tablespoons.  I massaged the meat with the seasonings and stuck it in the fridge for a couple of days, turning it several times.  Not a lot of liquid came off. 

Then I smoked it in my trusty Meco grill for about two hours at about 225, and I used wild black cherry as the main smoking wood, something I haven’t tried before. The end result was a delightful confluence of happenstance and experiment. I had no idea what the final product would look or taste like.  It smelled fantastic coming off the grill, and when I cut into it I was amazed at the color.  The taste is deep, layered, mysterious, and wild, but with a delicate texture that makes it seem refined, as well.  Really cool stuff.  What it reminded me of most was pastrami, which is smoked corned beef, so I guess that makes sense.


I have cooked slices to serve with eggs and polenta, and that was good, but I think it’s best straight up, on a slice of toasted country bread.  The sauce gribiche variation I came up with to accompany it doesn’t detract.  This is a really good time of year to dip into the pickle pantry for fresh and crunchy flavors.  The rhubarb pickles I made last summer have mellowed really nicely.  The sauce is composed of:

A grated hard-cooked egg
Dollop of Hellmann’s mayonnaise
A minced pickled ramp and a little of the pickling brine
Same amount minced pickled rhubarb
6 or 7 minced milkweed bud “capers”
A half teaspoon or so of sambal

I’ll run down the other preparations in another report.  All were worth recreating.

Text and photos copyright 2013 by Brett Laidlaw


Friday, February 15, 2013

Pan Roasting, Woodstove Style


Pan-roasted: it’s one of those menu descriptors that I always find appealing, like flame-broiled, wok-seared, fire-grilled. Maybe it has something to do with the muscular combination of noun and verb; maybe it’s the hyphen. The succinct combination is somehow far more appetizing than “roasted in a pan.” Whatever the source of that allure, if there’s a pan-roasted striped bass, pan-roasted duck breast, or pan-roasted double-cut pork chop on the menu, that’s what I’m ordering.

 Never mind that I’ve never been fully certain exactly what pan-roasted means, though I had an idea. So I looked it up, and found that the generally accepted definition involves starting a dish—usually a piece of meat—on the stovetop, searing it in a skillet or sauté pan, then finishing the cooking in a moderate oven. The idea is that the enveloping heat of the oven will finish the cooking more evenly than if you just left the pan on the burner. In some cases—that double-cut pork chop, for instance—I can see the logic. In others—the piece of fish—I think it’s probably more a case of menu puffery; once that fish fillet is browned on both sides, it’s practically done cooking. It really doesn’t require roasting. That doesn’t mean I’m not still a sucker for pan-roasted salmon with a ramp beurre blanc and nettle flan.


 All that being said, the kind of pan-roasting I’m talking about here is a method that doesn’t use the oven at all, but is ideal for woodstove or campfire cookery. And it elevates the importance of the pan, which should ideally be cast iron. The method evolved by happenstance, over years of cooking on the Bide-A-Wee woodstove, and really gelled in my mind with all the cooking we’ve been doing over the last few weeks on the new stove. It combines the qualities of the cast iron with the moderate, persistent heat of the woodstove. The results are savory, rustic, just the kind of thing you want to eat on a winter evening.

Now, I know some of the skeptics among you are going to say: You’re cooking stuff in fat in a fry pan on a stove top. How is this different from frying? Answer: It’s not. Except, when we talk about frying, I think it generally implies a fairly high heat, a larger amount of fat, a shorter cook time. You could call this low, slow frying, but in my mind the technique has more in common with pan-roasting, so I’m going with that. It’s a bit like the question of when something turns from a braise into a stew, from a stew into a soup.

Thelma Sanders Sweet Dumpling at harvest time

The two preparations I have here—acorn squash, a venison leg roast—are ideal examples of foods that respond well to this method. Both require a fairly long cooking time, and both benefit from long exposure to the hot—but not too hot!—pan. And in the case of the venison, there are beautiful drippings left to turn into a pan sauce (another of those simple yet supremely appetizing phrases).

The same squash, up from the root cellar a few months later; a wee bit wrinkled, still delicious

Given all that introduction, the method itself is pretty simple: for the squash, halve it, clean it, cut it into slices. With an acorn type, just go between the scallops, and with other kinds, make roughly 1-inch thick slices. What I used here was an acorn type called Thelma Sanders Sweet Dumpling—how charismatic is that? This has a fairly thin skin, which in fact is mostly edible by the end of cooking. The bottom, hollow part of a butternut also works well for this, and has nearly as tender a skin, once cooked. Delicata types would also work well. I would avoid drier types of squash with thicker rinds, such as buttercup.


So, you heat your cast iron skillet, and add some fat. Duck fat is beautiful, and my first choice for this. Rendered fat from excellent bacon is another good choice. Otherwise, the cooking oil of your choice, or clarified butter. You only need about a tablespoon. Add the squash slices and cook them on one side for 7 or 8 minutes. Turn them over and repeat. Keep turning at intervals until the squash is nicely brown all around and tender to taste. You could add a crushed garlic clove or a couple sprigs of thyme or rosemary along the way. At the end, season with coarse salt and freshly ground pepper. A dusting of paprika or espelette pepper would also be excellent, and ground Sichuan pepper (hua jiao) is a nice complement to sweet squash. Other possible finishes: a drizzle of pumpkin seed oil or melted butter, some chopped fresh herbs, finely minced garlic, or the the garlic, lemon zest, parsely combo called gremolata. Which makes me think that you could turn this into a vegetarian main course by serving the squash slices over pasta. In which case I imagine you’d want some excellent grated cheese to finish it off. I think I have a new dish to try out….

For the venison: this piece of leg was about a pound and a half, and nearly two inches thick, an excellent candidate for this kind of pan roasting. I salted and peppered it liberally. Heated a bit of sunflower oil in the pan, and added the meat. Let it cook 8 minutes per side, turning several times. It cooked a little more than 30 minutes, in the end. After the first turns I added a couple crushed cloves of garlic, a broken up dried red chile, and a couple sprigs of rosemary. As the meat browned and cooked very gently, and the aromatics released in the pan, the house came to smell amazing.


The meat came out a beautiful medium rare, and tender as can be.  We didn't eat it right away, but a couple of nights later I sliced it very thin and piled the slices on top of a piece of homemade grainy sourdough.  I then doused it with a sauce--a kind of jus--I had made by deglazing the pan with red wine and water.  I extended the jus with some chicken stock, and because it was quite spicy from the chile, I added a little maple syrup to balance the heat.  I also stirred some powdered cocoa into the syrup--a sudden inspiration--and the combination was terrific.

You don't necessarily need a woodstove for this kind of cooking.  The keys, I think, are the cast iron pan, the low and slow cooking time, and the appropriate ingredients.  It's a really mellow way of cooking, and foods prepared this way can often be made ahead and reheated--an ideal way to stockpile some made-ahead meals on a winter weekend afternoon.

Text and photos copyright 2013 by Brett Laidlaw

Monday, February 11, 2013

Wood Fired Up


We closed on the new old  house on January 30 of last year, at the title company's office in Menomonie, a 25-minute drive from the house (as well as from the Bide-A-Wee cabin).  Roughly 30 minutes after the last document had been inked, the last hand shaken, Mary was in the first floor bedroom tearing out the ancient, filthy shag carpeting to reveal fir floorboards that had been painted around the outer two feet (roughly) of the room--presumably an area rug had once covered the center of the room. (While this initial deconstruction was going on, I was moaning under the down comforter at Bide-A-Wee, victim of a stomach bug that had made the closing an excruciating experience; I don't think I'll ever eat seafood sausage again....)

With that initial un-rugging of the bedroom began a year-long cascade of projects that involved wood floor refinishing and installation, taking down an acoustic tile ceiling and a half-wall, paneling of walls and a ceiling, putting on gutters, moving an exterior stairway, replacing an exterior door, finishing dry wall, relining a flue, replacing light fixtures, building a garage, and painting, painting, painting, painting.  A lot of the work we hired out.  Our move to Ridgeland has been very, very good for the local economy.


About three weeks ago, just shy of our one-year anniversary in the house, we marked the culmination of Phase One with the installation of a woodstove, a Pacific Energy Summit model.  It is simply the greatest thing ever.  As I sit at the desktop computer in my office writing this, I'm yearning to be back down in the living room, gazing at the fire--in front of which the dogs have installed themselves more or less permanently, probably wondering in their flame-warmed dreams why on earth it took us so long to welcome this marvelous object into our home.  I feel pretty much the same way.  We're taking the rest of the winter off from major home reno projects; a kitchen re-do looms when warm weather returns, and that will require us to gather a great deal of strength and resolve.

Let me count the ways we love our woodstove:  Well, for starters, who doesn’t love looking at a fire?  The Haggis woodstove we have at Bide-A-Wee is excellent in many ways, but you can’t watch the fire unless you leave the door open, which is dangerous.  The new stove has this big glass door, perfect for fire viewing.  I find it calming, thrilling, and mesmerizing, all at once.  In the evenings I tend to forget we even have a TV upstairs (though I remain a devoted People's Court and Jeopardy fan).

 
Two, it is age-old technology brought beautifully up to date.  A modern motor vehicle bears really no resemblance to a horse and buggy, except for the wheels.  Modern woodstoves look and work very much like their ancestors—indeed, some new ones are designed to look exactly like the vintage models—but they are much more efficient in every way.

Three, following from above, a woodstove is a pretty clean way to heat.  Wood is a renewable, sustainable, and local source of fuel, and new technology makes these stoves up to 80 percent efficient.  When it’s burning hot with good seasoned wood, you see no smoke from the chimney.  And the fuel to feed it travels all of a couple hundred yards to get here (oh, well, some of it did come a couple of miles, as we recently purchased a cord from our friend Tina, who has a several-years’ backlog of wood in her yard).  Wood is also a fairly carbon-neutral form of fuel; it does release carbon into the atmosphere, but only at a faster rate than was going to happen anyway, as the wood broke down out in nature.  I’ve been harvesting small dead oaks almost exclusively, basically just taking advantage of natural attrition before those trees fall to the soil and rot.  (However, I’m being sure to leave a good number of taller snags for wildlife habitat.)

The woodstove gives us total heating and cooking independence, as long as there’s wood in the box.  I think I mentioned that the house came with a wood furnace in the basement, which we’d been using up until we got the stove.  But even that depended on an electric fan to work properly.  The Summit has no moving parts, but the door.  If the power goes out we'll still be warm and well-fed; the electric pump won't work, so we we'll have no water, but that's a separate issue.

And:  it’s a handy clothes dryer, combined with a simple drying rack.  This also helps, a little, to humidify the dry winter air.

The woolens chest had gone a little musty, requiring wholesale scarf and mitten laundering.

It is fabulous to cook on.  You knew this was where we were headed, didn’t you?  I’ve always enjoyed cooking on Bide-A-Wee’s Haggis, even though it’s a much less substantial stove than this one.  The Summit has a nice wide, flat top, plus a warming ledge behind.  We start putting the stove to use first thing in the morning, boiling water for our tea in the red kettle.  It requires a little patience, since you don’t necessarily have high heat on demand after the fire has burned down overnight.  But I like that about it.  It seems fitting with the slow food type of cooking at which a woodstove excels. 


I’ve simmered chicken stock, and soup, and just last night a marvelously complex venison goulash.  I’ve also pan-roasted a venison leg roast, fried steaks, warmed duck confit and braised cabbage.  The cast iron pans work amazingly well with the steady, even heat of the woodstove.  Mary made pancakes a couple weeks ago that came out better than they have in ages—even browning, terrific height, and thorough, consistent doneness.  Slices of squash slowly browned to tenderness in some duck fat give new life to that root-cellar mainstay, of which even I, a dedicated squash fancier, have been growing a little tired.  Not when prepared this way.

Venison goulash bubbled gently for  hours, filling the house with amazing aromas.

You can’t really bake on it, although I have made dutch oven bread on the Haggis before, and you could certainly do other kinds of flatbreads.  Frittatas and slowly scrambled eggs come out just lovely.  I know it will be perfect for paella and jambalaya, I just haven’t had time to try those yet.

When we redo the kitchen we’ll put in a really nice range, for sure, probably a dual-fuel model with an electric convection oven—that’s what I’ve found to be the best for baking and roasting, though I don’t use the convection fan for bread.  But in the cool months, when the stove is lit, I know I’ll still do plenty of cooking there.

Onions slowly caramelize for the goulash, while a venison leg roast cooks with chile, rosemary, and garlic.  Our downstairs freezer died, so I had to process a whole deer leg all at once.

Oh, and a collateral benefit to the woodstove:  It introduced us to a new skill, laying tile.  We built the pad that the stove sits on, our first such project.  It was surprisingly easy, and really, really fun and satisfying.  I’m eager to do it again.

How we chose this stove:  we didn’t do a ton of research, but we did read up on on-line reviews, and talked to people in person and via our Tell-All and HRTI Share list-servs.  From an email shout-out we heard from numerous people, and nearly all of them had a different brand of stove—Pacific Energy, Jotul, Vermont Castings, etc.—and they all loved them.  I don’t think we got a single non-recommendation.  We picked the PE largely because Tina has this same model, and loves it.  Also, since the PE stoves are steel, not cast iron, they can be placed fairly close to combustible surfaces, within a few inches of the wall.  This allowed us to tuck it in the corner so it doesn’t overwhelm our living room.

In choosing the size, again, we had the benefit of Tina’s experience.  Her house is smaller than ours, and more compact, so we went with the same size she has, the big one, even though it’s said to heat 3000 square feet, and our house is right around 2000.  But those ratings don’t give you any sense of what sort of weather they’re calibrated for; the stoves are made in British Columbia, in a region where it doesn’t get nearly as cold as it does here.  And what we’ve found so far is this:  if the outside temperature is above 30, we don’t need to burn much wood to keep the house toasty.  When the high temps were barely topping zero for a week straight, we kept that baby stoked, and we were not roasted out of the house, by any means.

So that’s the woodstove report.  We couldn’t be more tickled with this new addition to the family.  We only await a visit from Lulu, our Nomenclature Tsarina, to properly assess its character and offer a suitable name.

We got the stove from Stoveworks, with stores in Rice Lake and Hayward.  They were great.

Wednesday, January 2, 2013

Charge Ahead, Fall Down, Get Up, Repeat (New Year's Wishes, 2013)


From our bedroom window looking north.


2013 came at us from Day One with reminders of what winter used to be like, could still be like, north of 45 degrees latitude in the center of a continental land mass.  The thermometer registered 18-below on New Year’s morning at 7:30, then actually dropped a couple more notches, stopping at minus-20 as the sun crept over the southeast hill.  I looked at the dial with some disbelief, but when I stepped outside and heard the deck boards creak and groan with a frigid lament under my feet, I believed (I have not over-indulged this holiday season, so I’m certain excess weight wasn’t the cause of this phenomenon).  Also my nose hairs went instantly crispy, and my still sleepy eyes were like to be glued shut if I had stayed outside a minute longer.

Odd thing was, the needle stayed put at -20 as the sun grew stronger; Mary eventually went out and gave the dial a tap, and it jumped up suddenly to near zero.  Who knows where we actually bottomed out?  Cold enough.  But it warmed enough by mid-morning that we (Mary and I, guests Martha and Tom ) got into our skiing togs and hit the trails.  A glorious day for it—with bright sun and little wind the exertions quickly warmed us.  Lily charged ahead of us over the crest of the hill and her pounding paws kicked up a flurry of powdery snow while her breath billowed out in a steamy cumulus, caught in the sun’s sharp near-solstice angle on the line where snow meets sky.
 
We skied over the hayfield hill, swooping down the eastern slope to the boundary with LeRoy and Shelly’s land, traversed back up to the top and came down toward the house through the old pasture.  I took the hill first, on a slightly different line than I had taken before, and as I came around the curve and over the knob with speed, I saw that divot, and I thought Oh, crud….  I believe I was airborne for a moment; then I was anything but.  Wipe out. It must have been impressive, but I don’t know if anyone saw.  I got up and shook it off; I was a little embarrassed, but more exhilarated.

Top of the hayfield hill.

One thing I’ve been trying to do a lot while skiing this year is to fall down.  I know that might sound odd, and counter to the general aim of skiing, but I feel that one of the best things a 54-year-old can do is to fall down in the snow—provided that he is able to get up again, of course.  The key is to not be afraid of falling—charge ahead, fall down, get up, repeat.

That’s going to be the theme of 2013 for me.  I’m avoiding the resolutions game.  Except that I have already publicly resolved to eat more Wisconsin cheese.  And I want to learn to play Johnny B. Goode on the Ibanez Artcore electric guitar that Mary surprised me with on my birthday last October, best present ever.

Best present ever, the Ibanez "Blue Beauty"

But back to the ski trail—and just to digress here a bit: I have discovered this winter that one key to perfect bliss for me is to be able to step out my back door and ski in my very own woods; it’s a luxury, for sure, but one that I appreciate fully.
 
I took Martha and Tom through the woods to the northern tip of our land while Mary stayed out in the field (she’s particularly averse to trees on skis as she’s still just picking up the sport).  The woods trails could use some improvements, as there are a lot of downed trees and some brushy patches with no clear way through, but it is so quiet and beautiful there in the snow, skiing is really just a way to get there.  One charming thing I’ve noticed this winter is that there are often deer tracks running right down the ski trails—I don’t know if this is because the deer and I share an intuition about the best way through the woods, or if the deer are cleverly taking advantage of our efforts to lessen their energy output in the cold snowy weather.  Or perhaps they’re curious about these odd emanations in the snow, and follow them wondering what sort or creature they will lead to.  At any rate, it creates a pleasant feeling of simpatico with the animals, like, yeah, we all live here together.  We often see deer at a distance, in the woods at dusk, but I’ve noticed the hoofprints following the ski tracks nearly right up to our back door.


Après-ski, a warming lunch, and Mary and Martha sat on the couch knitting while Tom and I flipped through the Fäviken cookbook they brought us as a gift, wondered about just how tasty would be a tea brewed from forest leaves that have “almost turned into soil,” and vowed that we would mature our own cider vinegar in a charred, hollowed-out stump, so help us Odin.  (Fäviken is a Swedish restaurant on the cutting edge of atavistic Nordic cuisine, employing ultra-local ingredients like, yes, old leaves, moss, lots of other foraged stuff that is very far removed, indeed, from the typical European luxury ingredients like truffles and foie gras.  Some—well, a lot—of the recipes read like parodies of obsessive-compulsive chefdom in pursuit of the hottest trend, and yet I find the idea of digging down (literally and figuratively) into northern culinary roots really fascinating.  It’s the very idea I’m slowly developing for my next concerted project, as I look for emblematic foods, methods, and recipes that speak compellingly of our place.)

Tom and Martha took their leave mid-afternoon, to get back to town before full dark, and I took a nap.  I just zonked out, and woke feeling as if I were getting sick.  But I willed myself out of bed, put on my Swedish Army surplus wool knickers, whistled for Lily (Annabel, 14-and-a-half, pretty much just putters around the yard in the winter), pulled on the ski boots, clicked into the bindings, and headed back up the hill just as it was turning to dusk.  I followed the path along the edge of the field and then, near the top of the hayfield hill, turned left and worked a traversing course up to the highest point on our property, stopping along the way to remove a section of barbed wire.  I got to the top of the hill where a serious deer stand—ours, inherited—is slowly going back to nature, the plywood walls delaminating one by one.  Then I skied out to the tip of the promontory I romantically think of as “The Grande Esplanade”; from here there is a marvelous view of our house and outbuildings far below, and the valley and ridgelines running off to the south and west.
 
It was pretty much dark now.  I took in the view, and the silence, only enhanced by the bit of breeze that rattled some frigid branches.  A very light snow was falling, but I couldn’t really see it, only felt the flakes touch my face.  With my literary education and inclinations, I couldn’t help thinking of Frost, “Stopping By Woods on a Snowy Evening,” and that was okay.  Whose woods these were, I knew.  The woods were lovely, dark, and deep, but I did not have miles to go before I slept.

In our woods going up is often easier than going down—certainly less dangerous.  But coming back down last night I found the line I’d been looking for all winter:  a long traverse of the big swale, between the oaks and maples, avoiding deadfalls and stumps and hidden barbed wire, so that I made it from near the top to the edge of the woods in one exhilarating run, in control but with enough pace to make it interesting.  It felt like an accomplishment, as if I’d worked out a writing problem, and it made me feel like, yeah, I will learn how to play Johnny B. Goode, the coolest song ever.

Then I skied to the top of the hayfield hill and finished with a lovely downhill run with a decent telemark turn, and as I glided into the yard I thought for some reason of Hemingway, something reminded me of a story from In Our Time.  I can’t help it; I’m made that way.

For New Year’s dinner Mary and I raided the fridge for leftovers—a couple of shrimp fritters that were excellent reheated and dabbed with mayonnaise; home-smoked duck breast and its accompanying sauce, so luxurious served on toast with a carrot slaw, “leftovers” seems a wholly inappropriate term.  Then the last remnants of some excellent cheese, Uplands Pleasant Ridge Reserve, and aged Marieke gouda (off to a good start on one resolution…).  We were both weary, we didn’t talk about too much, but it was pleasant.  We sat in our usual living room chairs and noshed.  Mary went to bed around ten; I practiced Johnny B. Goode for a while.  I’ve got about two-thirds of the intro down pretty good.

From my office/spare bedroom window; note Tom (L) and Martha's (R) herringbone ski tracks up the hill, impressive.

Thinking about the events of last year makes my head spin—we bought a house, sold a house, left the city for the country, plunged into home renovations, learned to live in a whole new place, embraced it; my mother went into a nursing home, had to leave her old life behind for one with not promising prospects, but she’s doing okay, has such a positive attitude, she sustains us all; our old dog Annabel had a major health crisis last winter (because of various and numerous fabric items she consumed), and last summer, a seizure, so she’s now on a daily dose of doggy downers; Mary became a country-to-city commuter; book events crescendoed in the fall then completely tailed off (don’t forget, I’m available for birthday parties, bar/bat mitzvahs, bachelorettes, etc.!). 

I hardly fished, barely hunted.  I found morels in our yard, chanterelles where I expect to find them, and missed out on most of the other mushrooms.  Our garden produced a lot of squash, but our apple trees bore little fruit.  We ate exceedingly well, and I grew rather tired of taking pictures of food, or looking at them.  Cutting, hauling, and splitting oak logs to feed our wood furnace has become a consuming concern for me; we could turn on the LP furnace, but to me that feels like a moral failure.  I’m heading up the hill with the chain saw and the ice fishing sled this afternoon.

Not the easiest way to heat a  house, but among the more interesting.

What’s past is past (or not, ask Faulkner), and I’m taking a clean slate approach.  Charge ahead, fall down, get up, repeat.  Focus on the possibilities; it’s never too late.  Resolutely avoid resolutions (except as noted).  Let conclusions present themselves.  Some of this applies to the future of Trout Caviar, as its five-year anniversary nears.   It’s usual to say something like, “Five years ago I never would have believed I’d be writing this damn thing five years later…”, but since, when I started this journal I didn’t put a term limit on it, it sort of makes sense that I’m still doing it, especially in light of the book, and all.

Which is to say:  I’m not sure about the future of Trout Caviar.  I ended the year in a bit of a slump, with only a brief, herring-induced bounce-back; I wonder how long the topic can remain fresh, or why, ultimately, I would keep at it.  I know I am not alone in this, since if you click on many of the sites in my “We Read These” list, you’ll find that there’s not much new to read on a lot of them.  It is probably melodramatic to say that I have seen the best blogs of my generation destroyed by madness, or that the best lack all conviction while the worst are full of a passionate intensity….  Well, melodramatic and derivative, and wrong.  If some of our comrades have fallen by the cyber-wayside, others have picked up the torch and race onward.

Nonetheless, what seems fairly clear to me is that the thrilling promise of a true “Internet community” is paling more than a little.  I’ll bet there are plenty of you reading this who have resolved to spend less time on-line, get off Facebook, give up Twitter.  Who doesn’t want to live her or his life more fully in the actual moment?  There’s good stuff to be gleaned from the Interwebs; it’s setting the limits that is tough.

I revile myself for caring about how many Twitter followers I have (300!), and I believe that the whole of social media creates a lot more heat than light, while at the same time, thanks to the “blogosphere” I’ve met lots of people who have enriched my life.  I’m not planning to crawl into a cave; or, if I do, I’ll be sure to bring my iPhone….

What I meant to say was:  Happy New Year.  The designation is arbitrary, sure, but nonetheless significant.  Marking passages is important, can lend clarity.  I hope your 2013 is filled with satisfaction and growth; that the people and things around you compel your interest, and that you spread it to others.  I wish you moments of calm reflection, bursts of inspiration.  Thanks for hanging around here.  It means a lot to me.

Cheers~ Brett